中间件
Dapr 允许通过链接一系列中间件组件来定义自定义处理管道。一个请求在被路由到用户代码之前会经过所有定义的中间件组件,然后在返回到客户端之前以相反的顺序经过定义的中间件。

Dapr 中间件
当启动的时候,Dapr sidecar 会构造一个中间件处理管道。默认情况下,管道由 tracing 中间件和 CORS 中间件组成。通过 Dapr 配置添加的其他中间件会按定义顺序添加到管道中,该管道适用于所有 Dapr API 端点,包括状态、发布/订阅、服务调用、绑定、安全等。
如以下配置示例定义了一个使用 OAuth 2.0 中间件和大写中间件组件的自定义管道。在这种情况下,所有请求都通过 OAuth 2.0 协议进行授权,并转换为大写,然后再转发给用户代码。
apiVersion: dapr.io/v1alpha1
kind: Configuration
metadata:
  name: pipeline
  namespace: default
spec:
  httpPipeline:
    handlers:
      - name: oauth2
        type: middleware.http.oauth2
      - name: uppercase
        type: middleware.http.uppercase
与其他构建块组件一样,中间件组件是可扩展的,目前 Dapr 已经支持的中间件如下表所示。
| 中间件 | 描述 | 状态 | 组件版本 |
|---|---|---|---|
| OAuth2 Authorization Grant flow | 在 Web API 上启用 OAuth2 授权授予流 | Alpha | v1 |
| OAuth2 Client Credentials Grant flow | 在 Web API 上启用 OAuth2 客户端凭据授予流 | Alpha | v1 |
| OpenID Connect | 在 Web API 上使用 OpenID Connect 验证持有者令牌 | Alpha | v1 |
| Rate limit | 限制每秒允许的 HTTP 请求的最大请求数 | Alpha | v1 |
| Rego/OPA Policies | 将 Rego/OPA 策略应用于传入的 Dapr HTTP 请求 | Alpha | v1 |
| RouterChecker | 使用 RouterChecker 中间件来阻止无效的 http 请求路由 | Alpha | v1 |
| Sentinel | 使用 Sentinel 中间件保证应用程序的可靠性和弹性 | Alpha | v1 |
| Uppercase | 将请求正文转换为大写字母 (demo) | Stable | v1 |
| WASM | 在 HTTP 管道中使用 WASM 中间件 | Alpha | v1 |
这些中间件的实现源码位可以在 Github 仓库 https://github.com/dapr/components-contrib/tree/master/middleware/http 中找到。
自定义中间件
Dapr 使用 FastHTTP 来实现其 HTTP 服务器,所以自定义的 HTTP 中间件需要编写为 FastHTTP handler,你的中间件需要实现一个如下所示的 Middleware 接口:
package middleware

import (
    "github.com/valyala/fasthttp"
)

// Middleware is the interface for a middleware.
type Middleware interface {
    GetHandler(metadata Metadata) (func(h fasthttp.RequestHandler) fasthttp.RequestHandler, error)
}
该接口定义了一个返回 fasthttp.RequestHandler 和 error 的 GetHandler 方法。我们自定义的中间件处理程序实现可以包括任何入站逻辑、出站逻辑:
func (m *customMiddleware) GetHandler(metadata Metadata) (func(fasthttp.RequestHandler) fasthttp.RequestHandler, error) {
  var err error
  return func(h fasthttp.RequestHandler) fasthttp.RequestHandler {
    return func(ctx *fasthttp.RequestCtx) {
      // 入站逻辑
      h(ctx)  // 调用下游处理程序
      // 出站逻辑
    }
  }, err
}
然后你可以将你自定义的中间件组件贡献给 components-contrib 存储库。当 components-contrib 接受你的提交后,然后需要在 Dapr 运行时的仓库中的 https://github.com/dapr/dapr/tree/master/cmd/daprd/components 下面添加一个中间件注册文件。
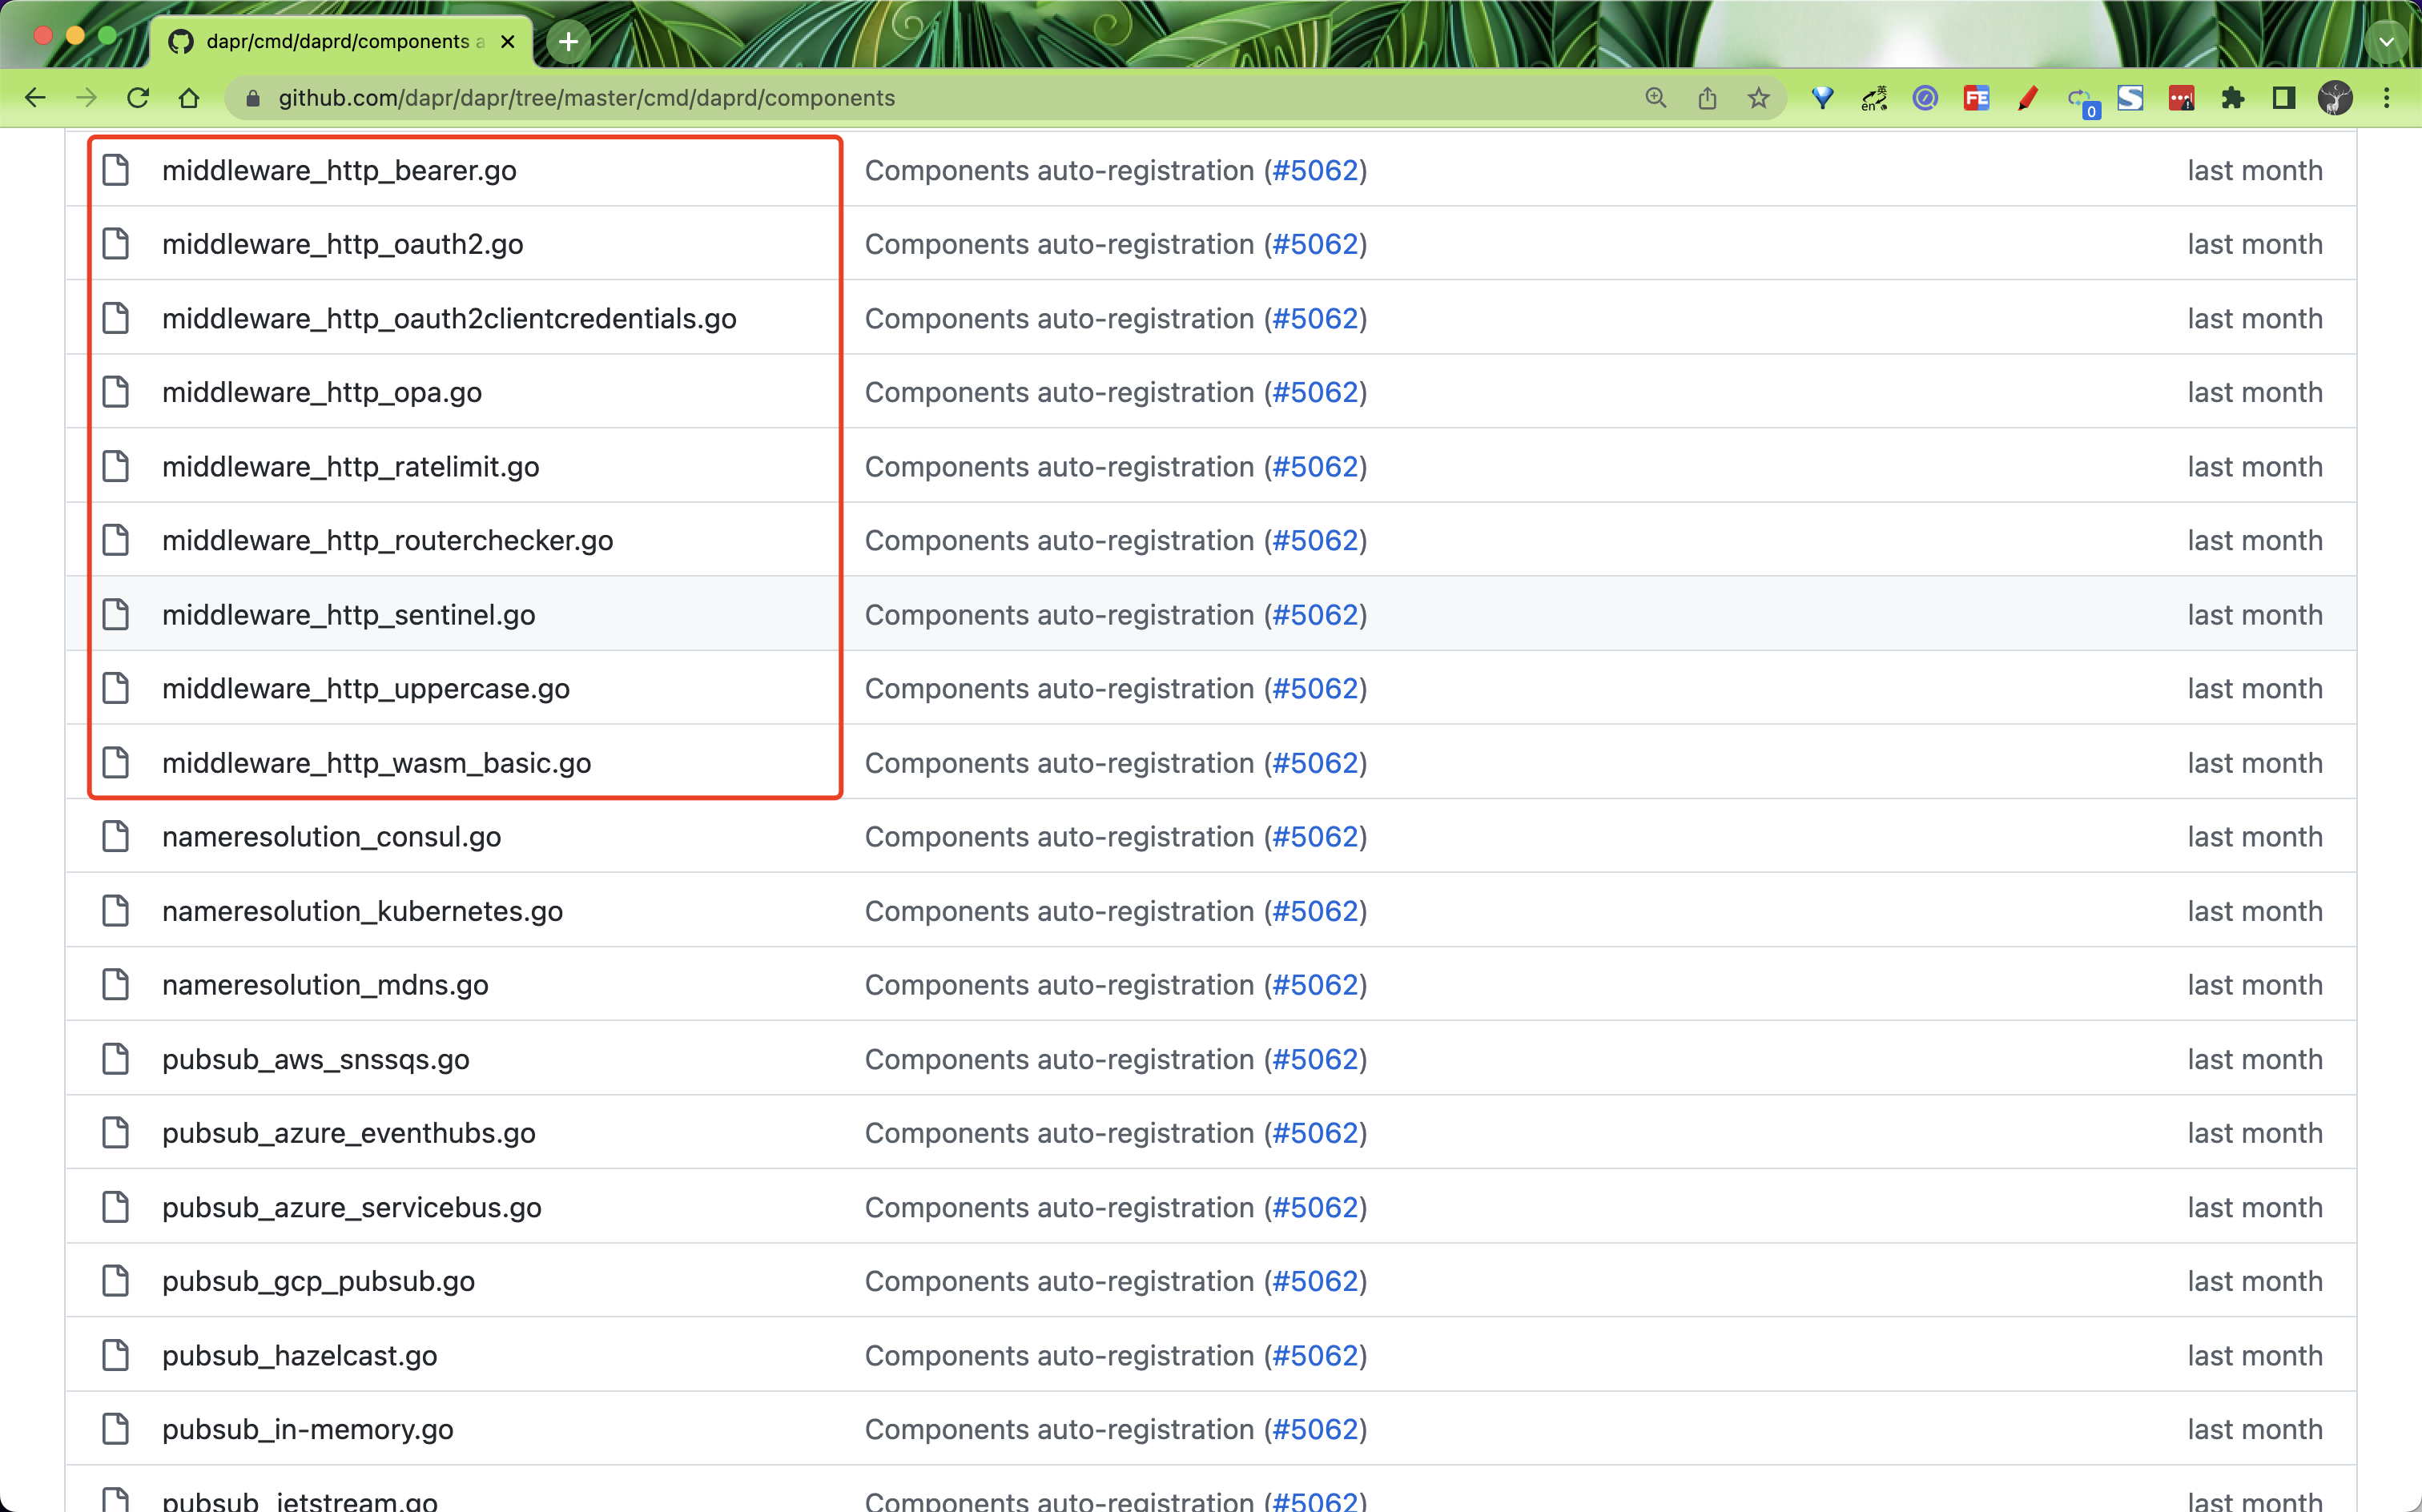
比如 uppercase 中间件的注册如下代码所示:
package components

import (
    "strings"

    "github.com/valyala/fasthttp"

    "github.com/dapr/components-contrib/middleware"
    httpMiddlewareLoader "github.com/dapr/dapr/pkg/components/middleware/http"
    httpMiddleware "github.com/dapr/dapr/pkg/middleware/http"
    "github.com/dapr/kit/logger"
)

func init() {
    httpMiddlewareLoader.DefaultRegistry.RegisterComponent(func(log logger.Logger) httpMiddlewareLoader.FactoryMethod {
        return func(metadata middleware.Metadata) (httpMiddleware.Middleware, error) {
            return func(h fasthttp.RequestHandler) fasthttp.RequestHandler {
                return func(ctx *fasthttp.RequestCtx) {
                    body := string(ctx.PostBody())
                    ctx.Request.SetBody([]byte(strings.ToUpper(body)))
                    h(ctx)
                }
            }, nil
        }
    }, "uppercase")
}
不过我们也可以发现 Dapr 对于中间件的扩展并没有完全放开,如果用户有特定的需求需要将代码在主仓库中进行更新,这势必也降低了灵活性,不过也可以避免因为低质量的中间件造成 Dapr 各种问题。
OAuth 中间件示例
接下来我们配置一个 OAuth 中间件来说明下 Dapr 中中间件的使用方法。通过配置一个 OAuth 中间件,在不修改应用程序的情况下在 Web API 上启用 OAuth 授权。这种设计将认证/授权问题从应用程序中分离出来,因此应用程序运维人员可以采用和配置认证/授权提供者而不影响应用程序代码。
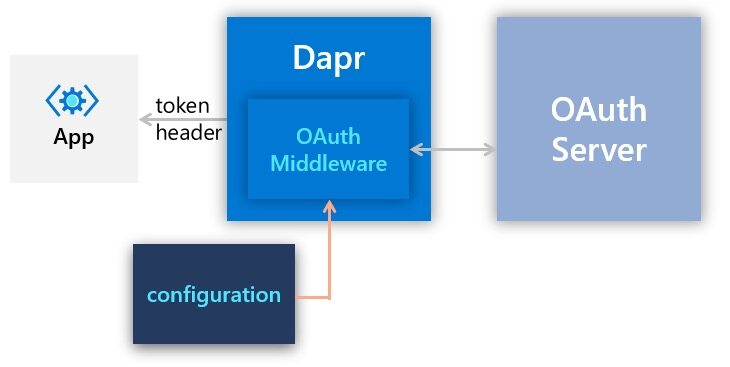
这里我们在 K8s 集群中使用 ingress-nginx 作为 ingress 控制器,如果没有安装可以使用下面的 Helm chart 来快速安装:
helm repo add ingress-nginx https://kubernetes.github.io/ingress-nginx
helm install my-release ingress-nginx/ingress-nginx
首先我们编写了一个使用 Node.js 开发的 echoapp,如下所示:
// app.js
const express = require("express");
const bodyParser = require("body-parser");
const app = express();
app.use(bodyParser.json());

const port = 3000;

app.get("/echo", (req, res) => {
  var text = req.query.text;
  console.log("Echoing: " + text);
  res.send("Access token: " + req.headers["authorization"] + " Text: " + text);
});

app.listen(port, () => console.log(`Node App listening on port ${port}!`));
然后编写了一个 /echo 接口,获取了请求 header 头中的 authorization 信息和客户端的请求文本信息。
接下来我们这里使用 Github 来实现认证授权,首先前往 https://github.com/settings/developers 注册一个 OAuth 应用,如下所示:
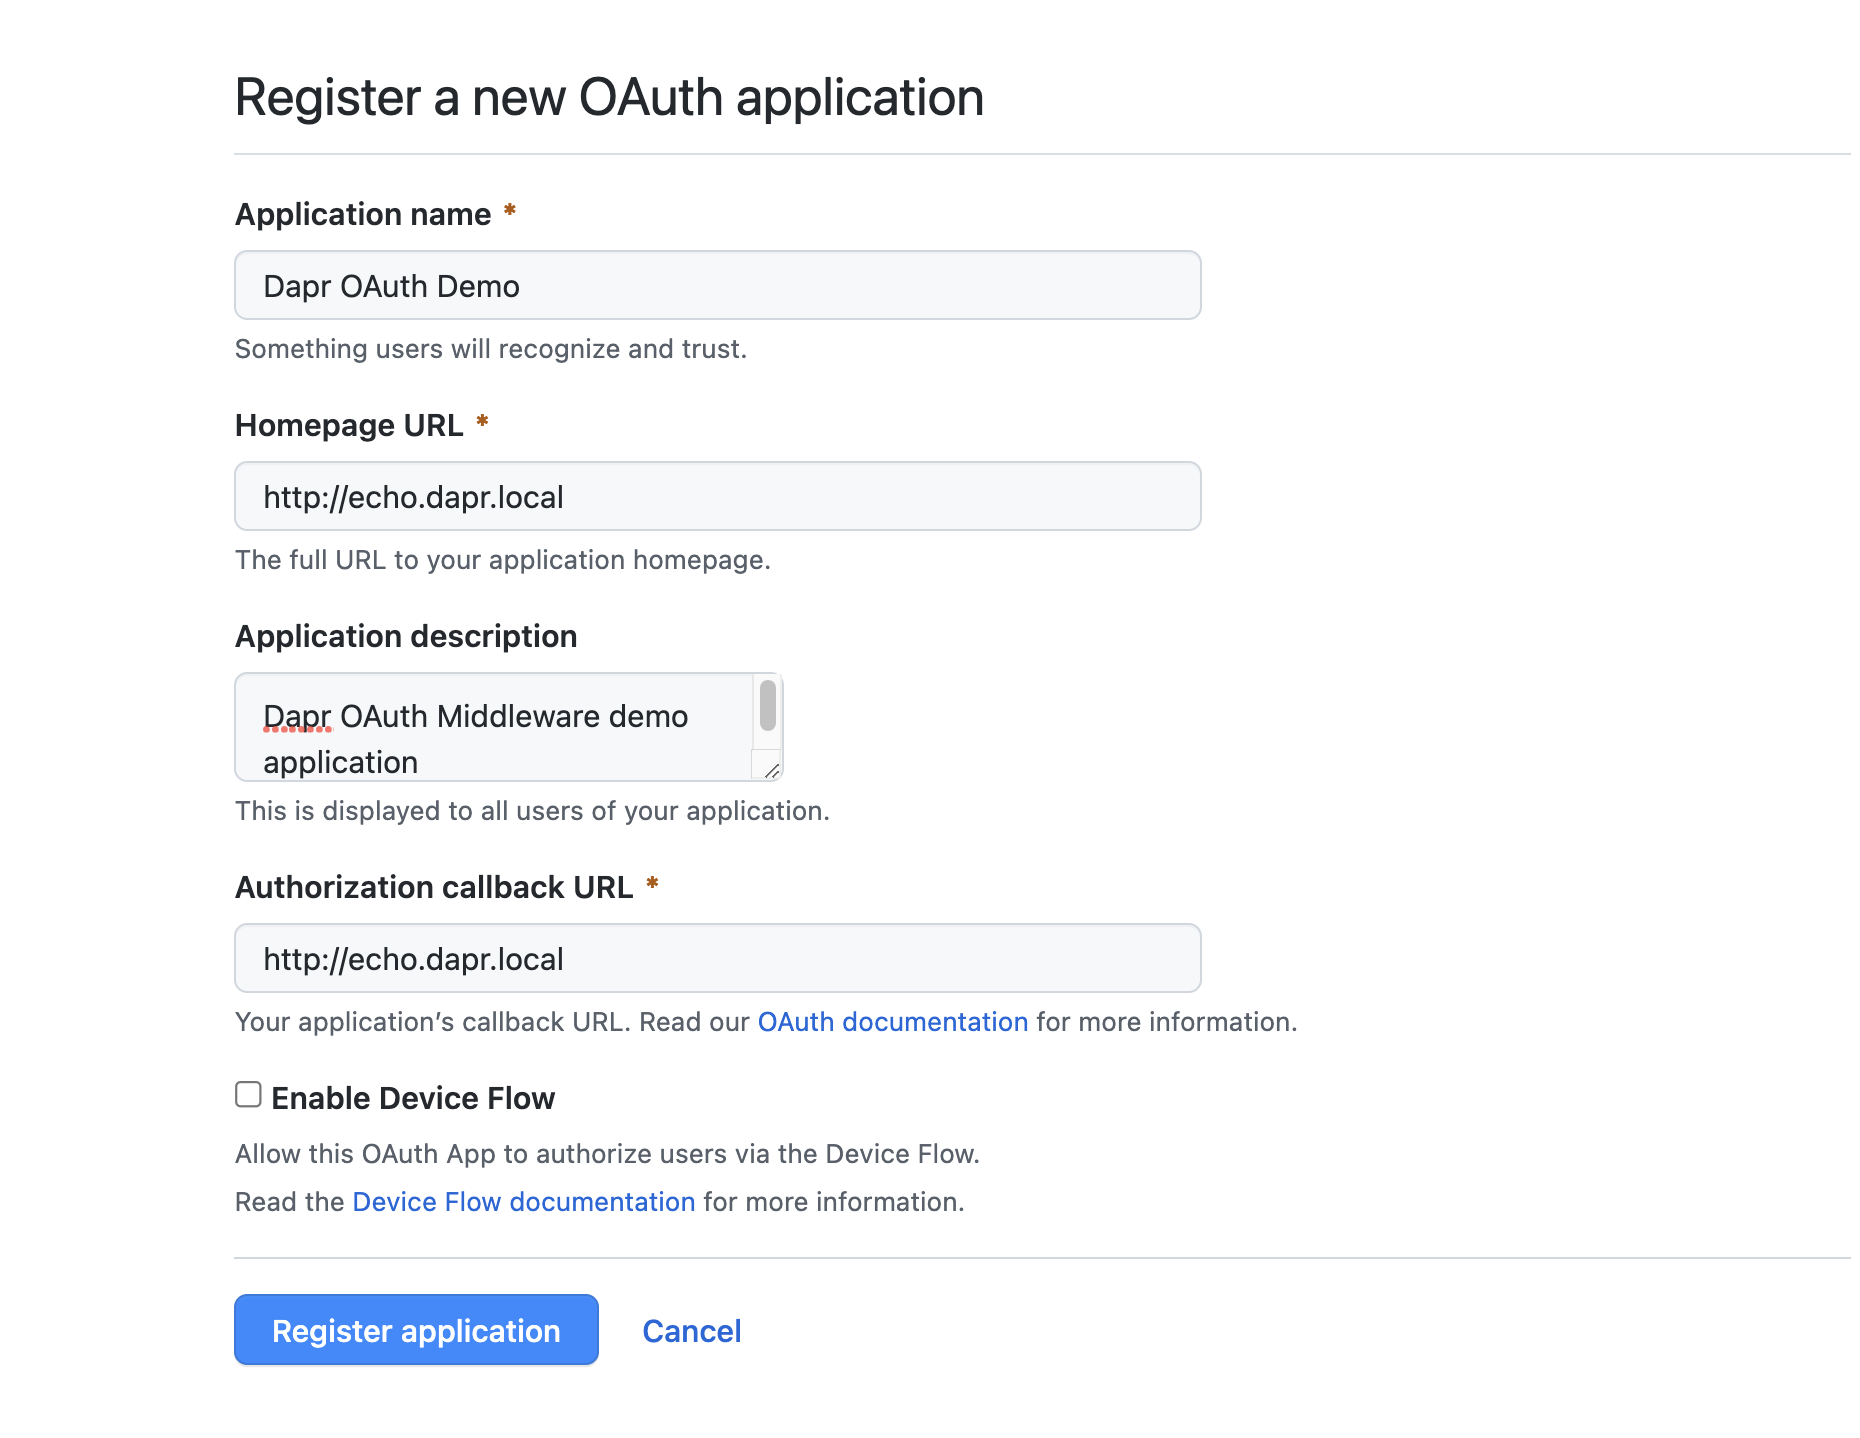
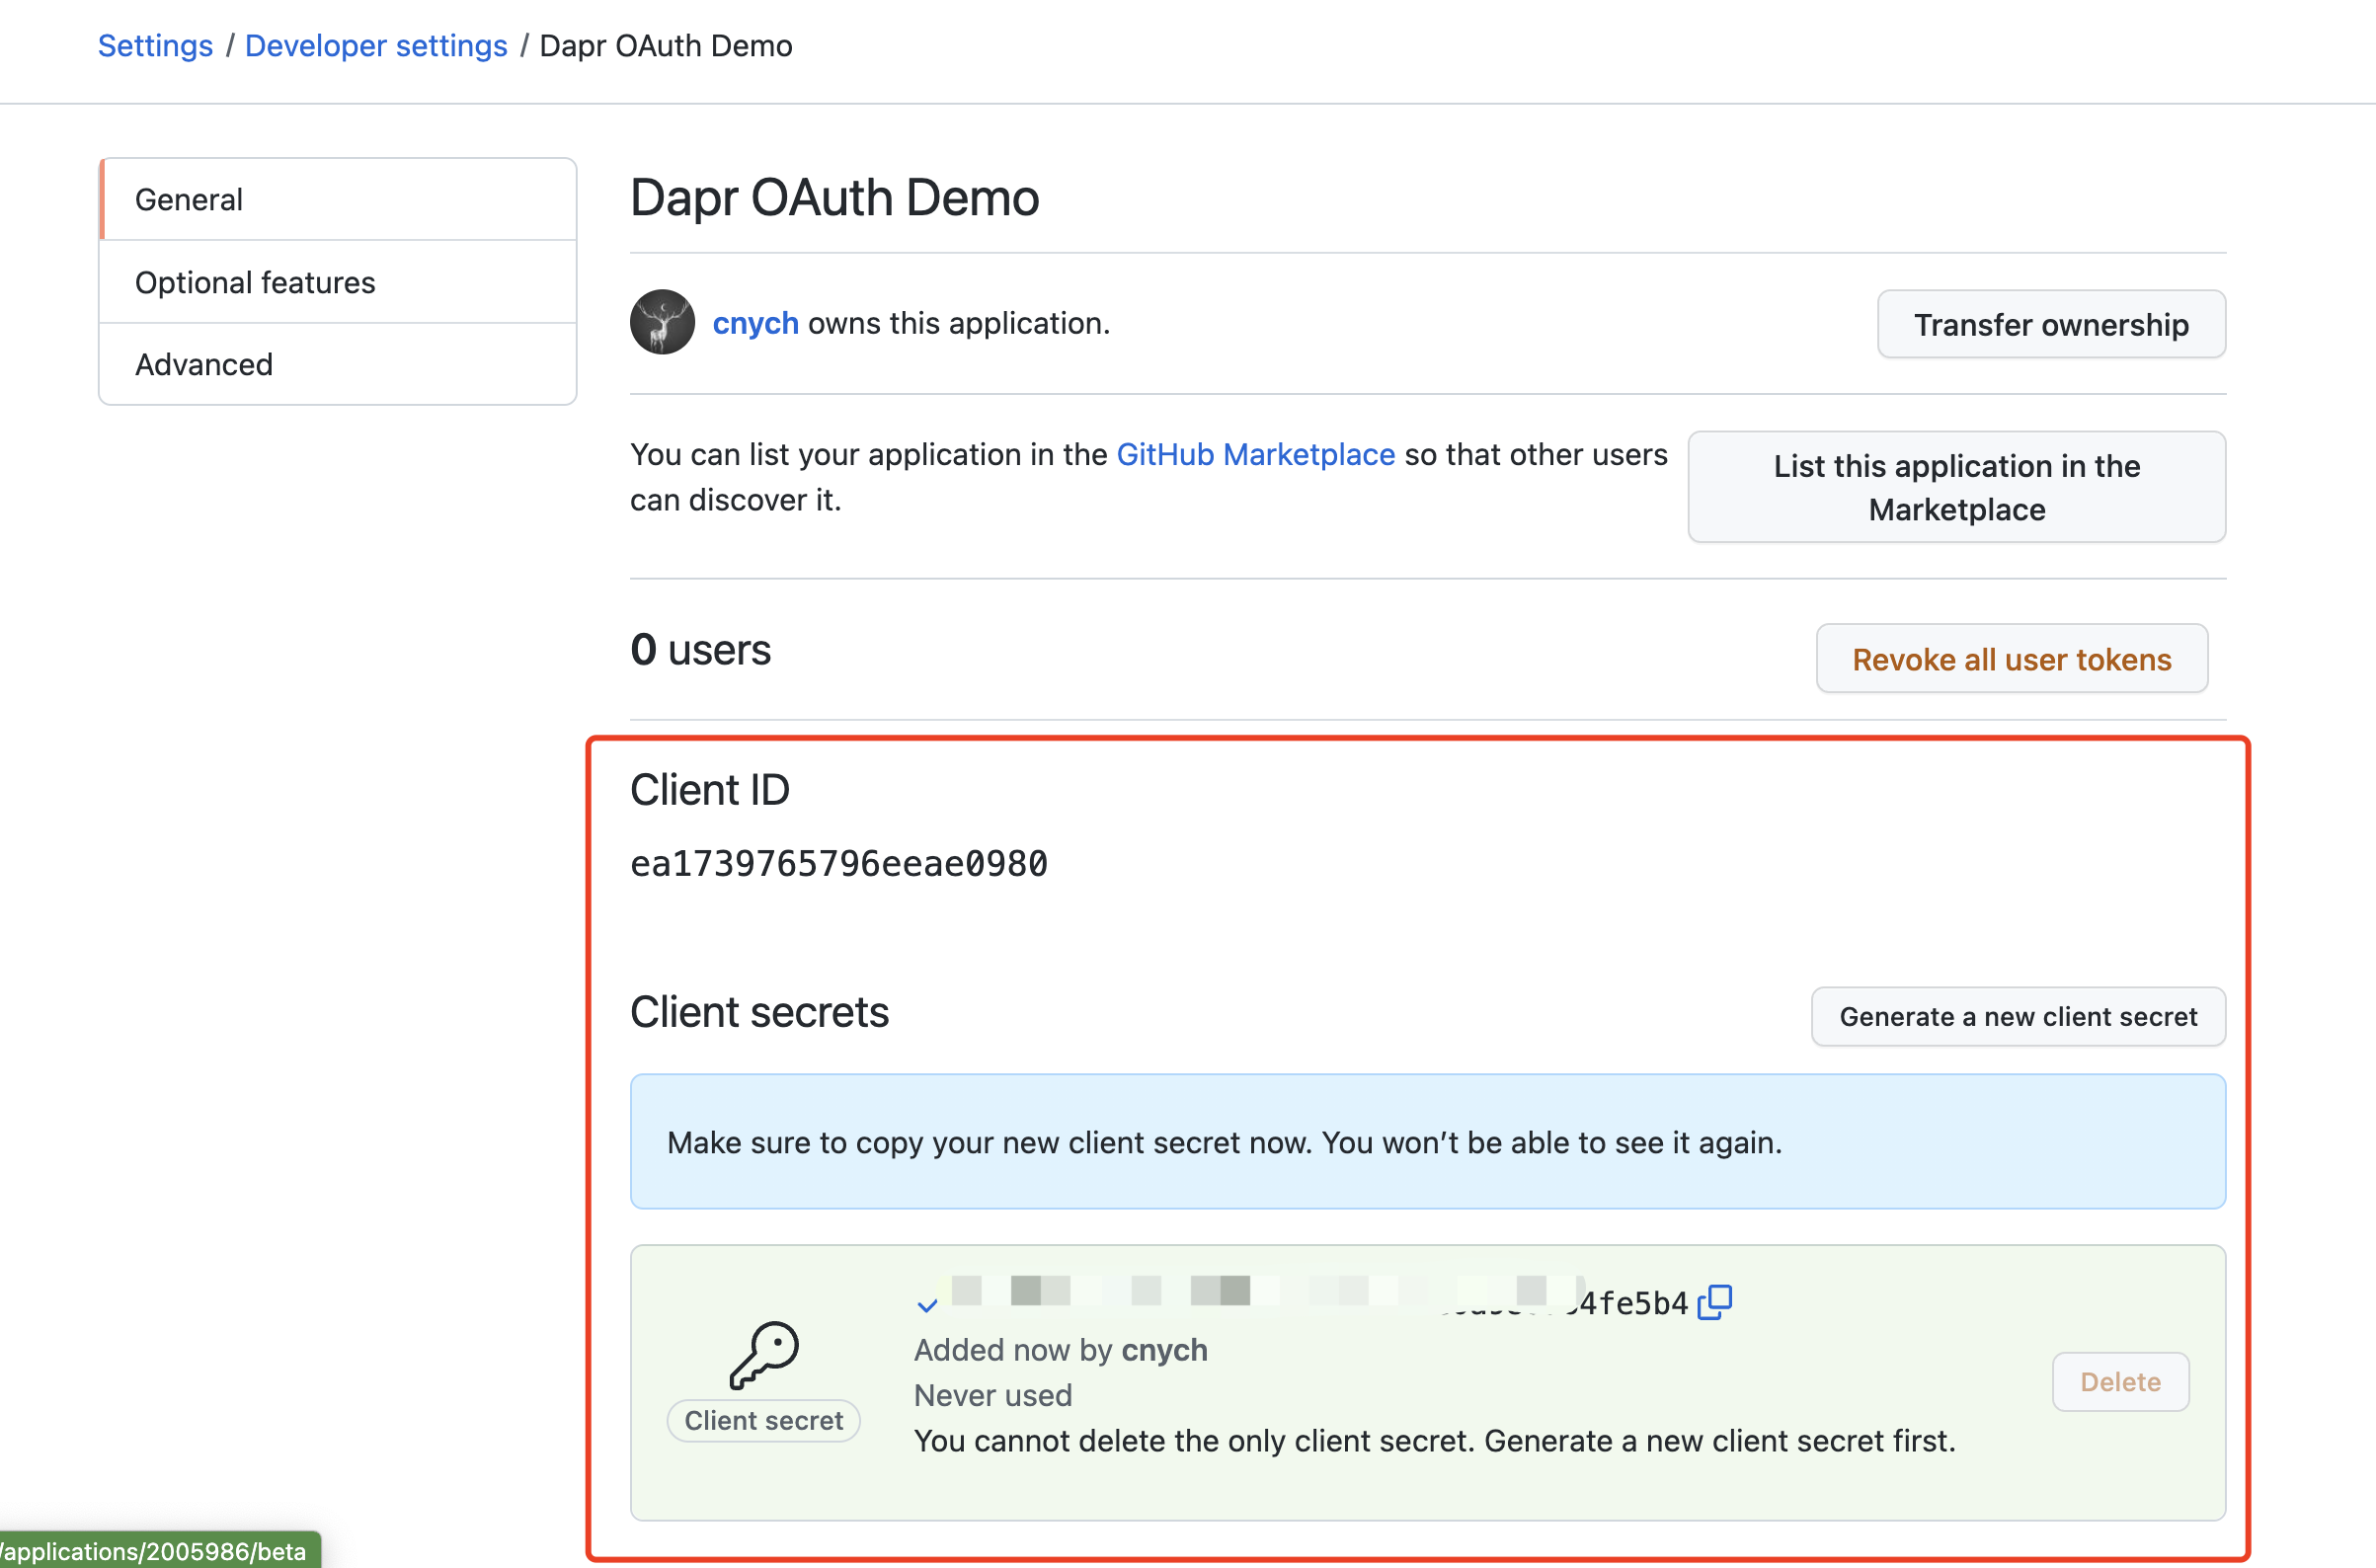
这里我们指定的应用 URL 为 http://echo.dapr.local,点击 Register application 注册新应用,注册后在应用详情页面可以获取到 clientId 信息,clientSecret 信息需要手动点击 Generate a new client secret 按钮获取,将该两个参数值记录下来,后续会使用到。
然后将我们的 echoapp 应用部署到 Kubernetes 集群中去,对应的资源清单如下所示:
apiVersion: apps/v1
kind: Deployment
metadata:
  name: echoapp
  labels:
    app: echo
spec:
  selector:
    matchLabels:
      app: echo
  template:
    metadata:
      labels:
        app: echo
      annotations:
        dapr.io/enabled: "true"
        dapr.io/app-id: "echoapp"
        dapr.io/app-port: "3000"
        dapr.io/config: "pipeline"
    spec:
      containers:
        - name: echo
          image: dapriosamples/middleware-echoapp:latest
          ports:
            - containerPort: 3000
          imagePullPolicy: Always
---
apiVersion: networking.k8s.io/v1
kind: Ingress
metadata:
  name: echo-ingress
spec:
  ingressClassName: nginx
  rules:
    - host: echo.dapr.local
      http:
        paths:
          - backend:
              service:
                name: echoapp-dapr
                port:
                  number: 80
            path: /
            pathType: Prefix
注意上面我们创建了一个 Ingress 对象,用来暴露 echoapp 应用,需要注意的是我们并没有主动创建 Service 对象,而是直接关联的 echoapp-dapr 这个 Service,其 80 端口映射到 echoapp 应用的 dapr sidecar 中的 3500 端口。
另外注意上面为应用添加的注解,其中有一个 dapr.io/config: "pipeline",这是用来指定使用的配置对象的,所以我们还需要创建一个名为 pipeline 的 Configuration 对象:
apiVersion: dapr.io/v1alpha1
kind: Configuration
metadata:
  name: pipeline
spec:
  tracing:
    samplingRate: "1"
    zipkin:
      endpointAddress: "http://zipkin.default.svc.cluster.local:9411/api/v2/spans"
  httpPipeline:
    handlers:
      - type: middleware.http.oauth2
        name: oauth2
这里我们为 echoapp 应用配置了一个 middleware.http.oauth2 类型的中间件,对应处理器的名称为 oauth2,该处理器对应中 Dapr 中的一个 Component 组件,如下所示:
apiVersion: dapr.io/v1alpha1
kind: Component
metadata:
  name: oauth2
spec:
  type: middleware.http.oauth2
  version: v1
  metadata:
    - name: clientId
      value: "<client-id>"
    - name: clientSecret
      value: "<client-secret>"
    - name: scopes
      value: ""
    - name: authURL
      value: "https://github.com/login/oauth/authorize"
    - name: tokenURL
      value: "https://github.com/login/oauth/access_token"
    - name: redirectURL
      value: "http://echo.dapr.local"
    - name: authHeaderName
      value: "authorization"
要使用 Dapr OAuth 中间件,需要配置以下信息:
- Client ID
- Client secret
- Scopes
- Authorization URL
- Token URL
下表是一些比较热门授权服务器的 Authorization/Token URLs:
| Server | Authorization URL | Token URL |
|---|---|---|
| Azure AAD | https://login.microsoftonline.com/{tenant}/oauth2/authorize | https://login.microsoftonline.com/{tenant}/oauth2/token |
| GitHub | https://github.com/login/oauth/authorize | https://github.com/login/oauth/access_token |
| https://accounts.google.com/o/oauth2/v2/auth | https://accounts.google.com/o/oauth2/token https://www.googleapis.com/oauth2/v4/token | |
| https://api.twitter.com/oauth/authorize | https://api.twitter.com/oauth2/token |
我们这里使用的 GitHub 的授权服务器配置,还要注意最后添加的 authHeaderName: authorization 属性,上面我们代码中就是从 Header 头从获取的 authorization 的值。
接下来创建上面的所有资源对象即可,创建完成后记得要将 echo.dapr.local 域名映射到 ingress 控制器。
$ kubectl get pods
NAME                              READY   STATUS    RESTARTS        AGE
echoapp-b7f5469cb-hzvth           2/2     Running   0               51s
$ kubectl get svc
NAME             TYPE           CLUSTER-IP      EXTERNAL-IP    PORT(S)                               AGE
echoapp-dapr     ClusterIP      None            <none>         80/TCP,50001/TCP,50002/TCP,9090/TCP   69m
$ kubectl get ingress echo-ingress
NAME           CLASS   HOSTS             ADDRESS        PORTS   AGE
echo-ingress   nginx   echo.dapr.local   192.168.0.52   80      59m
然后接下来我们就可以在浏览器中输入 http://echo.dapr.local/v1.0/invoke/echoapp/method/echo?text=hello 来访问应用中的 echo 方法了,正常访问的时候会出现 502 错误,不符合预期。
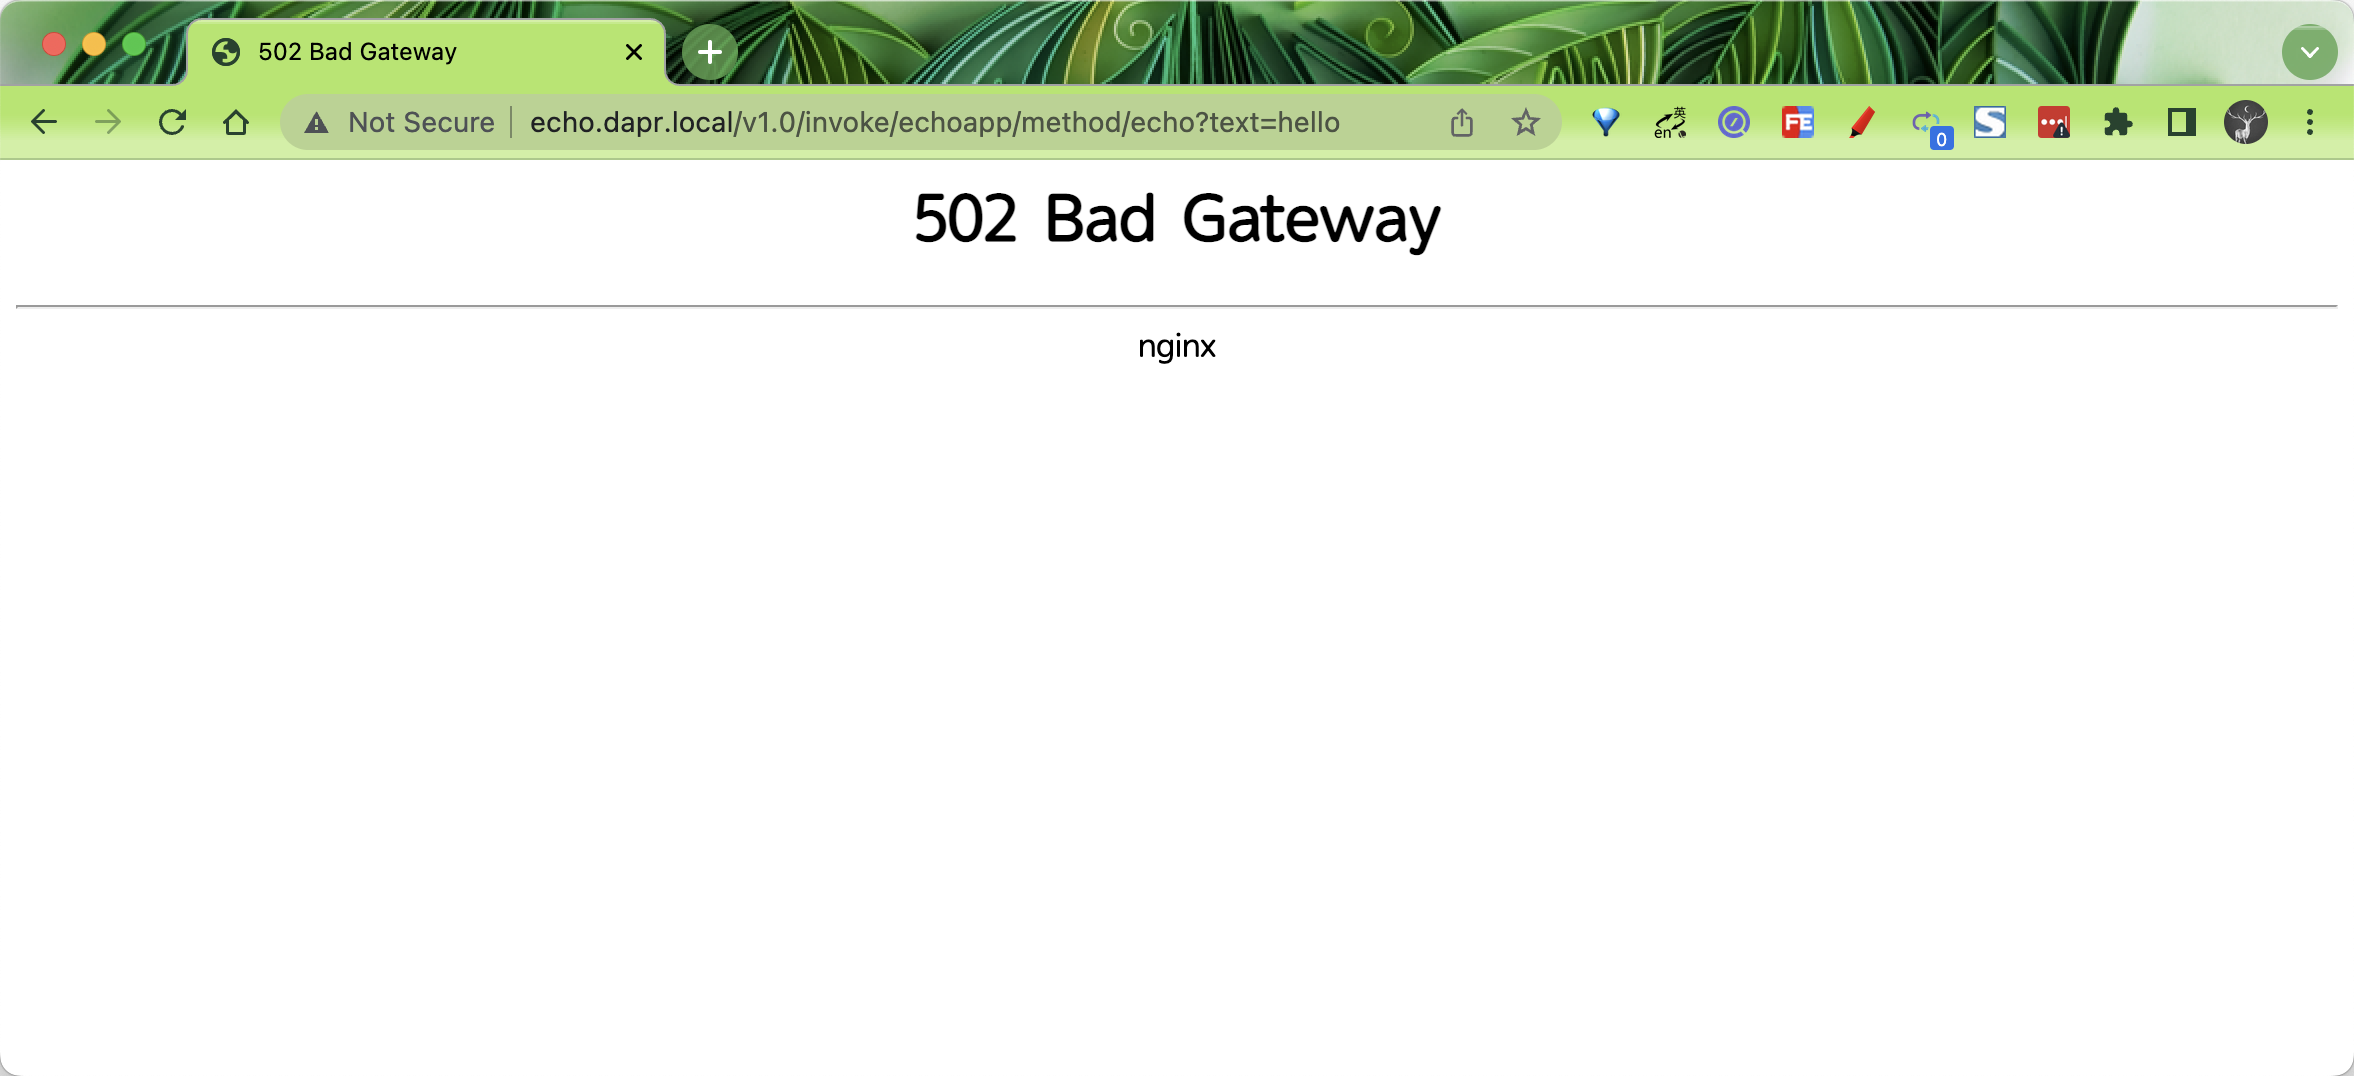
这是因为从 Dapr 1.4 版本开始,daprd 进程就被锁定为只接受来自 pod 边界的连接,以实现良好的安全措施。如果要启用外部调用 Dapr,则需要在应用中添加以下注解:
dapr.io/sidecar-listen-addresses: "0.0.0.0"
将该注解添加到 Deployment 中,更新后再次访问 http://echo.dapr.local/v1.0/invoke/echoapp/method/echo?text=hello 就正常了,第一次会跳转到 GitHub 进行授权。
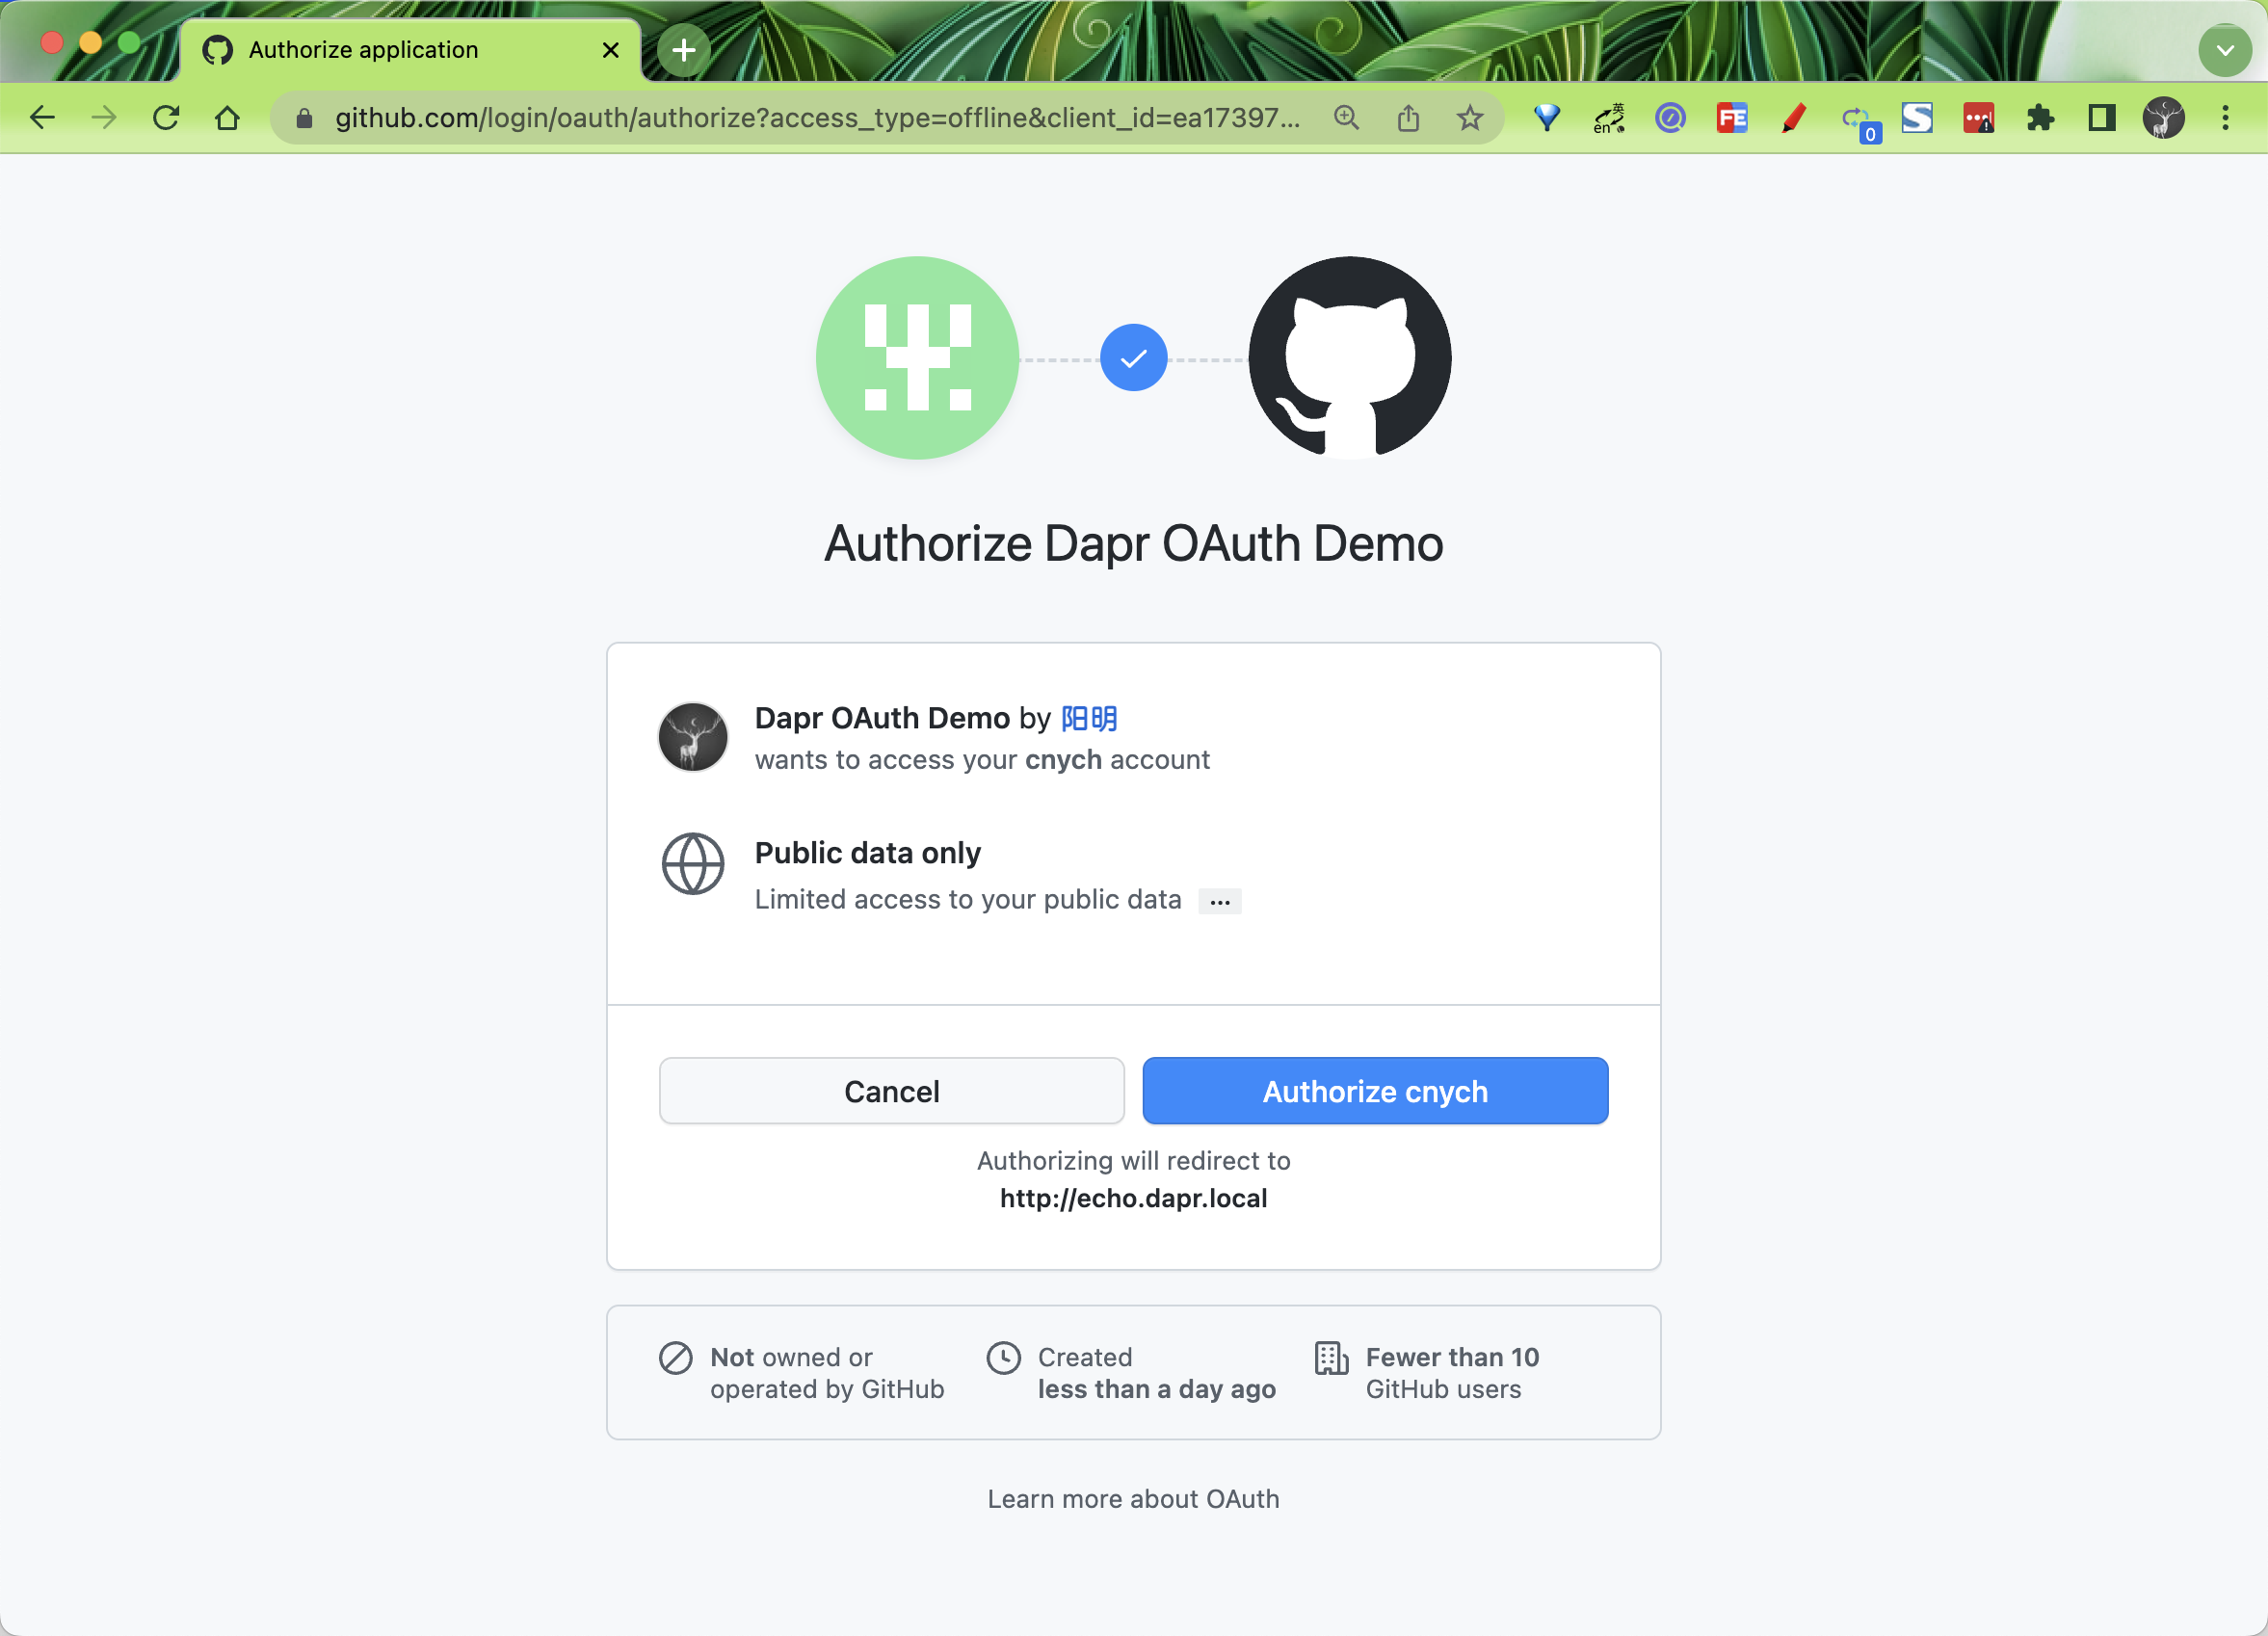
授权后会自动跳转回来,正常就会显示 echo 接口返回的数据,包括 Access Token 的数据和 text 参数的值。

到这里我们就实现了在 Dapr 中为应用启用 OAuth 中间件,对原始应用没有任何侵入性。