Argo CD
Argo CD 是一个为 Kubernetes 而生的,遵循声明式 GitOps 理念的持续部署工具。Argo CD 可在 Git 存储库更改时自动同步和部署应用程序。
Argo CD 遵循 GitOps 模式,使用 Git 仓库作为定义所需应用程序状态的真实来源,Argo CD 支持多种 Kubernetes 清单:
- kustomize
- helm charts
- ksonnet applications
- jsonnet files
- Plain directory of YAML/json manifests
- Any custom config management tool configured as a config management plugin
Argo CD 可在指定的目标环境中自动部署所需的应用程序状态,应用程序部署可以在 Git 提交时跟踪对分支、标签的更新,或固定到清单的指定版本。
架构
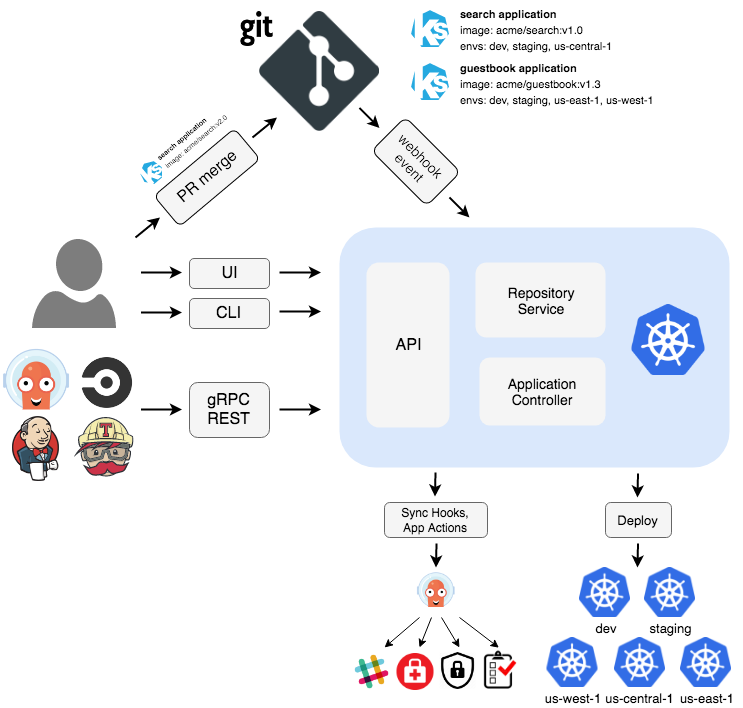
Argo CD 是通过一个 Kubernetes 控制器来实现的,它持续 watch 正在运行的应用程序并将当前的实时状态与所需的目标状态( Git 存储库中指定的)进行比较。已经部署的应用程序的实际状态与目标状态有差异,则被认为是 OutOfSync 状态,Argo CD 会报告显示这些差异,同时提供工具来自动或手动将状态同步到期望的目标状态。在 Git 仓库中对期望目标状态所做的任何修改都可以自动应用反馈到指定的目标环境中去。
下面简单介绍下 Argo CD 中的几个主要组件:
API 服务:API 服务是一个 gRPC/REST 服务,它暴露了 Web UI、CLI 和 CI/CD 系统使用的接口,主要有以下几个功能:
- 应用程序管理和状态报告
- 执行应用程序操作(例如同步、回滚、用户定义的操作)
- 存储仓库和集群凭据管理(存储为 K8S Secrets 对象)
- 认证和授权给外部身份提供者
- RBAC
- Git webhook 事件的侦听器/转发器
仓库服务:存储仓库服务是一个内部服务,负责维护保存应用程序清单 Git 仓库的本地缓存。当提供以下输入时,它负责生成并返回 Kubernetes 清单:
- 存储 URL
- revision 版本(commit、tag、branch)
- 应用路径
- 模板配置:参数、ksonnet 环境、helm values.yaml 等
应用控制器:应用控制器是一个 Kubernetes 控制器,它持续 watch 正在运行的应用程序并将当前的实时状态与所期望的目标状态( repo 中指定的)进行比较。它检测应用程序的 OutOfSync 状态,并采取一些措施来同步状态,它负责调用任何用户定义的生命周期事件的钩子(PreSync、Sync、PostSync)。
功能
- 自动部署应用程序到指定的目标环境
- 支持多种配置管理/模板工具(Kustomize、Helm、Ksonnet、Jsonnet、plain-YAML)
- 能够管理和部署到多个集群
- SSO 集成(OIDC、OAuth2、LDAP、SAML 2.0、GitHub、GitLab、Microsoft、LinkedIn)
- 用于授权的多租户和 RBAC 策略
- 回滚/随时回滚到 Git 存储库中提交的任何应用配置
- 应用资源的健康状况分析
- 自动配置检测和可视化
- 自动或手动将应用程序同步到所需状态
- 提供应用程序活动实时视图的 Web UI
- 用于自动化和 CI 集成的 CLI
- Webhook 集成(GitHub、BitBucket、GitLab)
- 用于自动化的 AccessTokens
- PreSync、Sync、PostSync Hooks,以支持复杂的应用程序部署(例如蓝/绿和金丝雀发布)
- 应用程序事件和 API 调用的审计
- Prometheus 监控指标
- 用于覆盖 Git 中的 ksonnet/helm 参数
核心概念
- Application:应用,一组由资源清单定义的 Kubernetes 资源,这是一个 CRD 资源对象
- Application source type:用来构建应用的工具
- Target state:目标状态,指应用程序所需的期望状态,由 Git 存储库中的文件表示
- Live state:实时状态,指应用程序实时的状态,比如部署了哪些 Pods 等真实状态
- Sync status:同步状态表示实时状态是否与目标状态一致,部署的应用是否与 Git 所描述的一样?
- Sync:同步指将应用程序迁移到其目标状态的过程,比如通过对 Kubernetes 集群应用变更
- Sync operation status:同步操作状态指的是同步是否成功
- Refresh:刷新是指将 Git 中的最新代码与实时状态进行比较,弄清楚有什么不同
- Health:应用程序的健康状况,它是否正常运行?能否为请求提供服务?
- Tool:工具指从文件目录创建清单的工具,例如 Kustomize 或 Ksonnet 等
- Configuration management tool:配置管理工具
- Configuration management plugin:配置管理插件
安装
当然前提是需要有一个 kubectl 可访问的 Kubernetes 的集群,直接使用下面的命令即可,这里我们安装最新的稳定版 v2.0.4:
kubectl create namespace argocd
kubectl apply -n argocd -f https://raw.githubusercontent.com/argoproj/argo-cd/v2.0.4/manifests/install.yaml
如果你要用在生产环境,则可以使用下面的命令部署一个 HA 高可用的版本:
kubectl create namespace argocd
kubectl apply -n argocd -f https://raw.githubusercontent.com/argoproj/argo-cd/v2.0.4/manifests/ha/install.yaml
这将创建一个新的命名空间 argocd,Argo CD 的服务和应用资源都将部署到该命名空间。
$ kubectl get pods -n argocd
NAME                                  READY   STATUS    RESTARTS   AGE
argocd-application-controller-0       1/1     Running   0          15m
argocd-dex-server-76ff776f97-ds7mm    1/1     Running   0          15m
argocd-redis-747b678f89-w99wf         1/1     Running   0          15m
argocd-repo-server-6fc4456c89-586zl   1/1     Running   0          15m
argocd-server-7d57bc994b-kkwsd        1/1     Running   0          15m
如果你对 UI、SSO、多集群管理这些特性不感兴趣,只想把应用变更同步到集群中,那么你可以使用
--disable-auth标志来禁用认证,可以通过命令kubectl patch deploy argocd-server -n argocd -p '[{"op": "add", "path": "/spec/template/spec/containers/0/command/-", "value": "--disable-auth"}]' --type json来实现。
然后我们可以在本地安装 CLI 工具方便操作 Argo CD,我们可以在 Argo CD Git 仓库发布页面查看最新版本的 Argo CD 或运行以下命令来获取版本:
VERSION=$(curl --silent "https://api.github.com/repos/argoproj/argo-cd/releases/latest" | grep '"tag_name"' | sed -E 's/.*"([^"]+)".*/\1/')
VERSION 在下面的命令中替换为你要下载的 Argo CD 版本:
curl -sSL -o /usr/local/bin/argocd https://github.com/argoproj/argo-cd/releases/download/$VERSION/argocd-linux-amd64
为 argocd CLI 赋予可执行权限:
$ chmod +x /usr/local/bin/argocd
$ argocd version
argocd: v2.0.4+0842d44
  BuildDate: 2021-06-23T01:29:55Z
  GitCommit: 0842d448107eb1397b251e63ec4d4bc1b4efdd6e
  GitTreeState: clean
  GoVersion: go1.16
  Compiler: gc
  Platform: darwin/amd64
argocd-server: v2.0.4+0842d44
  BuildDate: 2021-06-23T01:27:53Z
  GitCommit: 0842d448107eb1397b251e63ec4d4bc1b4efdd6e
  GitTreeState: clean
  GoVersion: go1.16
  Compiler: gc
  Platform: linux/amd64
  Ksonnet Version: v0.13.1
  Kustomize Version: v3.9.4 2021-02-09T19:22:10Z
  Helm Version: v3.5.1+g32c2223
  Kubectl Version: v0.20.4
  Jsonnet Version: v0.17.0
现在我们就可以使用 argocd 命令了。
如果你是 Mac,则可以直接使用 brew install argocd 进行安装。
Argo CD 会运行一个 gRPC 服务(由 CLI 使用)和 HTTP/HTTPS 服务(由 UI 使用),这两种协议都由 argocd-server 服务在以下端口进行暴露:
- 443 - gRPC/HTTPS
- 80 - HTTP(重定向到 HTTPS)
我们可以通过配置 Ingress 的方式来对外暴露服务,这里我们仍然使用 Traefik 的 IngressRoute 进行配置,其他 Ingress 控制器的配置可以参考官方文档 https://argo-cd.readthedocs.io/en/stable/operator-manual/ingress/ 进行配置。
由于 Traefik 它可以在同一端口处理 TCP 和 HTTP 连接,所以我们不需要定义多个 IngressRoute 来暴露 HTTP 和 gRPC 服务,然后应在禁用 TLS 的情况下运行 API 服务,编辑 argocd-server Deployment 以将 --insecure 标志添加到 argocd-server 命令中:
spec:
  template:
    spec:
      containers:
      - name: argocd-server
        command:
        - argocd-server
        - --staticassets
        - /shared/app
        - --repo-server
        - argocd-repo-server:8081
        - --insecure  # 需要禁用 tls,否则会 `redirected you too many times`
然后创建如下所的 IngressRoute 资源对象即可,我们创建了一个 redirect-https 的中间件,可以让 http 服务强制跳转到 https 服务去:
apiVersion: traefik.containo.us/v1alpha1
kind: Middleware
metadata:
  name: redirect-https
  namespace: argocd
spec:
  redirectScheme:
    scheme: https
---
apiVersion: traefik.containo.us/v1alpha1
kind: IngressRoute
metadata:
  name: argocd-server-http
  namespace: argocd
spec:
  entryPoints:
    - web
  routes:
    - kind: Rule
      match: Host(`argocd.k8s.local`)
      priority: 10
      middlewares:
        - name: redirect-https
      services:
        - name: argocd-server
          port: 80
    - kind: Rule
      match: Host(`argocd.k8s.local`) && Headers(`Content-Type`, `application/grpc`)
      priority: 11
      middlewares:
        - name: redirect-https
      services:
        - name: argocd-server
          port: 80
          scheme: h2c
---
apiVersion: traefik.containo.us/v1alpha1
kind: IngressRoute
metadata:
  name: argocd-server
  namespace: argocd
spec:
  entryPoints:
    - websecure
  routes:
    - kind: Rule
      match: Host(`argocd.k8s.local`)
      priority: 10
      services:
        - name: argocd-server
          port: 80
    - kind: Rule
      match: Host(`argocd.k8s.local`) && Headers(`Content-Type`, `application/grpc`)
      priority: 11
      services:
        - name: argocd-server
          port: 80
          scheme: h2c
  tls:
    certResolver: default
    options: {}
创建完成后,我们就可以通过 argocd.k8s.local 来访问 Argo CD 服务了,不过需要注意我们这里配置的证书是自签名的,所以在第一次访问的时候会提示不安全,强制跳转即可:
默认情况下 admin 帐号的初始密码是自动生成的,会以明文的形式存储在 Argo CD 安装的命名空间中名为 password 的 Secret 对象下的 argocd-initial-admin-secret 字段下,我们可以用下面的命令来获取:
kubectl -n argocd get secret argocd-initial-admin-secret -o jsonpath="{.data.password}" | base64 -d && echo
使用用户名 admin 和上面输出的密码即可登录 Dashboard,同样我们也可以通过 ArgoCD CLI 命令行工具进行登录:
$ argocd login argocd.k8s.local

WARNING: server certificate had error: x509: certificate is valid for e2d1e856c987c94f3c918276921a61ba.6a98e1283291d1b7a23d19e240b6ee89.traefik.default, not argocd.k8s.local. Proceed insecurely (y/n)? y
Username: admin
Password:
'admin:login' logged in successfully
Context 'argocd.k8s.local' updated
CLI 登录成功后,可以使用如下所示命令更改密码:
$ argocd account update-password
*** Enter current password:
*** Enter new password:
*** Confirm new password:
Password updated
Context 'argocd.k8s.local' updated
配置集群
由于 Argo CD 支持部署应用到多集群,所以如果你要将应用部署到外部集群的时候,需要先将外部集群的认证信息注册到 Argo CD 中,如果是在内部部署(运行 Argo CD 的同一个集群,默认不需要配置),应该使用 https://kubernetes.default.svc 作为应用的 K8S APIServer 地址。
首先列出当前 kubeconfig 中的所有集群上下文:
kubectl config get-contexts -o name
从列表中选择一个上下文名称并将其提供给 argocd cluster add CONTEXTNAME,比如对于 docker-desktop上下文,运行:
argocd cluster add docker-desktop
上述命令会将 ServiceAccount (argocd-manager) 安装到该 kubectl 上下文的 kube-system 命名空间中,并将 ServiceAccount 绑定到管理员级别的 ClusterRole,Argo CD 使用此 ServiceAccount 令牌来执行任务管理(部署/监控)。
argocd-manager-role可以修改 Role 的规则,使其仅对有限的一组命名空间、组、种类具有 create、update、patch、delete 等权限,但是对于 Argo CD 需要 get,list,watch 的权限在 ClusterRole 范围内。
创建应用
Git 仓库 https://github.com/argoproj/argocd-example-apps.git 是一个包含留言簿应用程序的示例库,我们可以用该应用来演示 Argo CD 的工作原理。
通过 CLI 创建应用
我们可以通过 argocd app create xxx 命令来创建一个应用:
$ argocd app create --help
Create an application

Usage:
  argocd app create APPNAME [flags]

Examples:

        # Create a directory app
        argocd app create guestbook --repo https://github.com/argoproj/argocd-example-apps.git --path guestbook --dest-namespace default --dest-server https://kubernetes.default.svc --directory-recurse

        # Create a Jsonnet app
        argocd app create jsonnet-guestbook --repo https://github.com/argoproj/argocd-example-apps.git --path jsonnet-guestbook --dest-namespace default --dest-server https://kubernetes.default.svc --jsonnet-ext-str replicas=2

        # Create a Helm app
        argocd app create helm-guestbook --repo https://github.com/argoproj/argocd-example-apps.git --path helm-guestbook --dest-namespace default --dest-server https://kubernetes.default.svc --helm-set replicaCount=2

        # Create a Helm app from a Helm repo
        argocd app create nginx-ingress --repo https://kubernetes-charts.storage.googleapis.com --helm-chart nginx-ingress --revision 1.24.3 --dest-namespace default --dest-server https://kubernetes.default.svc

        # Create a Kustomize app
        argocd app create kustomize-guestbook --repo https://github.com/argoproj/argocd-example-apps.git --path kustomize-guestbook --dest-namespace default --dest-server https://kubernetes.default.svc --kustomize-image gcr.io/heptio-images/ks-guestbook-demo:0.1

        # Create a app using a custom tool:
        argocd app create ksane --repo https://github.com/argoproj/argocd-example-apps.git --path plugins/kasane --dest-namespace default --dest-server https://kubernetes.default.svc --config-management-plugin kasane


Flags:
......
直接执行如下所示命令即可:
$ argocd app create guestbook --repo https://github.com/argoproj/argocd-example-apps.git --path guestbook --dest-server https://kubernetes.default.svc --dest-namespace default
application 'guestbook' created
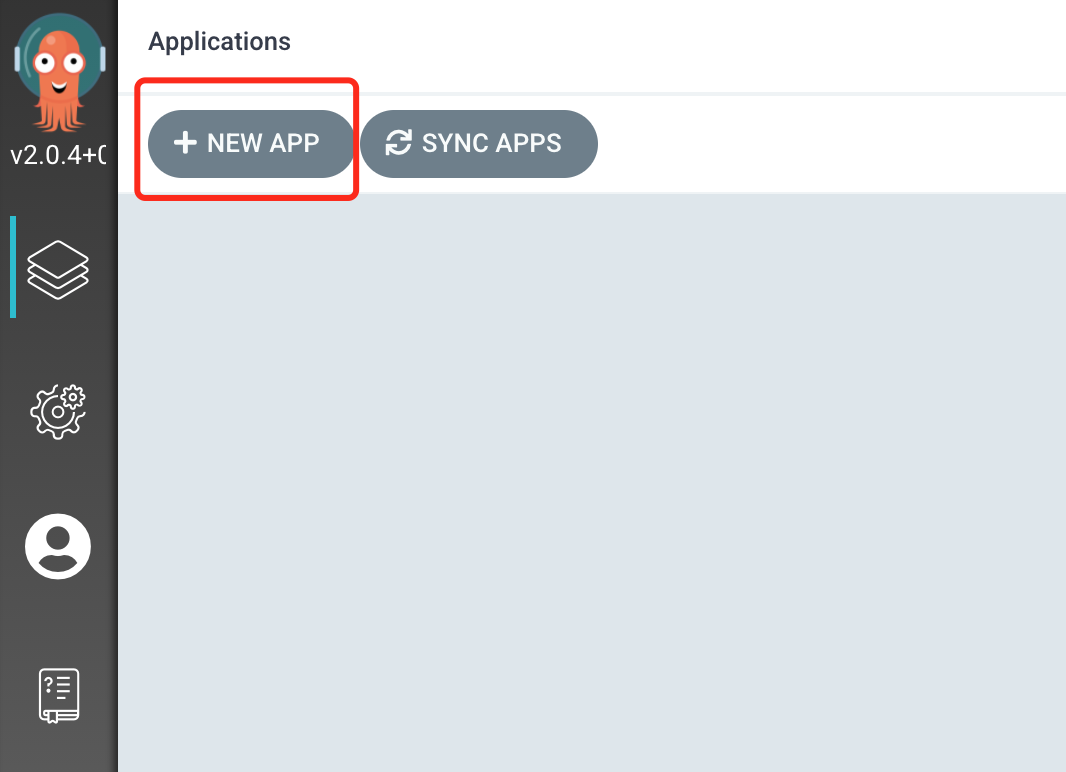
通过 UI 创建应用
除了可以通过 CLI 工具来创建应用,我们也可以通过 UI 界面来创建,定位到 argocd.k8s.local 页面,登录后,点击 +New App 新建应用按钮,如下图:
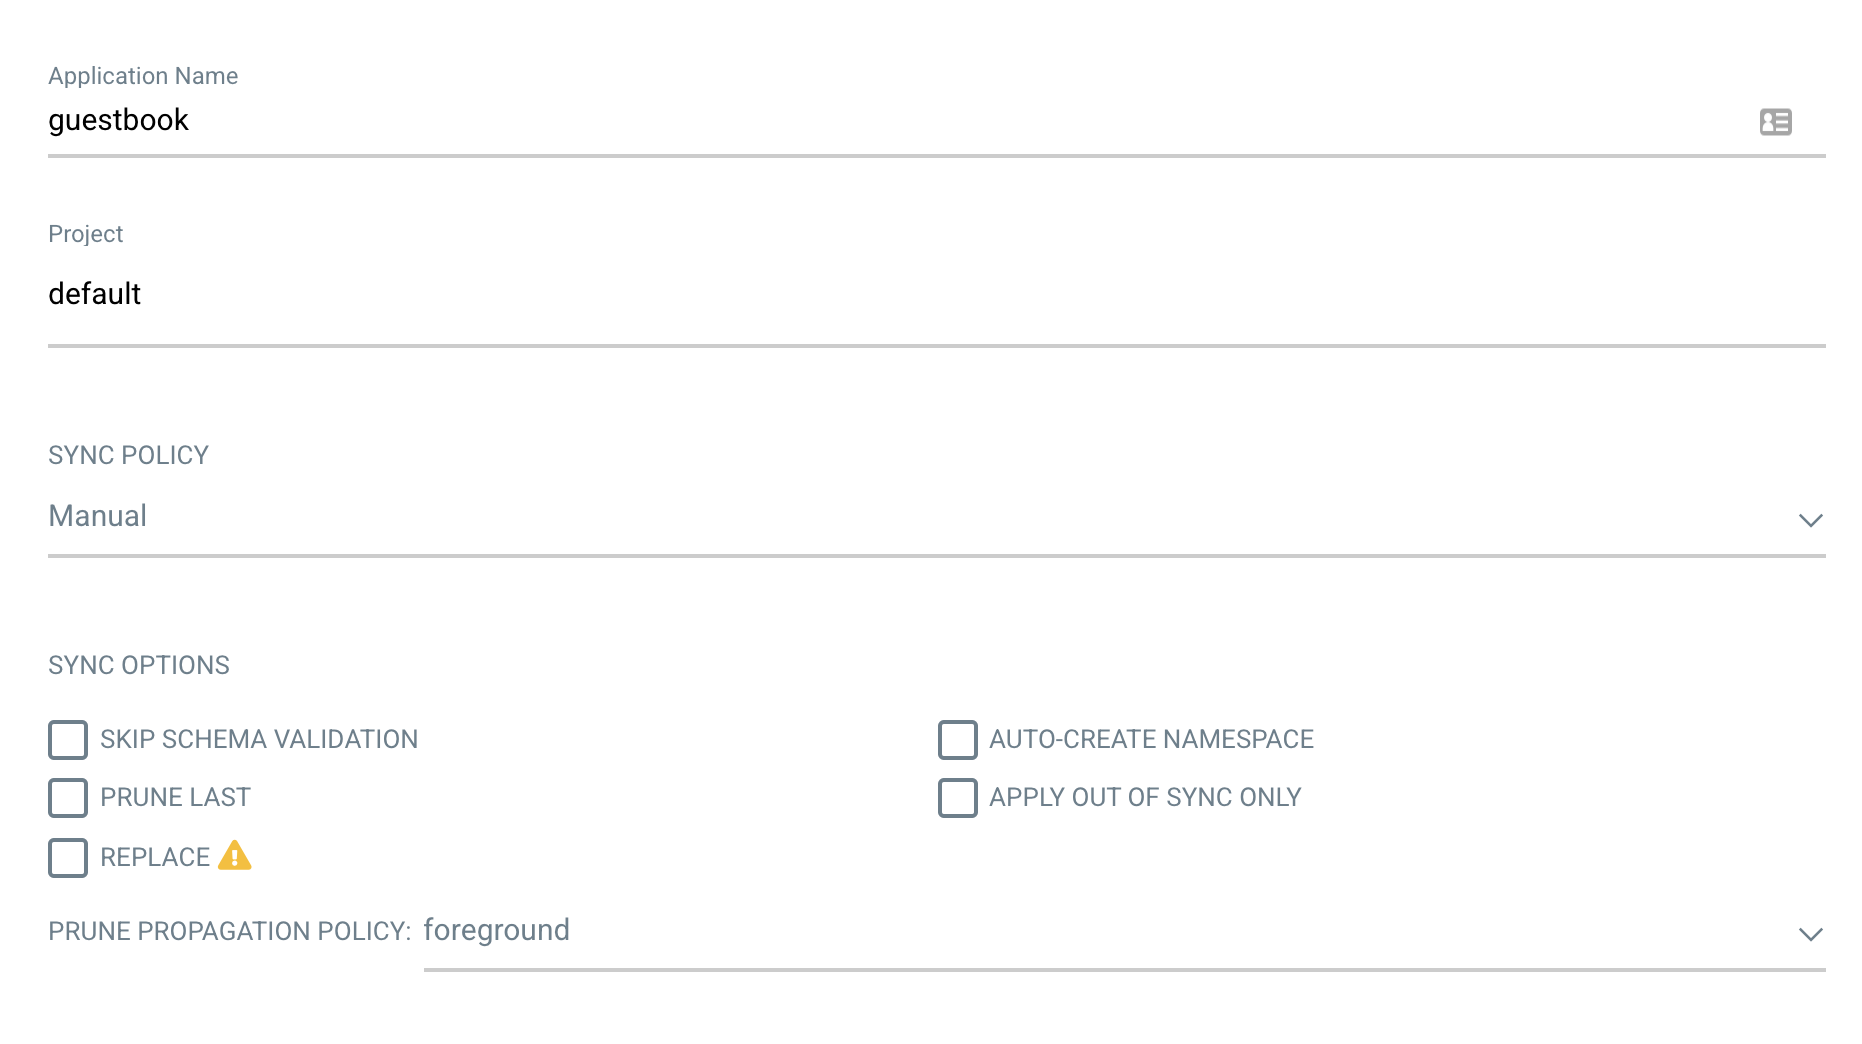
将应用命名为 guestbook,使用 default project,并将同步策略设置为 Manual:
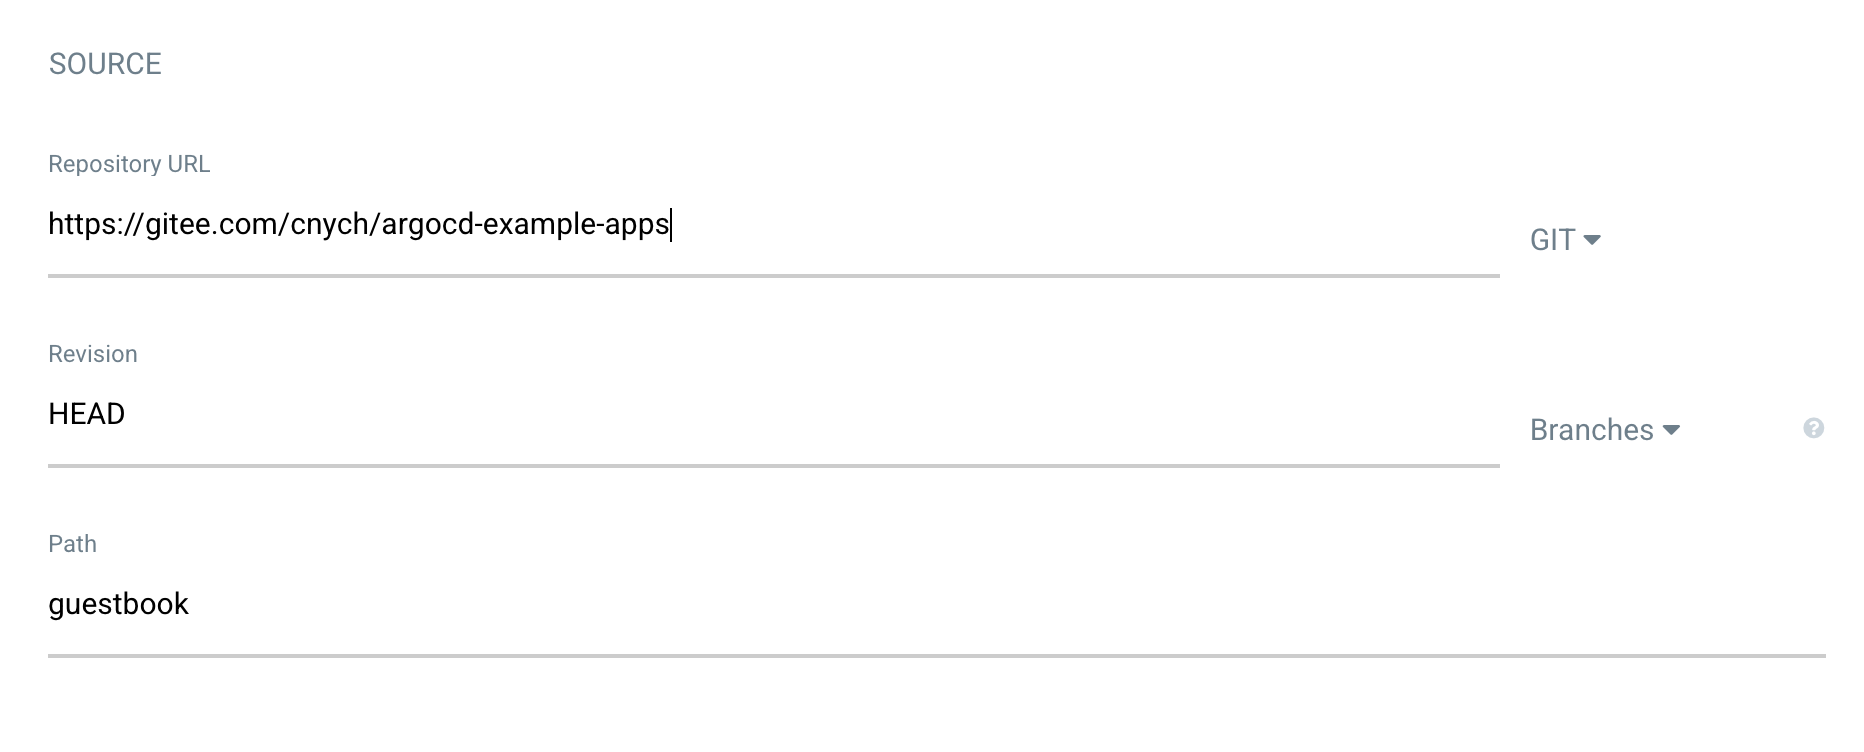
然后在下面配置 Repository URL 为 https://github.com/argoproj/argocd-example-apps.git,由于某些原因我们这里使用迁移到 Gitee 上面的仓库地址 https://gitee.com/cnych/argocd-example-apps,将 Revision 设置为 HEAD,并将路径设置为 guestbook:
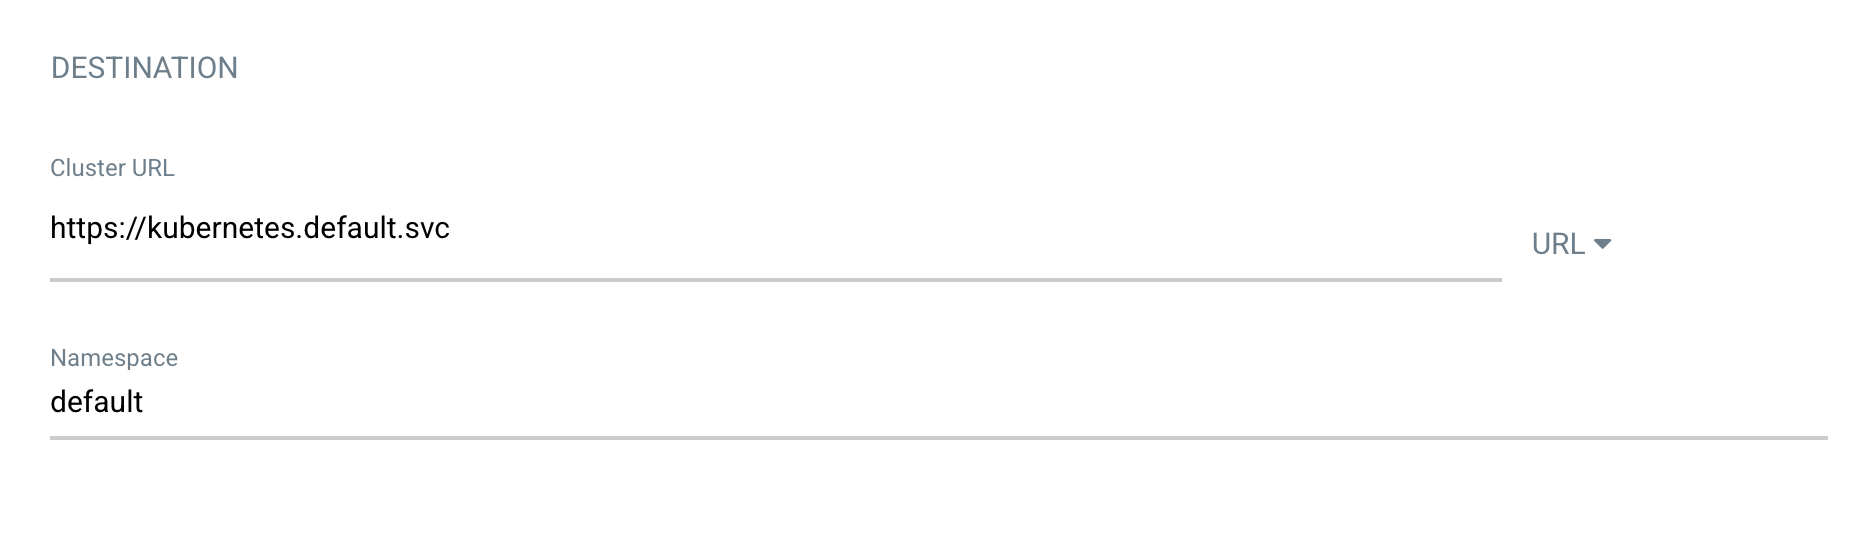
然后下面的 Destination 部分,将 cluster 设置为 in-cluster 和 namespace 为 default:
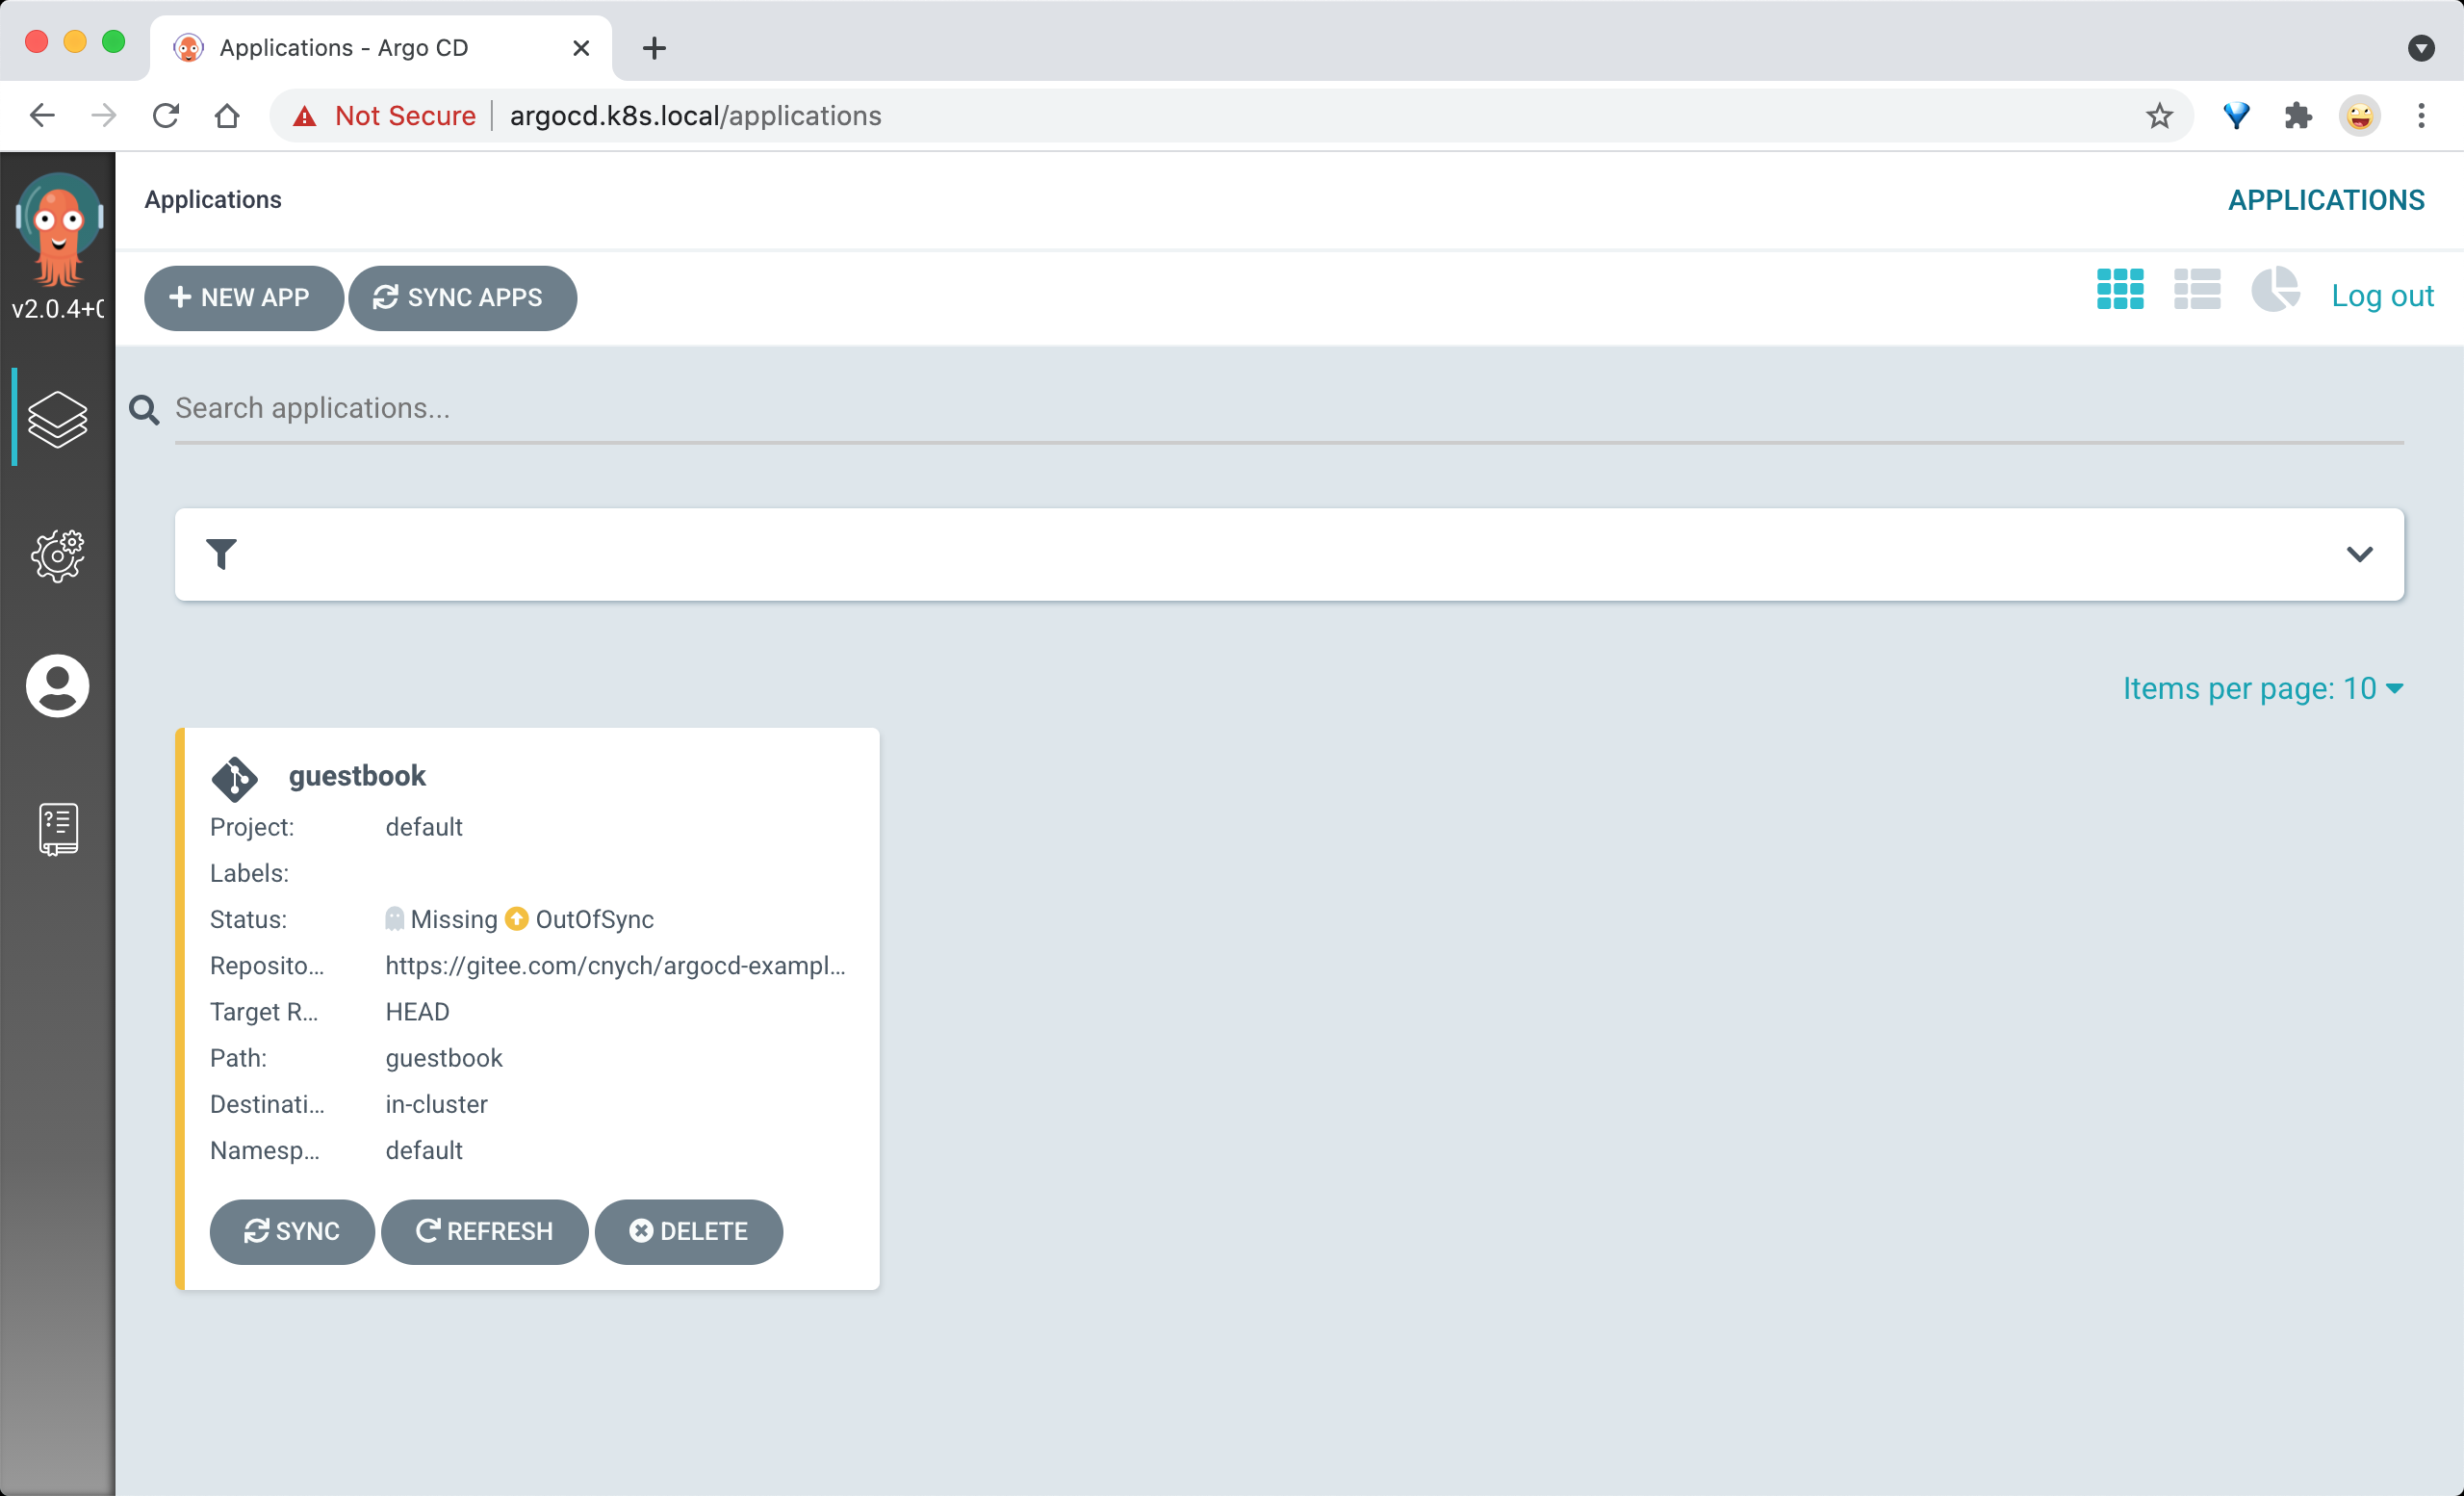
填写完以上信息后,点击页面上方的 Create 安装,即可创建 guestbook 应用,创建完成后可以看到当前应用的处于 OutOfSync 状态:
部署应用
由于上面我们在创建应用的时候使用的同步策略为 Manual,所以应用创建完成后没有自动部署,需要我们手动去部署应用。同样可以通过 CLI 和 UI 界面两种同步方式。
使用 CLI 同步
应用创建完成后,我们可以通过如下所示命令查看其状态:
$ argocd app get guestbook
Name:               guestbook
Project:            default
Server:             https://kubernetes.default.svc
Namespace:          default
URL:                https://argocd.k8s.local/applications/guestbook
Repo:               https://gitee.com/cnych/argocd-example-apps
Target:             HEAD
Path:               guestbook
SyncWindow:         Sync Allowed
Sync Policy:        <none>
Sync Status:        OutOfSync from HEAD (53e28ff)
Health Status:      Missing

GROUP  KIND        NAMESPACE  NAME          STATUS     HEALTH   HOOK  MESSAGE
       Service     default    guestbook-ui  OutOfSync  Missing
apps   Deployment  default    guestbook-ui  OutOfSync  Missing
应用程序状态为初始 OutOfSync 状态,因为应用程序尚未部署,并且尚未创建任何 Kubernetes 资源。要同步(部署)应用程序,可以执行如下所示命令:
argocd app sync guestbook
此命令从 Git 仓库中检索资源清单并执行 kubectl apply 部署应用,执行上面命令后 guestbook 应用便会运行在集群中了,现在我们就可以查看其资源组件、日志、事件和评估其健康状态了。
通过 UI 同步
直接添加 UI 界面上应用的 Sync 按钮即可开始同步:

同步完成后可以看到我们的资源状态:
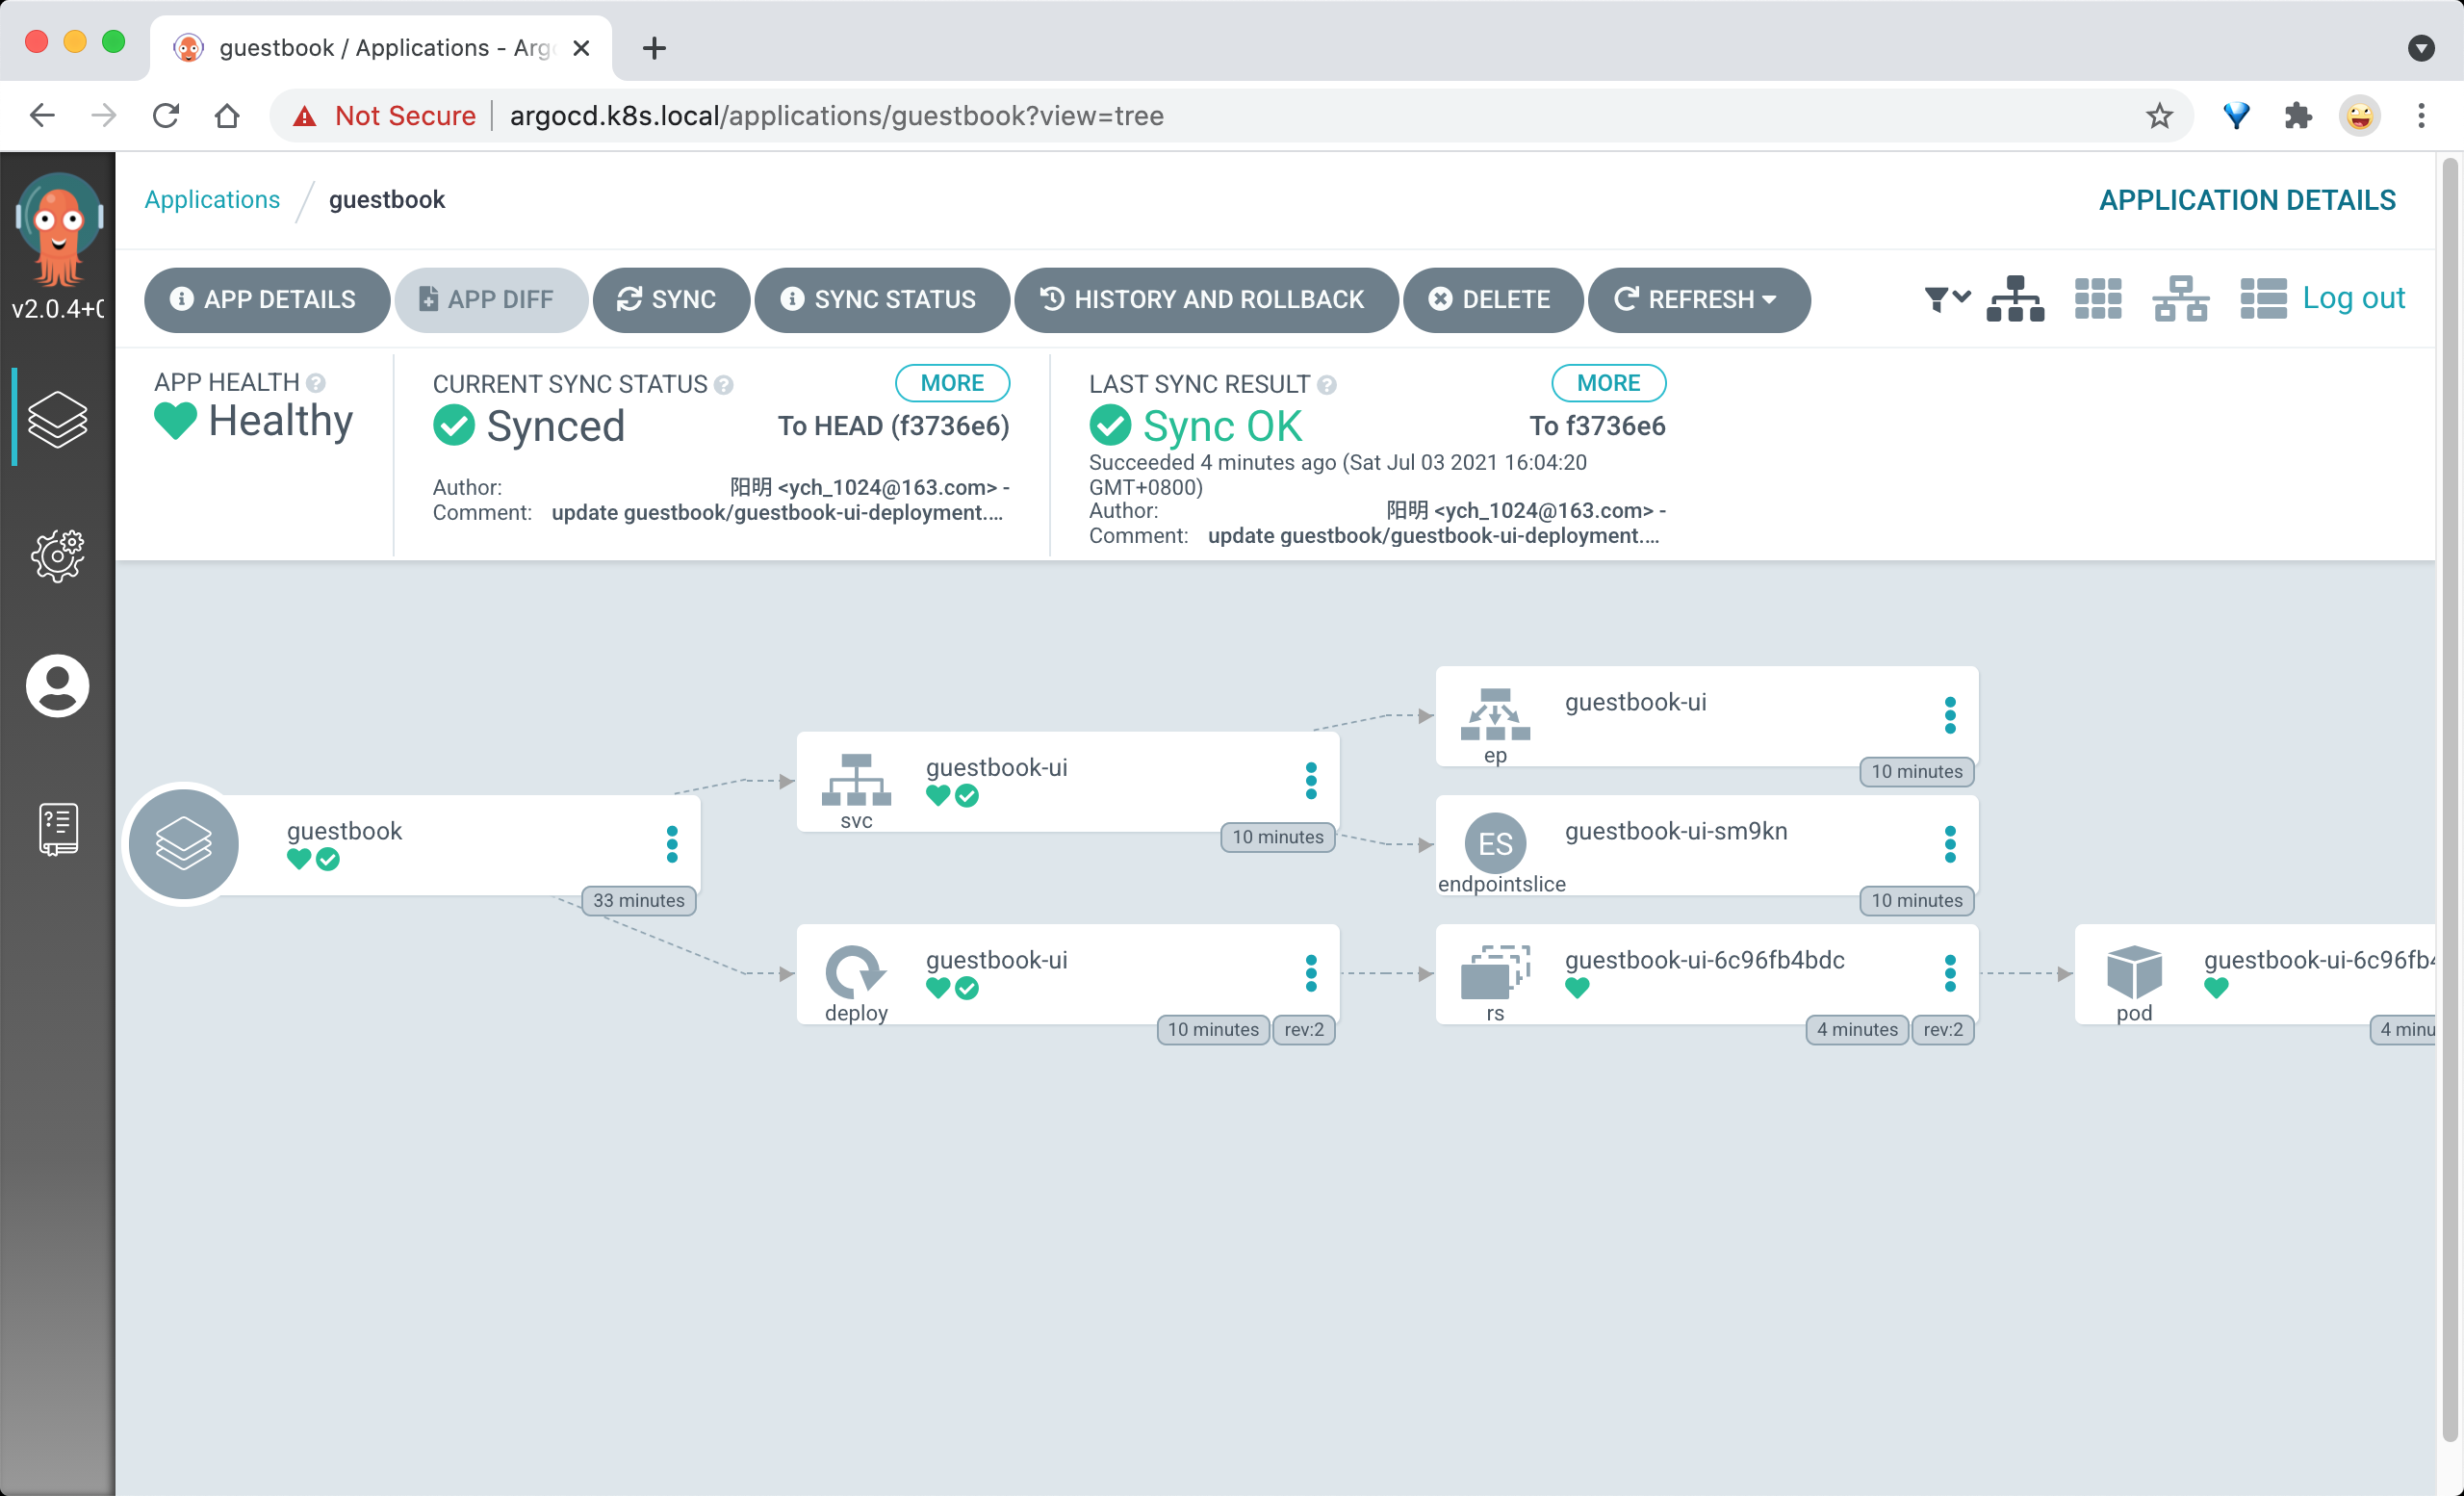
还可以有不同的视角进行查看:
也可以通过 kubectl 查看到我们部署的资源:
➜  ~ kubectl get pods
NAME                                      READY   STATUS      RESTARTS   AGE
guestbook-ui-6c96fb4bdc-nmk9b             1/1     Running     0          2m22s
➜  ~ kubectl get svc
NAME                 TYPE        CLUSTER-IP      EXTERNAL-IP   PORT(S)    AGE
guestbook-ui         ClusterIP   10.96.32.11     <none>        80/TCP     11m
kubernetes           ClusterIP   10.96.0.1       <none>        443/TCP    41d
和我们从 Git 仓库中同步 guestbook 目录下面的资源状态也是同步的,证明同步成功了。
Tekton 结合 Argo CD
前面我们使用 Tekton 完成了应用的 CI/CD 流程,但是 CD 是在 Tekton 的任务中去完成的,现在我们使用 GitOps 的方式来改造我们的流水线,将 CD 部分使用 Argo CD 来完成。
这里我们要先去回顾下前面的 Tekton 实战部分的内容,整个流水线包括 clone、test、build、docker、deploy、rollback 几个部分的任务,最后的 deploy 和 rollback 属于 CD 部分,我们只需要这部分使用 Argo CD 来构建即可。
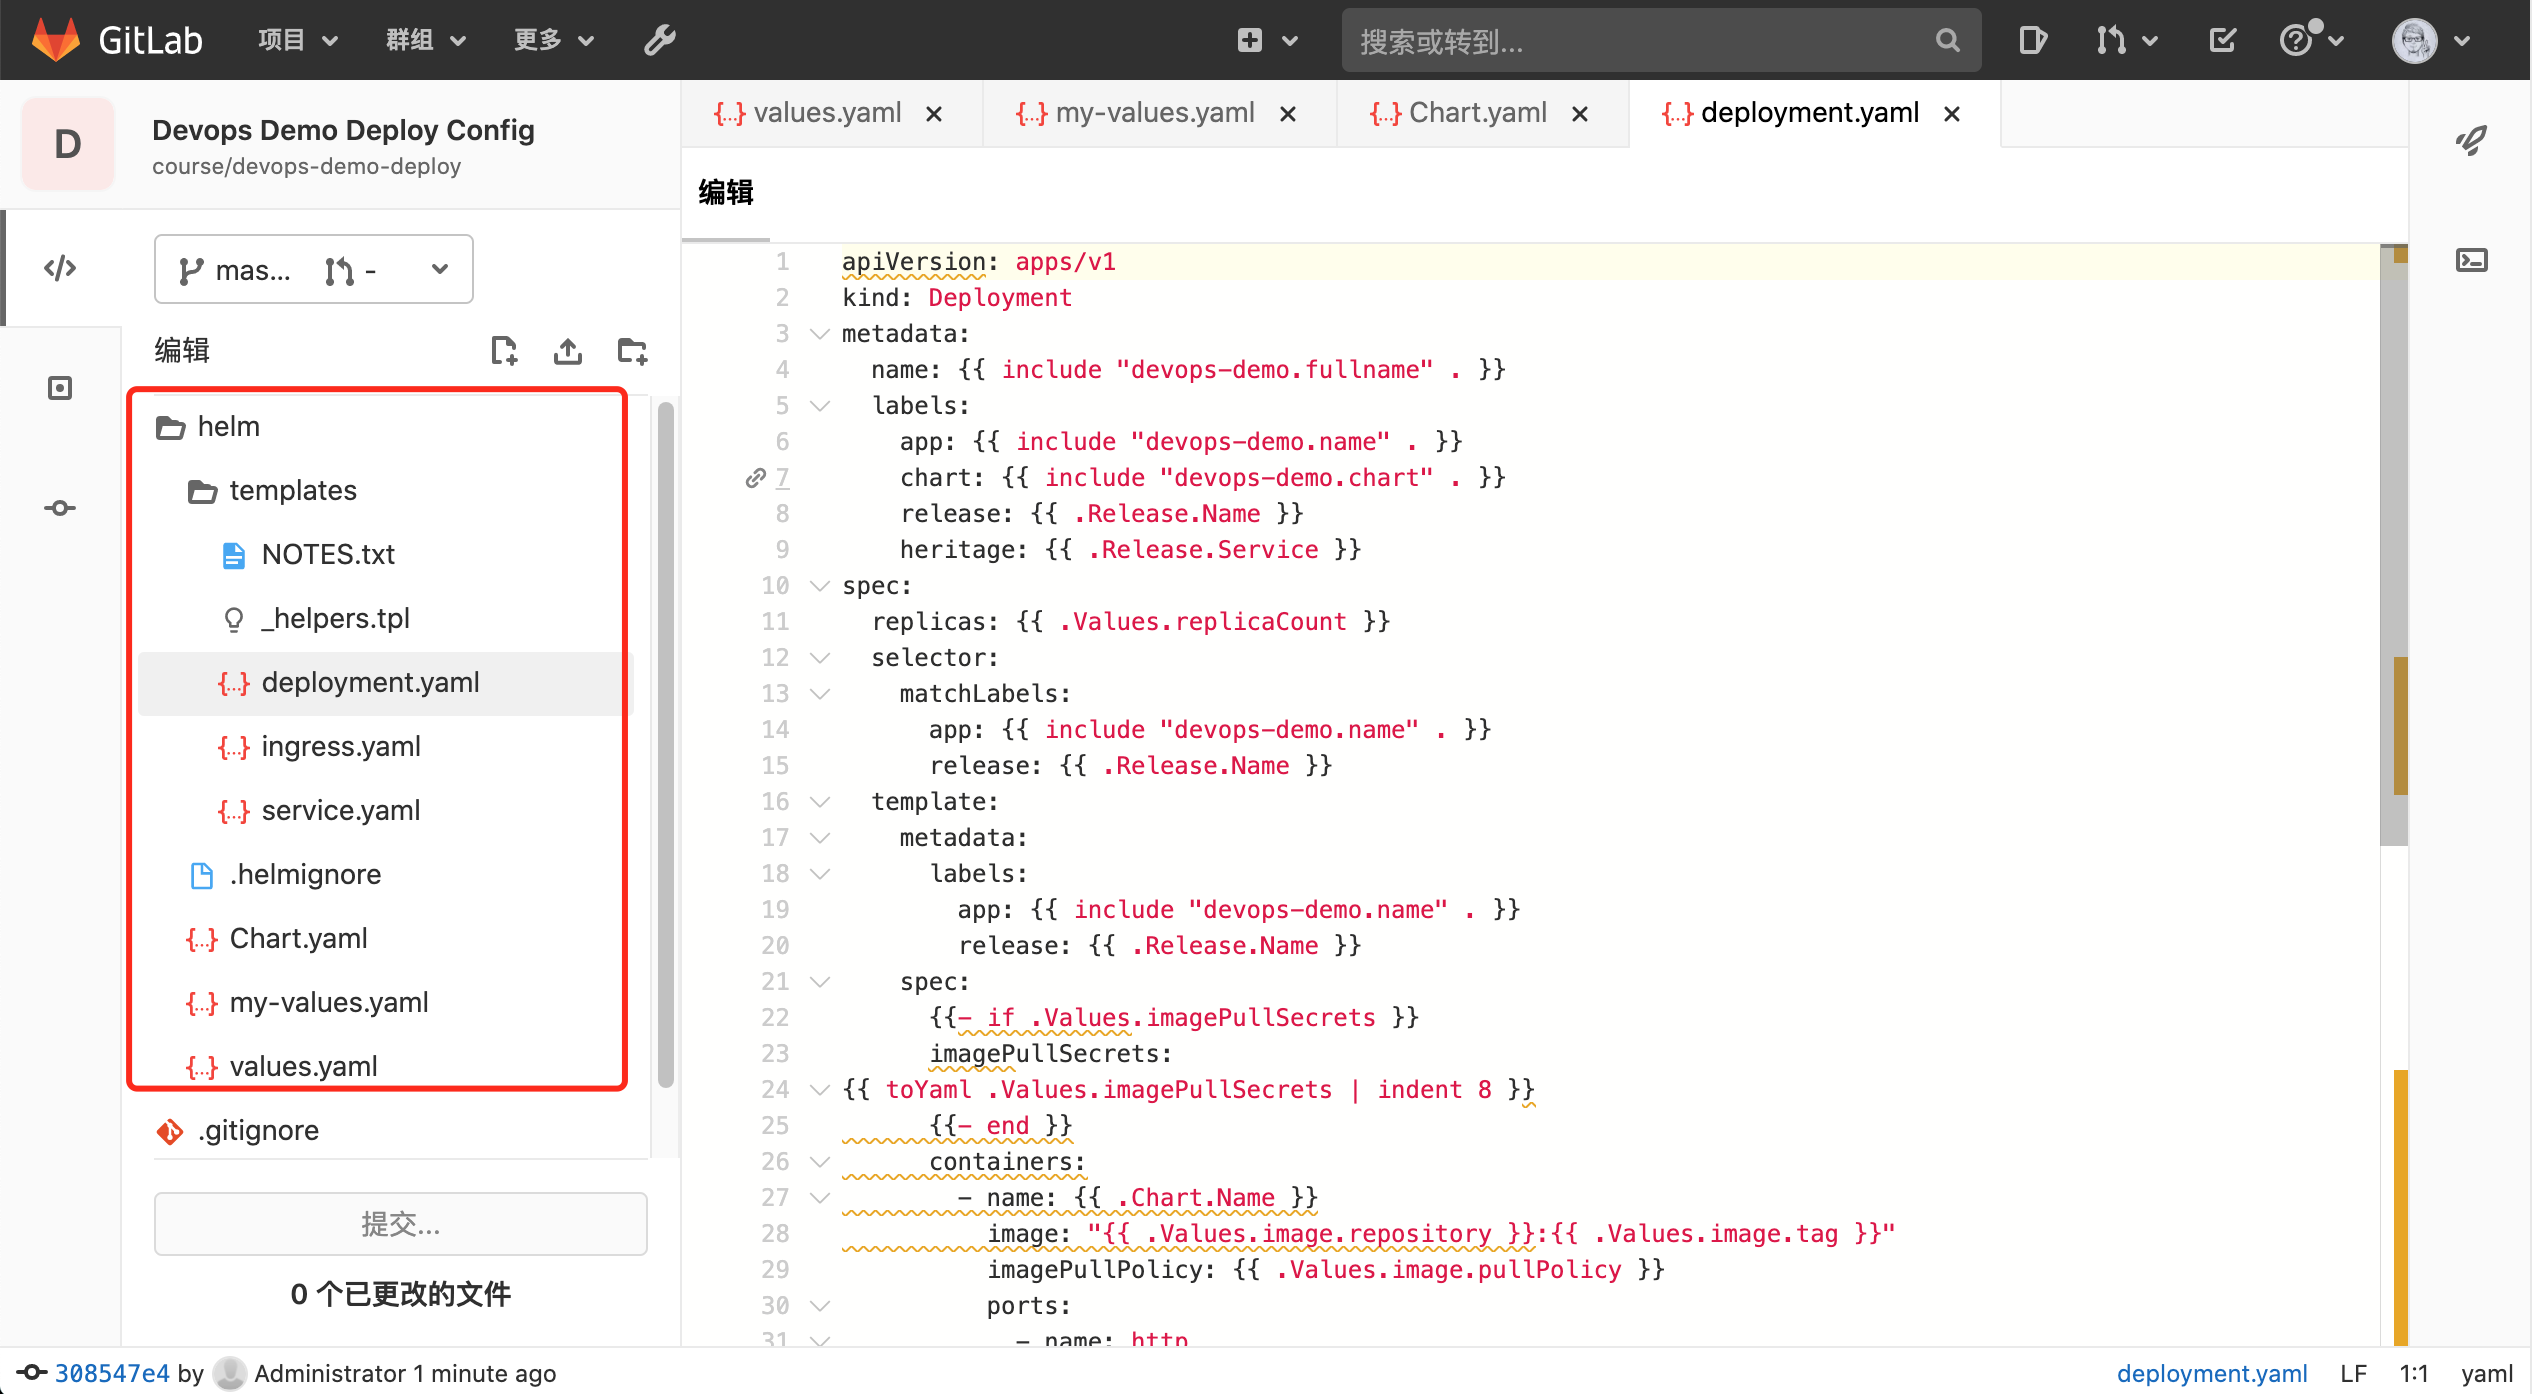
首先我们将项目 http://git.k8s.local/course/devops-demo.git 仓库中的 Helm Chart 模板单独提取出来放到一个独立的仓库中 http://git.k8s.local/course/devops-demo-deploy,这样方便和 Argo CD 进行对接,整个项目下面只有用于应用部署的 Helm Chart 模板。
首先在 Argo CD 上面添加该仓库:

然后创建新应用,首先可以创建一个项目,在 Argo CD 中有一个 AppProject 的 CRD,表示应用程序的逻辑分组,它由以下几个关键属性组成:
sourceRepos:项目中的应用程序可以从中获取清单的仓库引用destinations:项目中的应用可以部署到的集群和命名空间roles:项目内资源访问定义的角色
apiVersion: argoproj.io/v1alpha1
kind: AppProject
metadata:
  # 项目名
  name: demo
  namespace: argocd
spec:
  # 目标
  destinations:
    # 此项目的服务允许部署的 namespace,这里为全部
  - namespace: '*'
    # 此项目允许部署的集群,这里为默认集群,即为Argo CD部署的当前集群
    server: https://kubernetes.default.svc
  # 允许的数据源
  sourceRepos:
  - http://git.k8s.local/course/devops-demo-deploy.git
更多配置信息可以前往文档 https://argo-cd.readthedocs.io/en/stable/operator-manual/declarative-setup/ 查看,项目创建完成后,在该项目下创建一个 Application,代表环境中部署的应用程序实例。
apiVersion: argoproj.io/v1alpha1
kind: Application
metadata:
  name: devops-demo
  namespace: argocd
spec:
  destination:
    namespace: default
    server: 'https://kubernetes.default.svc'
  project: demo
  source:
    path: helm  # 从 Helm 存储库创建应用程序时,chart 必须指定 path
    repoURL: 'http://git.k8s.local/course/devops-demo-deploy.git'
    targetRevision: HEAD
    helm:
      parameters:
        - name: replicaCount
          value: '2'
      valueFiles:
        - my-values.yaml
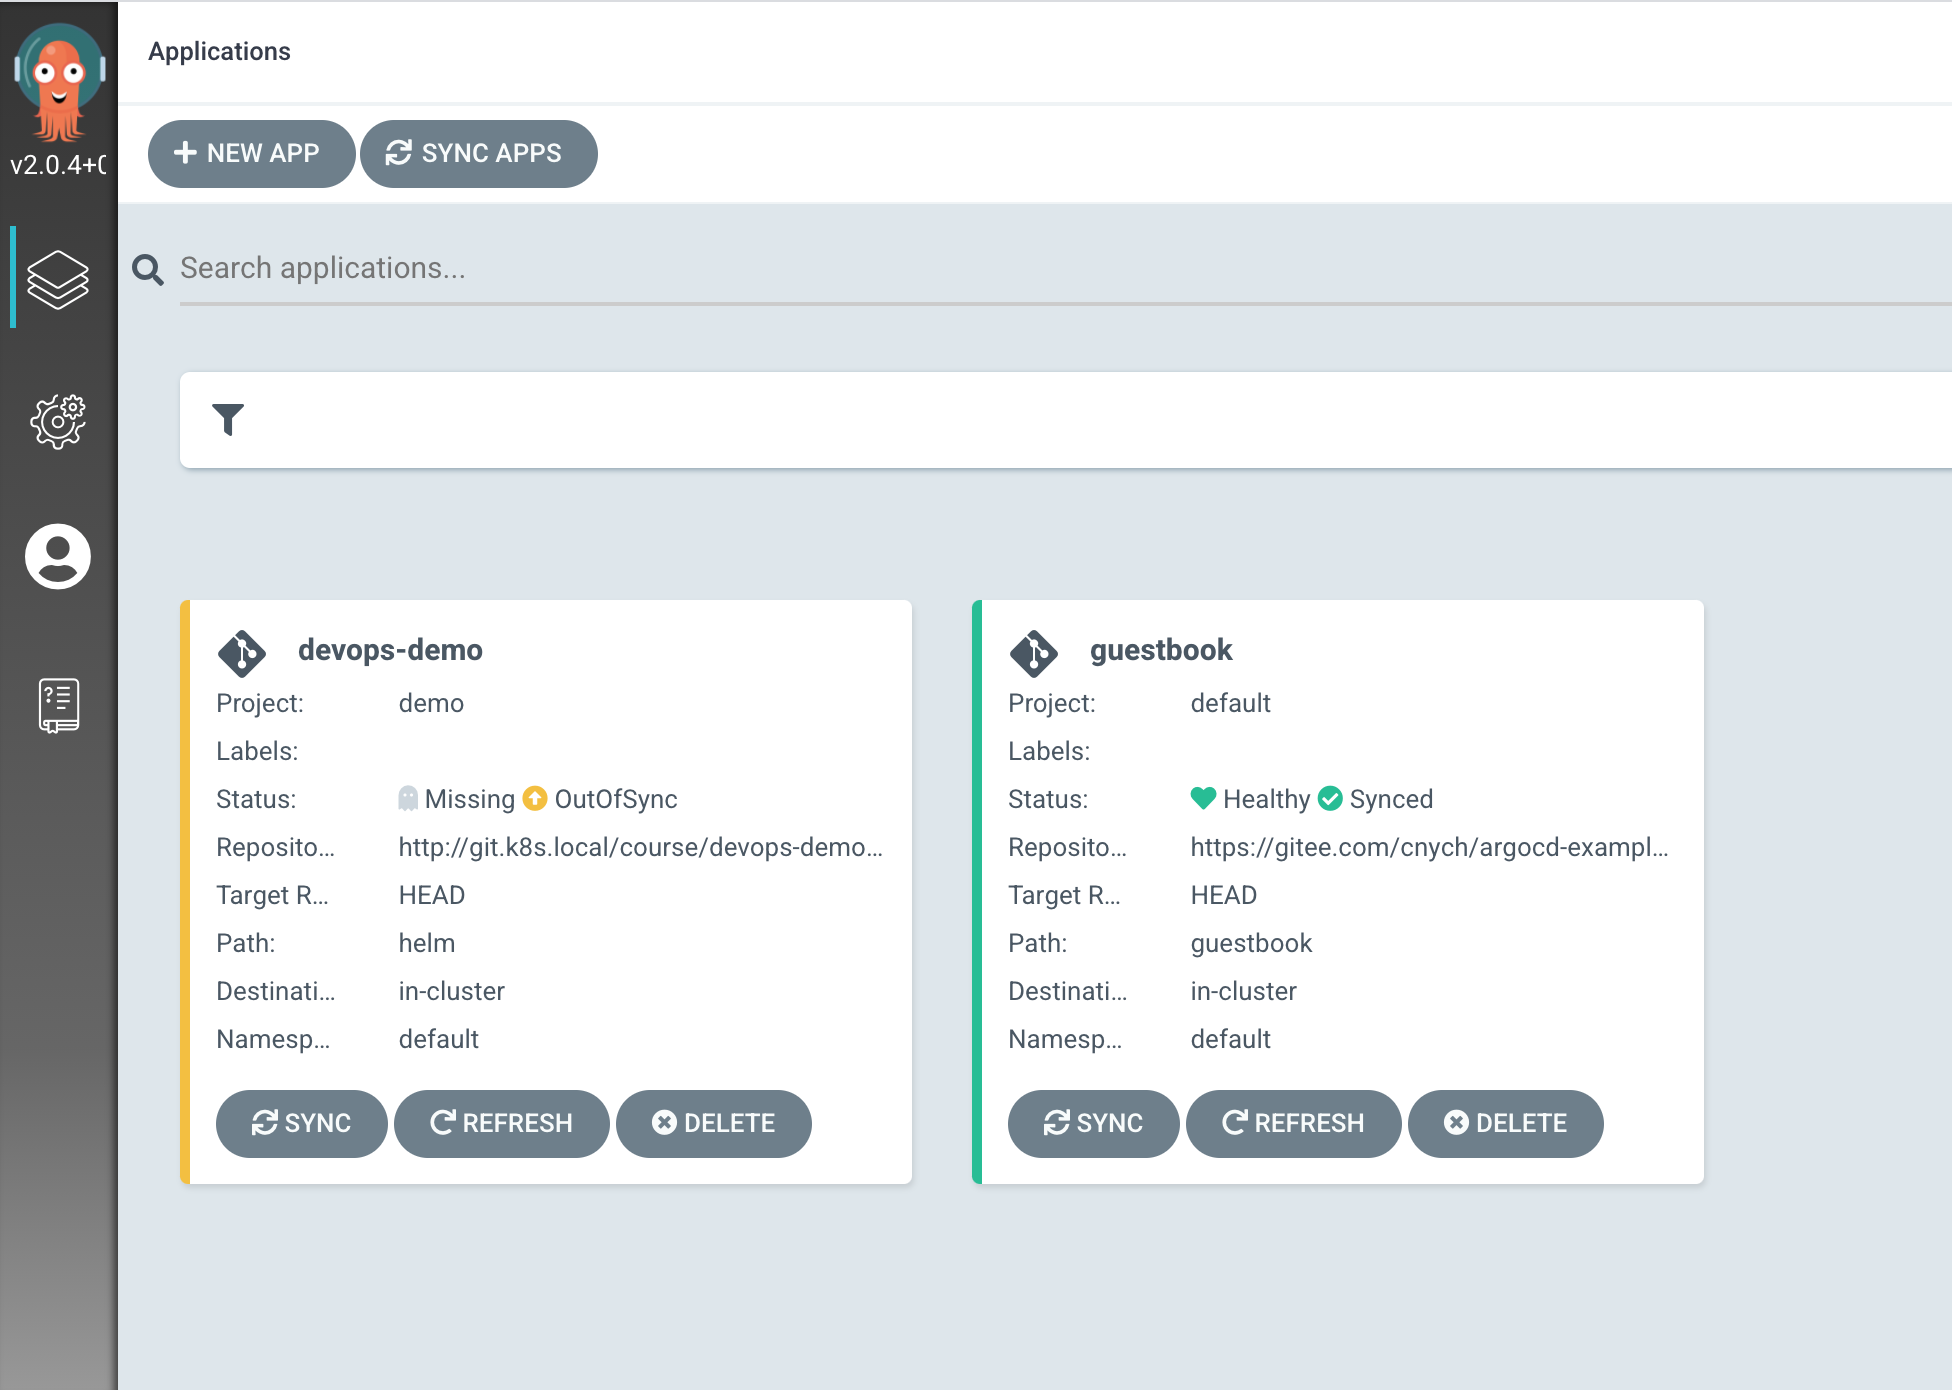
这里我们定义了一个名为 devops-demo 的应用,应用源来自于 helm 路径,使用的是 my-values.yaml 文件,此外还可以通过 source.helm.parameters 来配置参数,同步策略我们仍然选择使用手动的方式,我们可以在 Tekton 的任务中去手动触发同步。上面的资源对象创建完成后应用就会处于 OutOfSync 状态,因为集群中还没部署该应用。
现在接下来我们去修改之前的 Tekton 流水线,之前的 Pipeline 流水线如下所示:
# pipeline.yaml
apiVersion: tekton.dev/v1beta1
kind: Pipeline
metadata:
  name: pipeline
spec:
  workspaces: # 声明 workspaces
    - name: go-repo-pvc
  params:
    # 定义代码仓库
    - name: git_url
    - name: revision
      type: string
      default: "master"
    # 定义镜像参数
    - name: image
    - name: registry_url
      type: string
      default: "harbor.k8s.local"
    - name: registry_mirror
      type: string
      default: "https://ot2k4d59.mirror.aliyuncs.com/"
    # 定义 helm charts 参数
    - name: charts_dir
    - name: release_name
    - name: release_namespace
      default: "default"
    - name: overwrite_values
      default: ""
    - name: values_file
      default: "values.yaml"
  tasks: # 添加task到流水线中
    - name: clone
      taskRef:
        name: git-clone
      workspaces:
        - name: output
          workspace: go-repo-pvc
      params:
        - name: url
          value: $(params.git_url)
        - name: revision
          value: $(params.revision)
    - name: test
      taskRef:
        name: test
    - name: build # 编译二进制程序
      taskRef:
        name: build
      runAfter: # 测试任务执行之后才执行 build task
        - test
        - clone
      workspaces: # 传递 workspaces
        - name: go-repo
          workspace: go-repo-pvc
    - name: docker # 构建并推送 Docker 镜像
      taskRef:
        name: docker
      runAfter:
        - build
      workspaces: # 传递 workspaces
        - name: go-repo
          workspace: go-repo-pvc
      params: # 传递参数
        - name: image
          value: $(params.image)
        - name: registry_url
          value: $(params.registry_url)
        - name: registry_mirror
          value: $(params.registry_mirror)
    - name: deploy # 部署应用
      taskRef:
        name: deploy
      runAfter:
        - docker
      workspaces:
        - name: source
          workspace: go-repo-pvc
      params:
        - name: charts_dir
          value: $(params.charts_dir)
        - name: release_name
          value: $(params.release_name)
        - name: release_namespace
          value: $(params.release_namespace)
        - name: overwrite_values
          value: $(params.overwrite_values)
        - name: values_file
          value: $(params.values_file)
    - name: rollback # 回滚
      taskRef:
        name: rollback
      when:
        - input: "$(tasks.deploy.results.helm-status)"
          operator: in
          values: ["failed"]
      params:
        - name: release_name
          value: $(params.release_name)
        - name: release_namespace
          value: $(params.release_namespace)
现在我们需要去掉最后的 deploy 和 rollback 两个任务,当 Docker 镜像构建推送完成后,我们只需要去修改部署代码仓库中的 values 文件,然后再去手动触发 Argo CD 同步状态即可(如果开启了自动同步这一步都可以省略了),而回滚操作直接在 Argo CD 中去操作即可,不需要定义一个单独的 Task 任务。
定义一个如下所的 Taks 任务:
apiVersion: tekton.dev/v1alpha1
kind: Task
metadata:
  name: sync
spec:
  volumes:
  - name: argocd-secret
    secret:
      secretName: $(inputs.params.argocd_secret)
  params:
    - name: argocd_url
      description: "The URL of the ArgoCD server"
    - name: argocd_secret
      description: "The secret containing the username and password for the tekton task to connect to argo"
    - name: commit_id
      description: "The commit ID to update"
    - name: app_name
      description: "The name of the argo app to update"
    - name: app_revision
      default: "HEAD"
      description: "The revision of the argo app to update"
  steps:
  - name: deploy
    image: argoproj/argocd
    volumeMounts:
    - name: argocd-secret
      mountPath: /var/secret
    command:
    - sh
    args:
    - -ce
    - |
      set -e
      echo "update commit id"
      argocd login --insecure $(params.argocd_url) --username $(/bin/cat /var/secret/username) --password $(/bin/cat /var/secret/password)
      argocd app sync $(params.app_name) --revision $(params.app_revision)
      argocd app wait $(params.app_name) --health
由于我们这里只需要修改 Helm Chart 的 Values 文件中的 image.tag 参数,最好的方式当然还是在一个 Task 中去修改 values.yaml 文件并 commit 到 Repo 仓库中去,当然也可以为了简单直接在 Argo CD 的应用侧配置参数即可,比如可以使用 argocd app set 命令来为应用配置参数,然后下面再用 argocd app sync 命令手动触发同步操作,这里其实就可以有很多操作了,比如我们可以根据某些条件来判断是否需要部署,满足条件后再执行 sync 操作,最后使用 wait 命令等待应用部署完成。
当然除了通过手动 argocd app set 的方式来配置参数之外,可能更好的方式还是直接去修改 Repo 仓库中的 values 值,这样在源代码仓库中有一个版本记录,我们可以新建如下所示的一个任务用来修改 values 值:
apiVersion: tekton.dev/v1beta1
kind: Task
metadata:
  name: change-manifests
spec:
  params:
    - name: git_url
      description: Git repository containing manifest files to update
    - name: git_email
      default: pipeline@k8s.local
    - name: git_name
      default: Tekton Pipeline
    - name: git_manifest_dir
      description: Manifests files dir
    - name: tool_image
      default: cnych/helm-kubectl-curl-git-jq-yq
    - name: image_tag
      description: Deploy docker image tag
  steps:
    - name: git-push
      image: $(params.tool_image)
      env:
        - name: GIT_USERNAME
          valueFrom:
            secretKeyRef:
              name: gitlab-auth
              key: username
              optional: true
        - name: GIT_PASSWORD
          valueFrom:
            secretKeyRef:
              name: gitlab-auth
              key: password
              optional: true
      command: ["/bin/bash"]
      args:
        - -c
        - |
          set -eu
          git config --global user.email "$(params.git_email)"
          git config --global user.name "$(params.git_name)"
          git clone --branch master --depth 1 http://${GIT_USERNAME}:${GIT_PASSWORD}@$(params.git_url) repo
          cd "repo/$(params.git_manifest_dir)"
          ls -l
          echo old value:
          cat my-values.yaml | yq r - 'image.tag'
          echo replacing with new value:
          echo $(params.image_tag)
          yq w --inplace my-values.yaml 'image.tag' "$(params.image_tag)"
          echo verifying new value
          yq r my-values.yaml 'image.tag'
          if ! git diff-index --quiet HEAD --; then
            git status
            git add .
            git commit -m "helm values updated by tekton pipeline in change-manifests task"
            git push
          else
              echo "no changes, git repository is up to date"
          fi
现在我们的流水线就变成了如下所示的清单:
# pipeline.yaml
apiVersion: tekton.dev/v1beta1
kind: Pipeline
metadata:
  name: pipeline
spec:
  workspaces: # 声明 workspaces
    - name: go-repo-pvc
  params:
    # 定义代码仓库
    - name: git_url
    - name: git_infra_url
    - name: revision
      type: string
      default: "master"
    # 定义镜像参数
    - name: image
    - name: image_tag
    - name: registry_url
      type: string
      default: "harbor.k8s.local"
    - name: registry_mirror
      type: string
      default: "https://ot2k4d59.mirror.aliyuncs.com/"
    - name: git_manifest_dir
      default: "helm"
    # 定义 argocd 参数
    - name: argocd_url
    - name: argocd_secret
    - name: app_name
    - name: app_revision
      type: string
      default: "HEAD"
  tasks: # 添加task到流水线中
    - name: clone
      taskRef:
        name: git-clone
      workspaces:
        - name: output
          workspace: go-repo-pvc
      params:
        - name: url
          value: $(params.git_url)
        - name: revision
          value: $(params.revision)
    - name: test
      taskRef:
        name: test
    - name: build # 编译二进制程序
      taskRef:
        name: build
      runAfter: # 测试任务执行之后才执行 build task
        - test
        - clone
      workspaces: # 传递 workspaces
        - name: go-repo
          workspace: go-repo-pvc
    - name: docker # 构建并推送 Docker 镜像
      taskRef:
        name: docker
      runAfter:
        - build
      workspaces: # 传递 workspaces
        - name: go-repo
          workspace: go-repo-pvc
      params: # 传递参数
        - name: image
          value: $(params.image):$(params.image_tag)
        - name: registry_url
          value: $(params.registry_url)
        - name: registry_mirror
          value: $(params.registry_mirror)
    - name: manifests
      taskRef:
        name: change-manifests
      runAfter:
        - docker
      params:
      - name: git_url
        value: $(params.git_infra_url)
      - name: git_manifest_dir
        value: $(params.git_manifest_dir)
      - name: image_tag
        value: $(params.image_tag)
    - name: sync
      taskRef:
        name: sync
      runAfter:
        - manifests
      params:
      - name: argocd_url
        value: $(params.argocd_url)
      - name: argocd_secret
        value: $(params.argocd_secret)
      - name: app_name
        value: $(params.app_name)
      - name: app_revision
        value: $(params.app_revision)
最后创建用于 Argo CD 登录使用的 Secret 对象:
apiVersion: v1
kind: Secret
metadata:
  name: argocd-auth
type: Opaque
stringData:
  username: admin
  password: admin321
最后修改 Tekton Triggers 中的 Template,如下所示:
# gitlab-template.yaml
apiVersion: triggers.tekton.dev/v1alpha1
kind: TriggerTemplate
metadata:
  name: gitlab-template
spec:
  params: # 定义参数,和 TriggerBinding 中的保持一致
    - name: gitrevision
    - name: gitrepositoryurl
  resourcetemplates: # 定义资源模板
    - apiVersion: tekton.dev/v1beta1
      kind: PipelineRun # 定义 pipeline 模板
      metadata:
        generateName: gitlab-run- # TaskRun 名称前缀
      spec:
        serviceAccountName: tekton-build-sa
        pipelineRef:
          name: pipeline
        workspaces:
          - name: go-repo-pvc
            persistentVolumeClaim:
              claimName: go-repo-pvc
        params:
          - name: git_url
            value: $(tt.params.gitrepositoryurl)
          - name: git_infra_url
            value: git.k8s.local/course/devops-demo-deploy.git
          - name: image
            value: "harbor.k8s.local/course/devops-demo"
          - name: image_tag
            value: "$(tt.params.gitrevision)"
          - name: argocd_url
            value: argocd.k8s.local
          - name: argocd_secret
            value: argocd-auth
          - name: app_name
            value: devops-demo
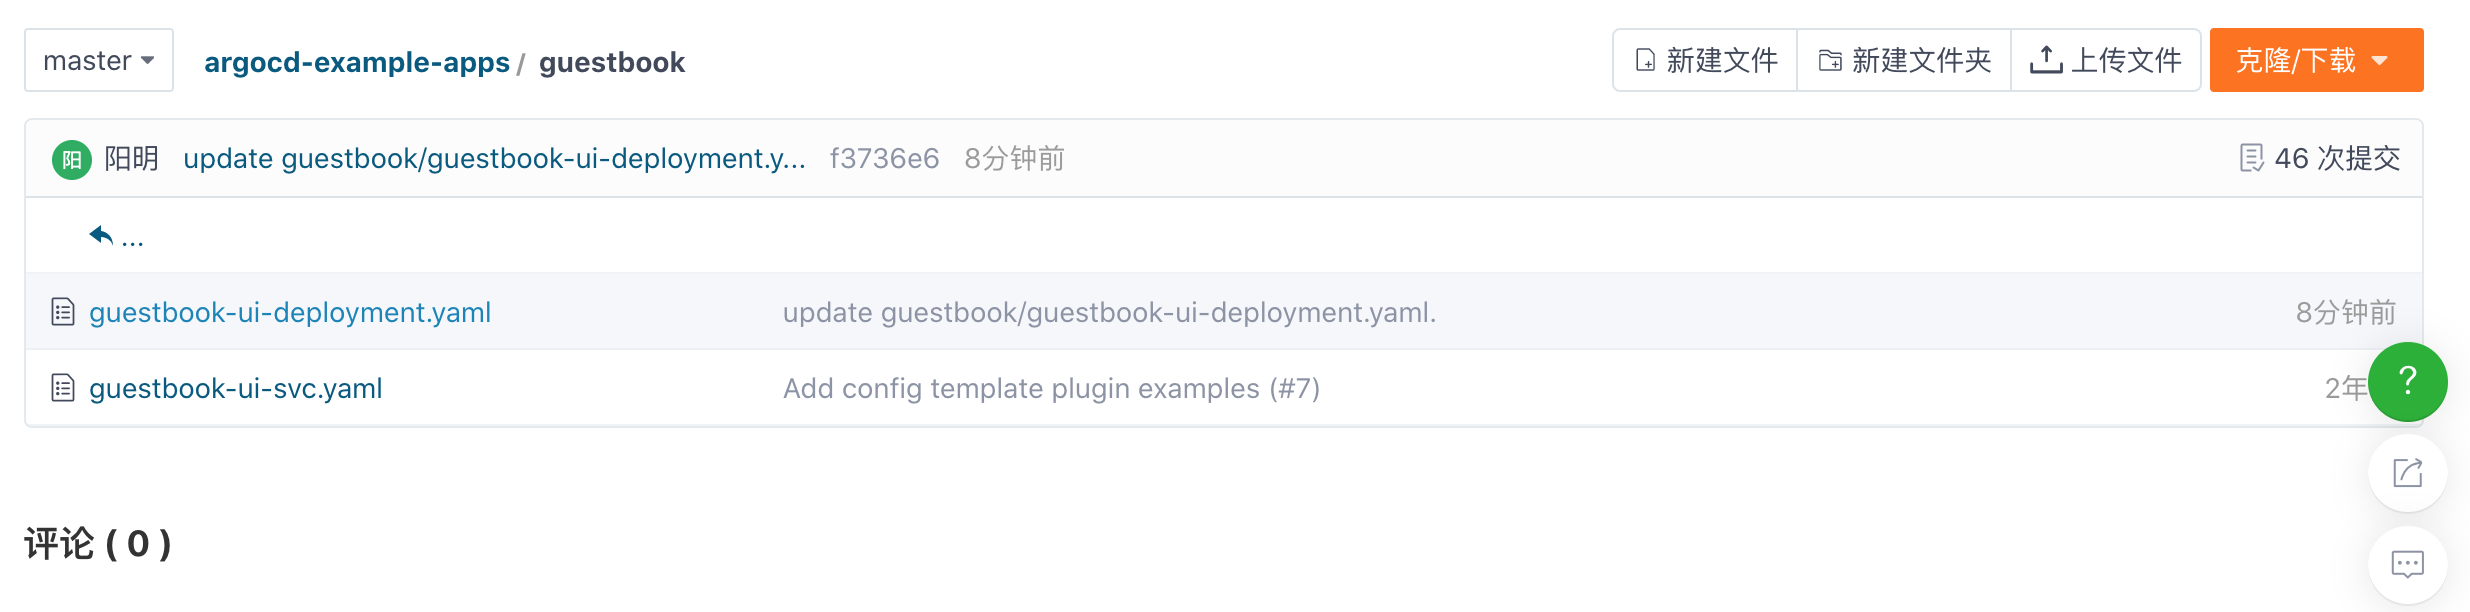
现在我们的整个流水线就更加精简了。现在我们去应用仓库中修改下源代码并提交就可以触发我们的流水线了。
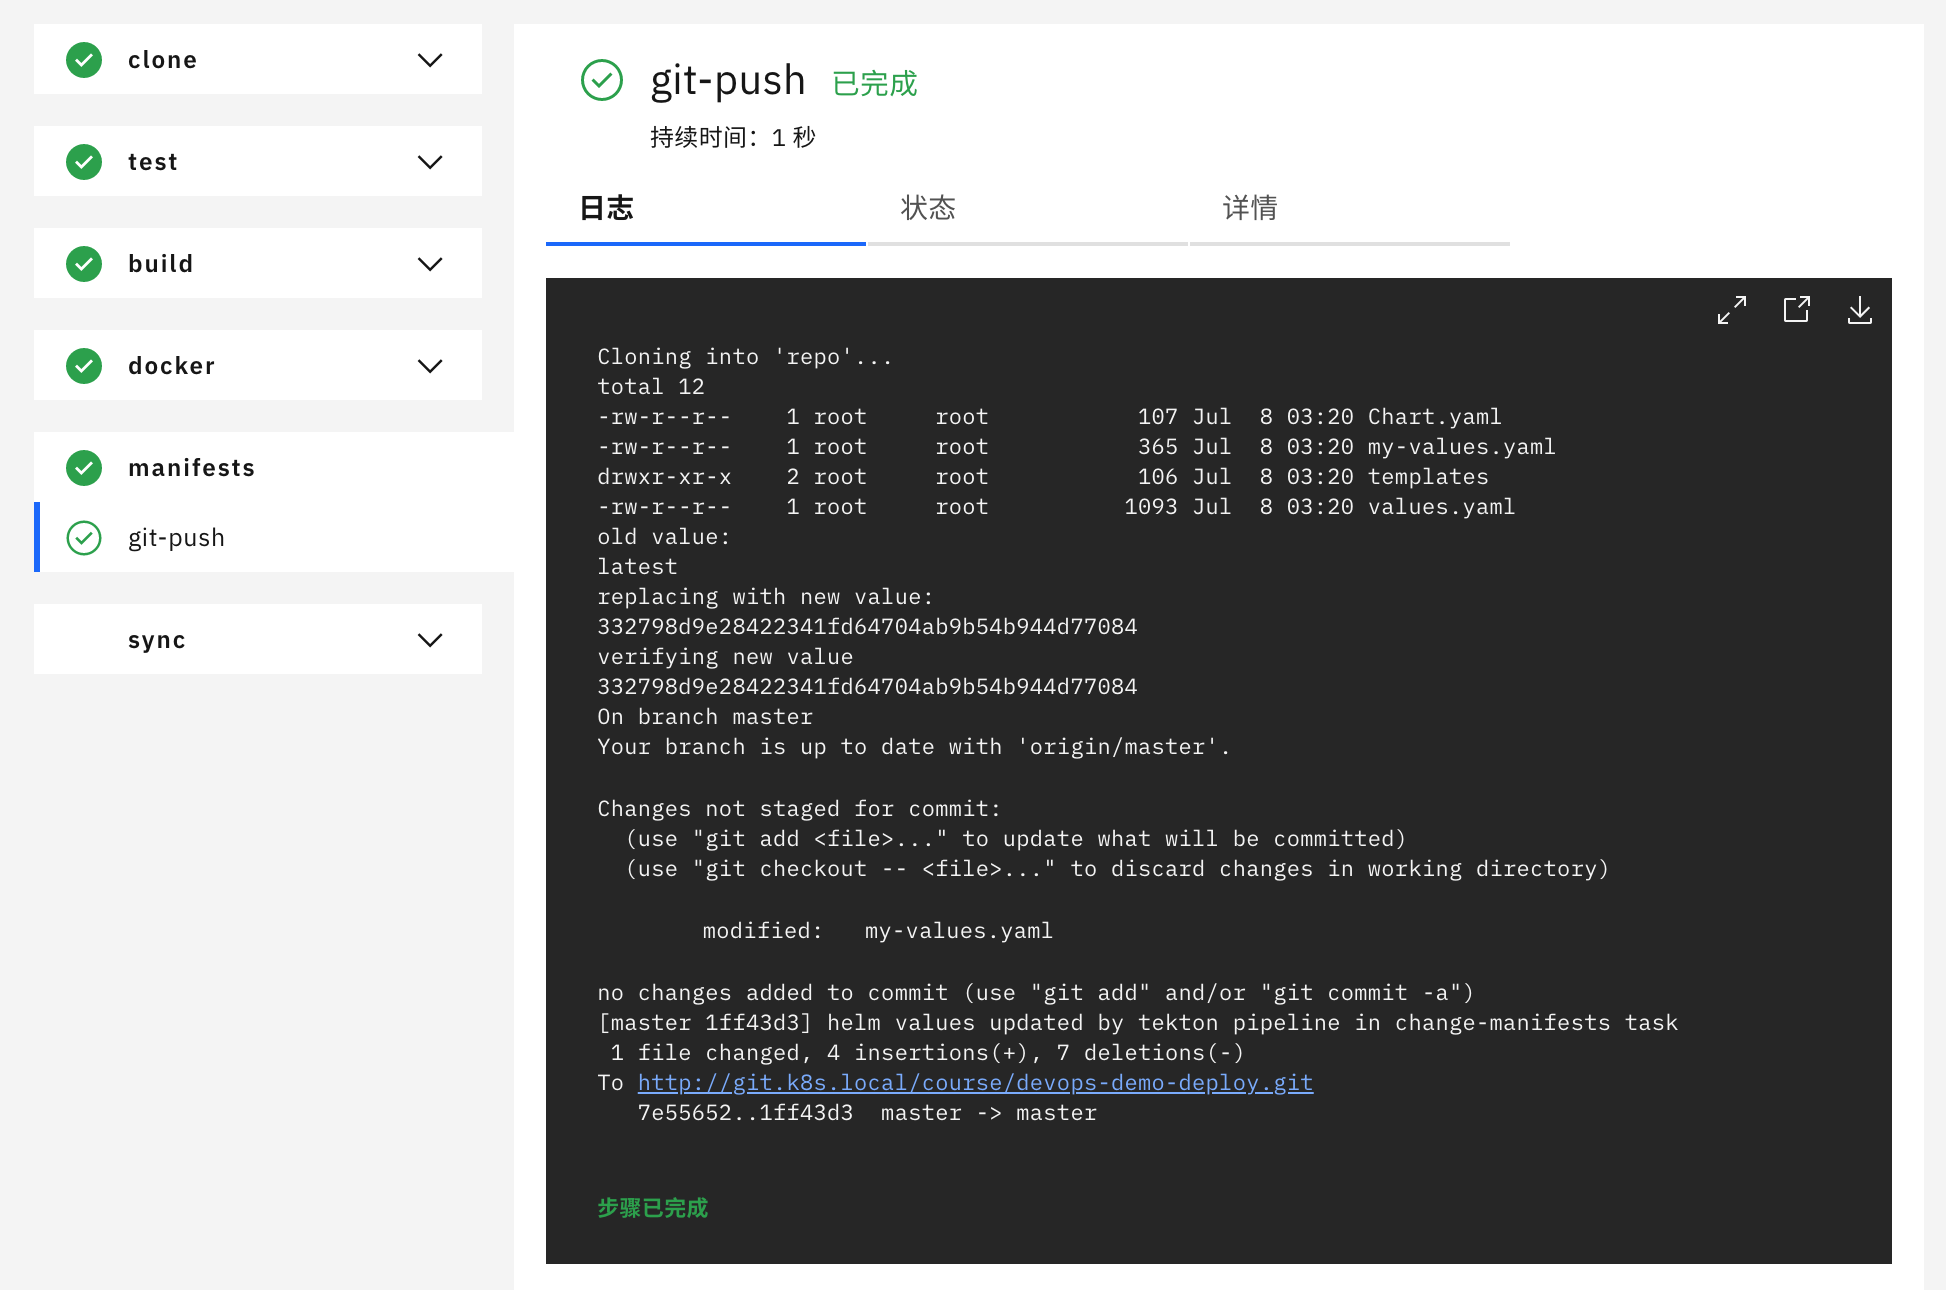
可以看到当我们提交代码后,整个流水线构建会一直卡在最后的 sync 任务,这是因为我们执行了 argocd app wait $(params.app_name) --health 这个命令,需要等待应用健康后才会退出。
$ curl devops-demo.k8s.local
{"msg":"Hello Tekton + ArgoCD On GitLab"}
但实际上上面我们的应用已经部署成功了,只是 Argo CD 的健康检查没有通过,Argo CD 为几种标准的 Kubernetes 资源提供了内置的健康策略,然后将这些策略作为一个整体呈现在应用的健康状态中,比如会检查副本数是否正常,PVC 是否绑定等,而对于 Ingress 资源会检查 status.loadBalancer.ingress 列表是否非空,需要至少有一个 hostname 或 IP 值,而我们这里部署的 Ingress 中的值为空:
$ kubectl get ingress devops-demo -o yaml
apiVersion: extensions/v1beta1
kind: Ingress
......
spec:
  rules:
  - host: devops-demo.k8s.local
    http:
      paths:
      - backend:
          serviceName: devops-demo
          servicePort: http
        path: /
        pathType: ImplementationSpecific
status:
  loadBalancer: {}
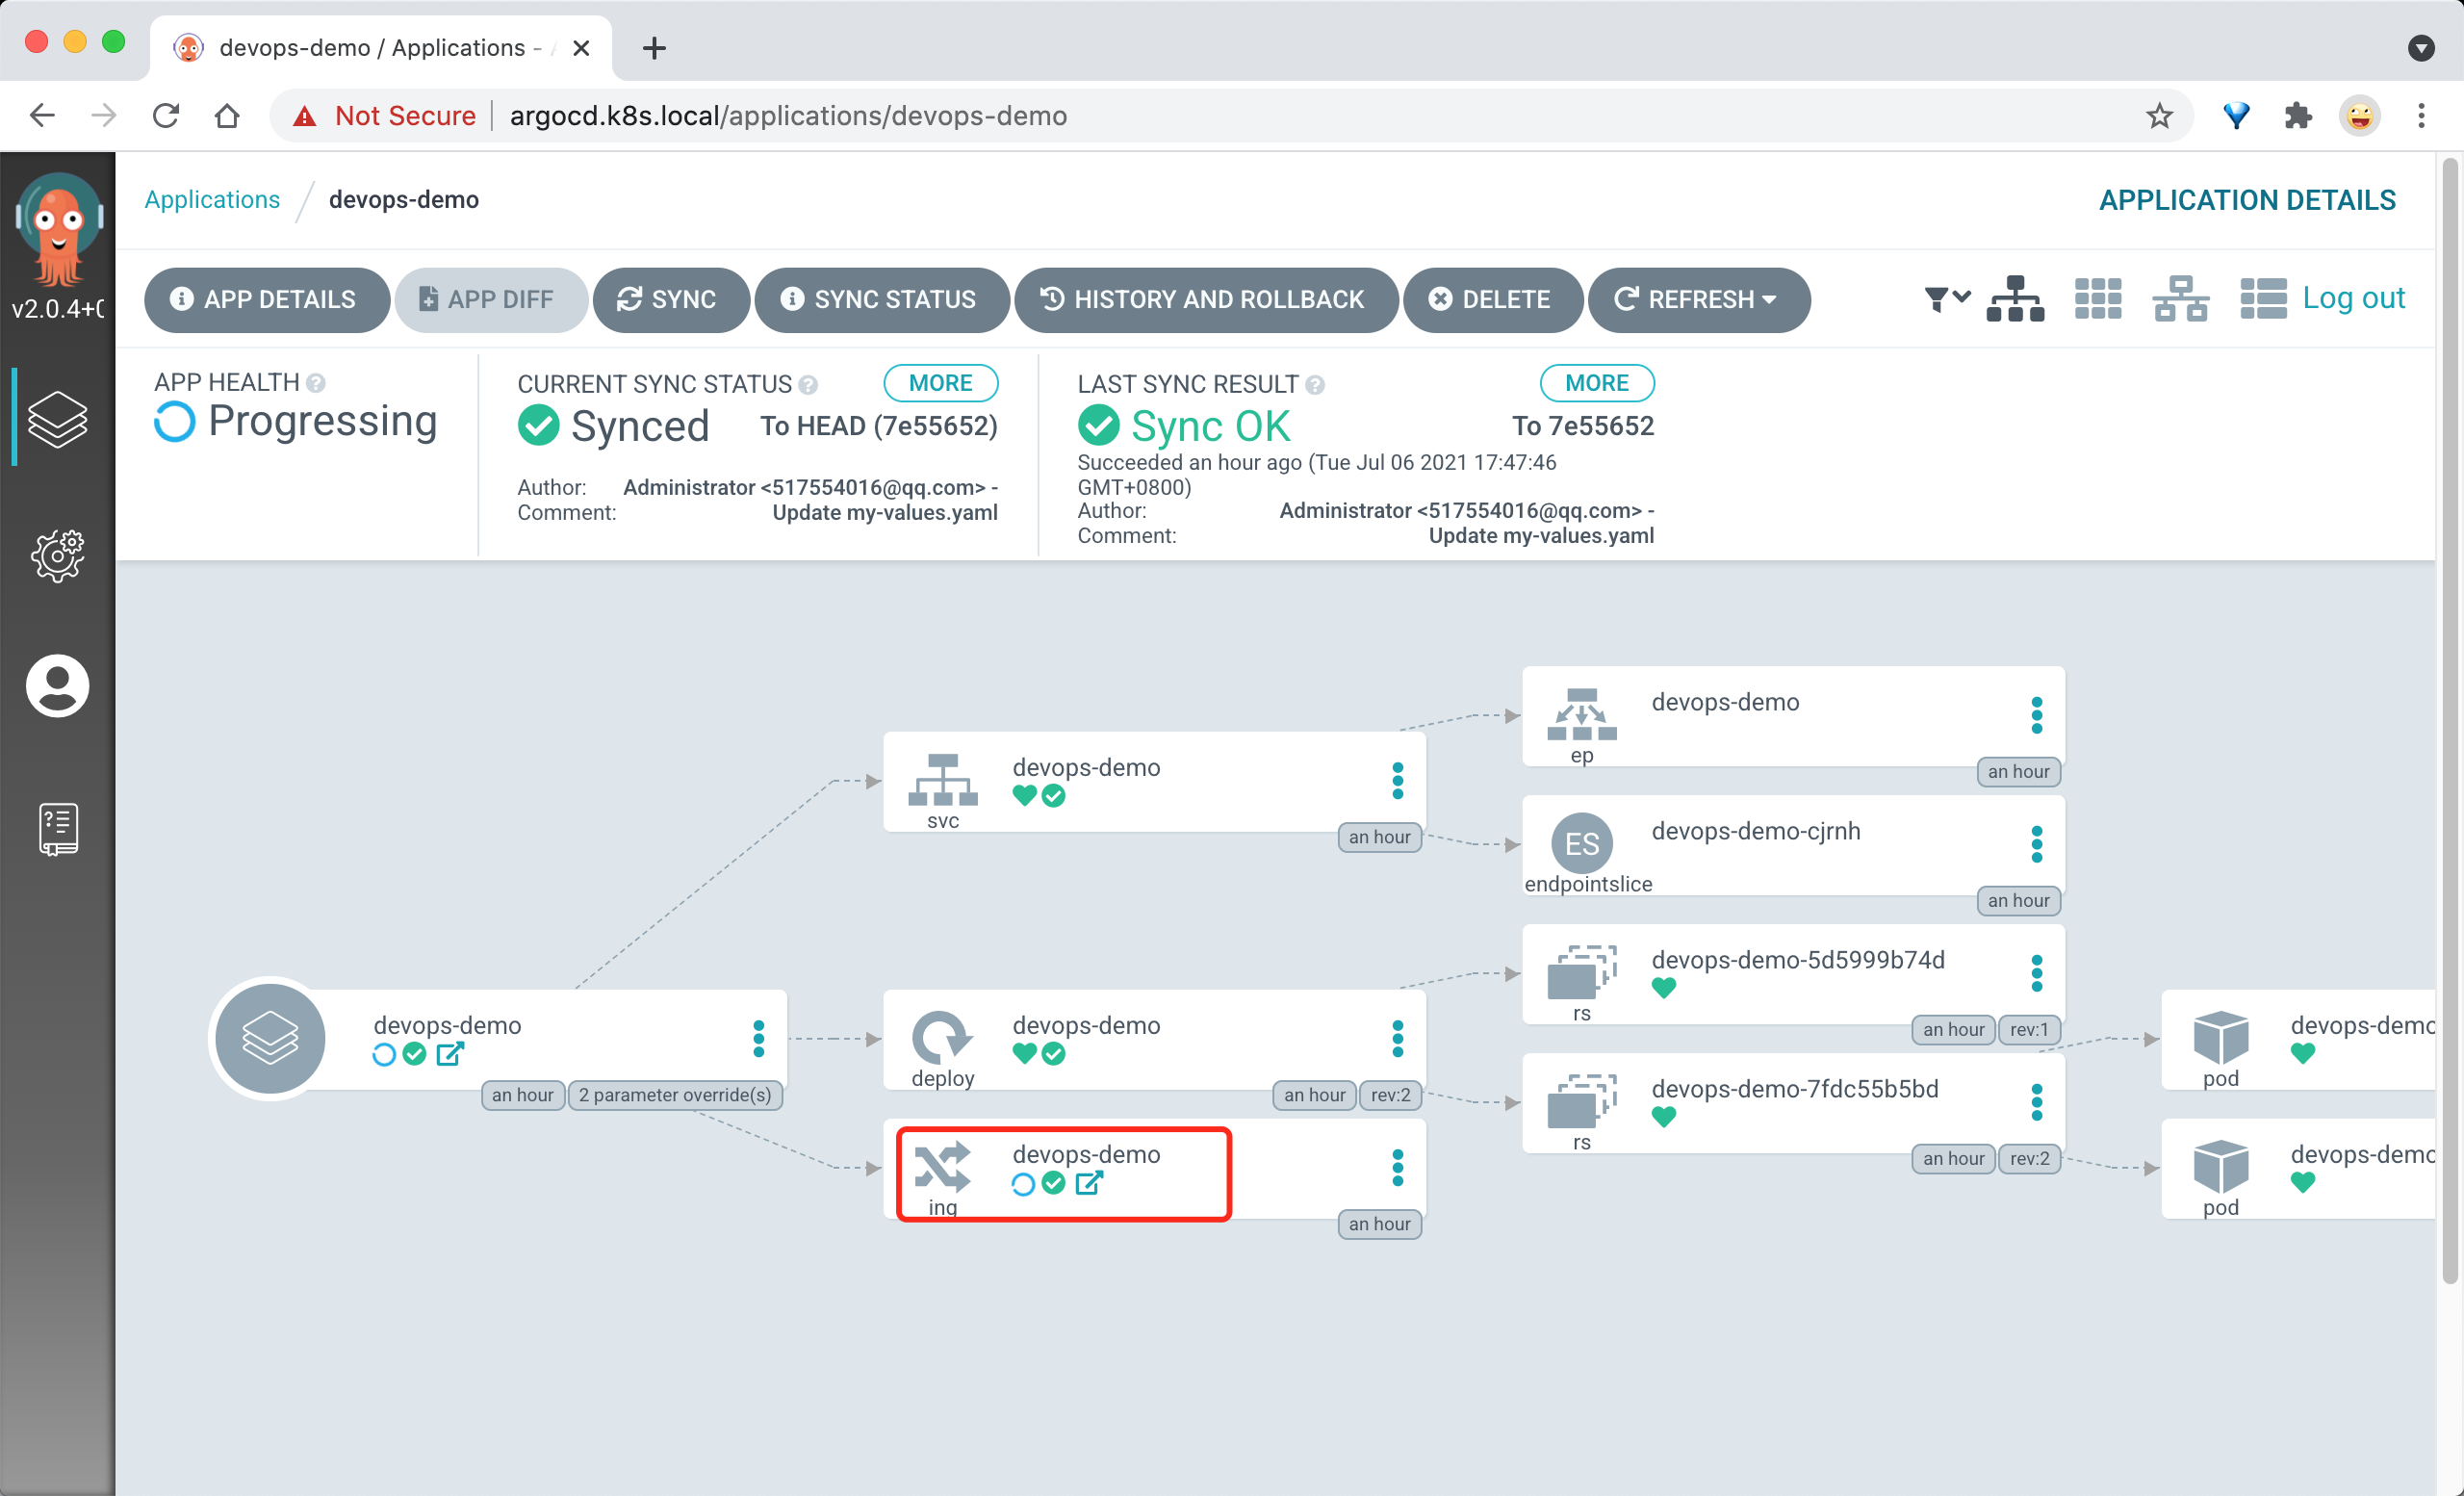
所以健康检查一直不通过,在 Argo CD 页面上也可以证实是 Ingress 导致健康检查没通过:
这个时候需要我们去自定义 Ingress 资源的监控检查方式,Argo CD 支持用 Lua 来编写检查规则,修改 Argo CD 的 Configmap 配置文件:
$ kubectl edit cm -n argocd argocd-cm
# Please edit the object below. Lines beginning with a '#' will be ignored,
# and an empty file will abort the edit. If an error occurs while saving this file will be
# reopened with the relevant failures.
#
apiVersion: v1
data:
  resource.customizations: |  # 定制 Ingress 资源的健康检查方式
    extensions/Ingress:
        health.lua: |
          hs = {}
          hs.status = "Healthy"
          return hs
......
修改完成后,我们的应用就会变成健康状态了。

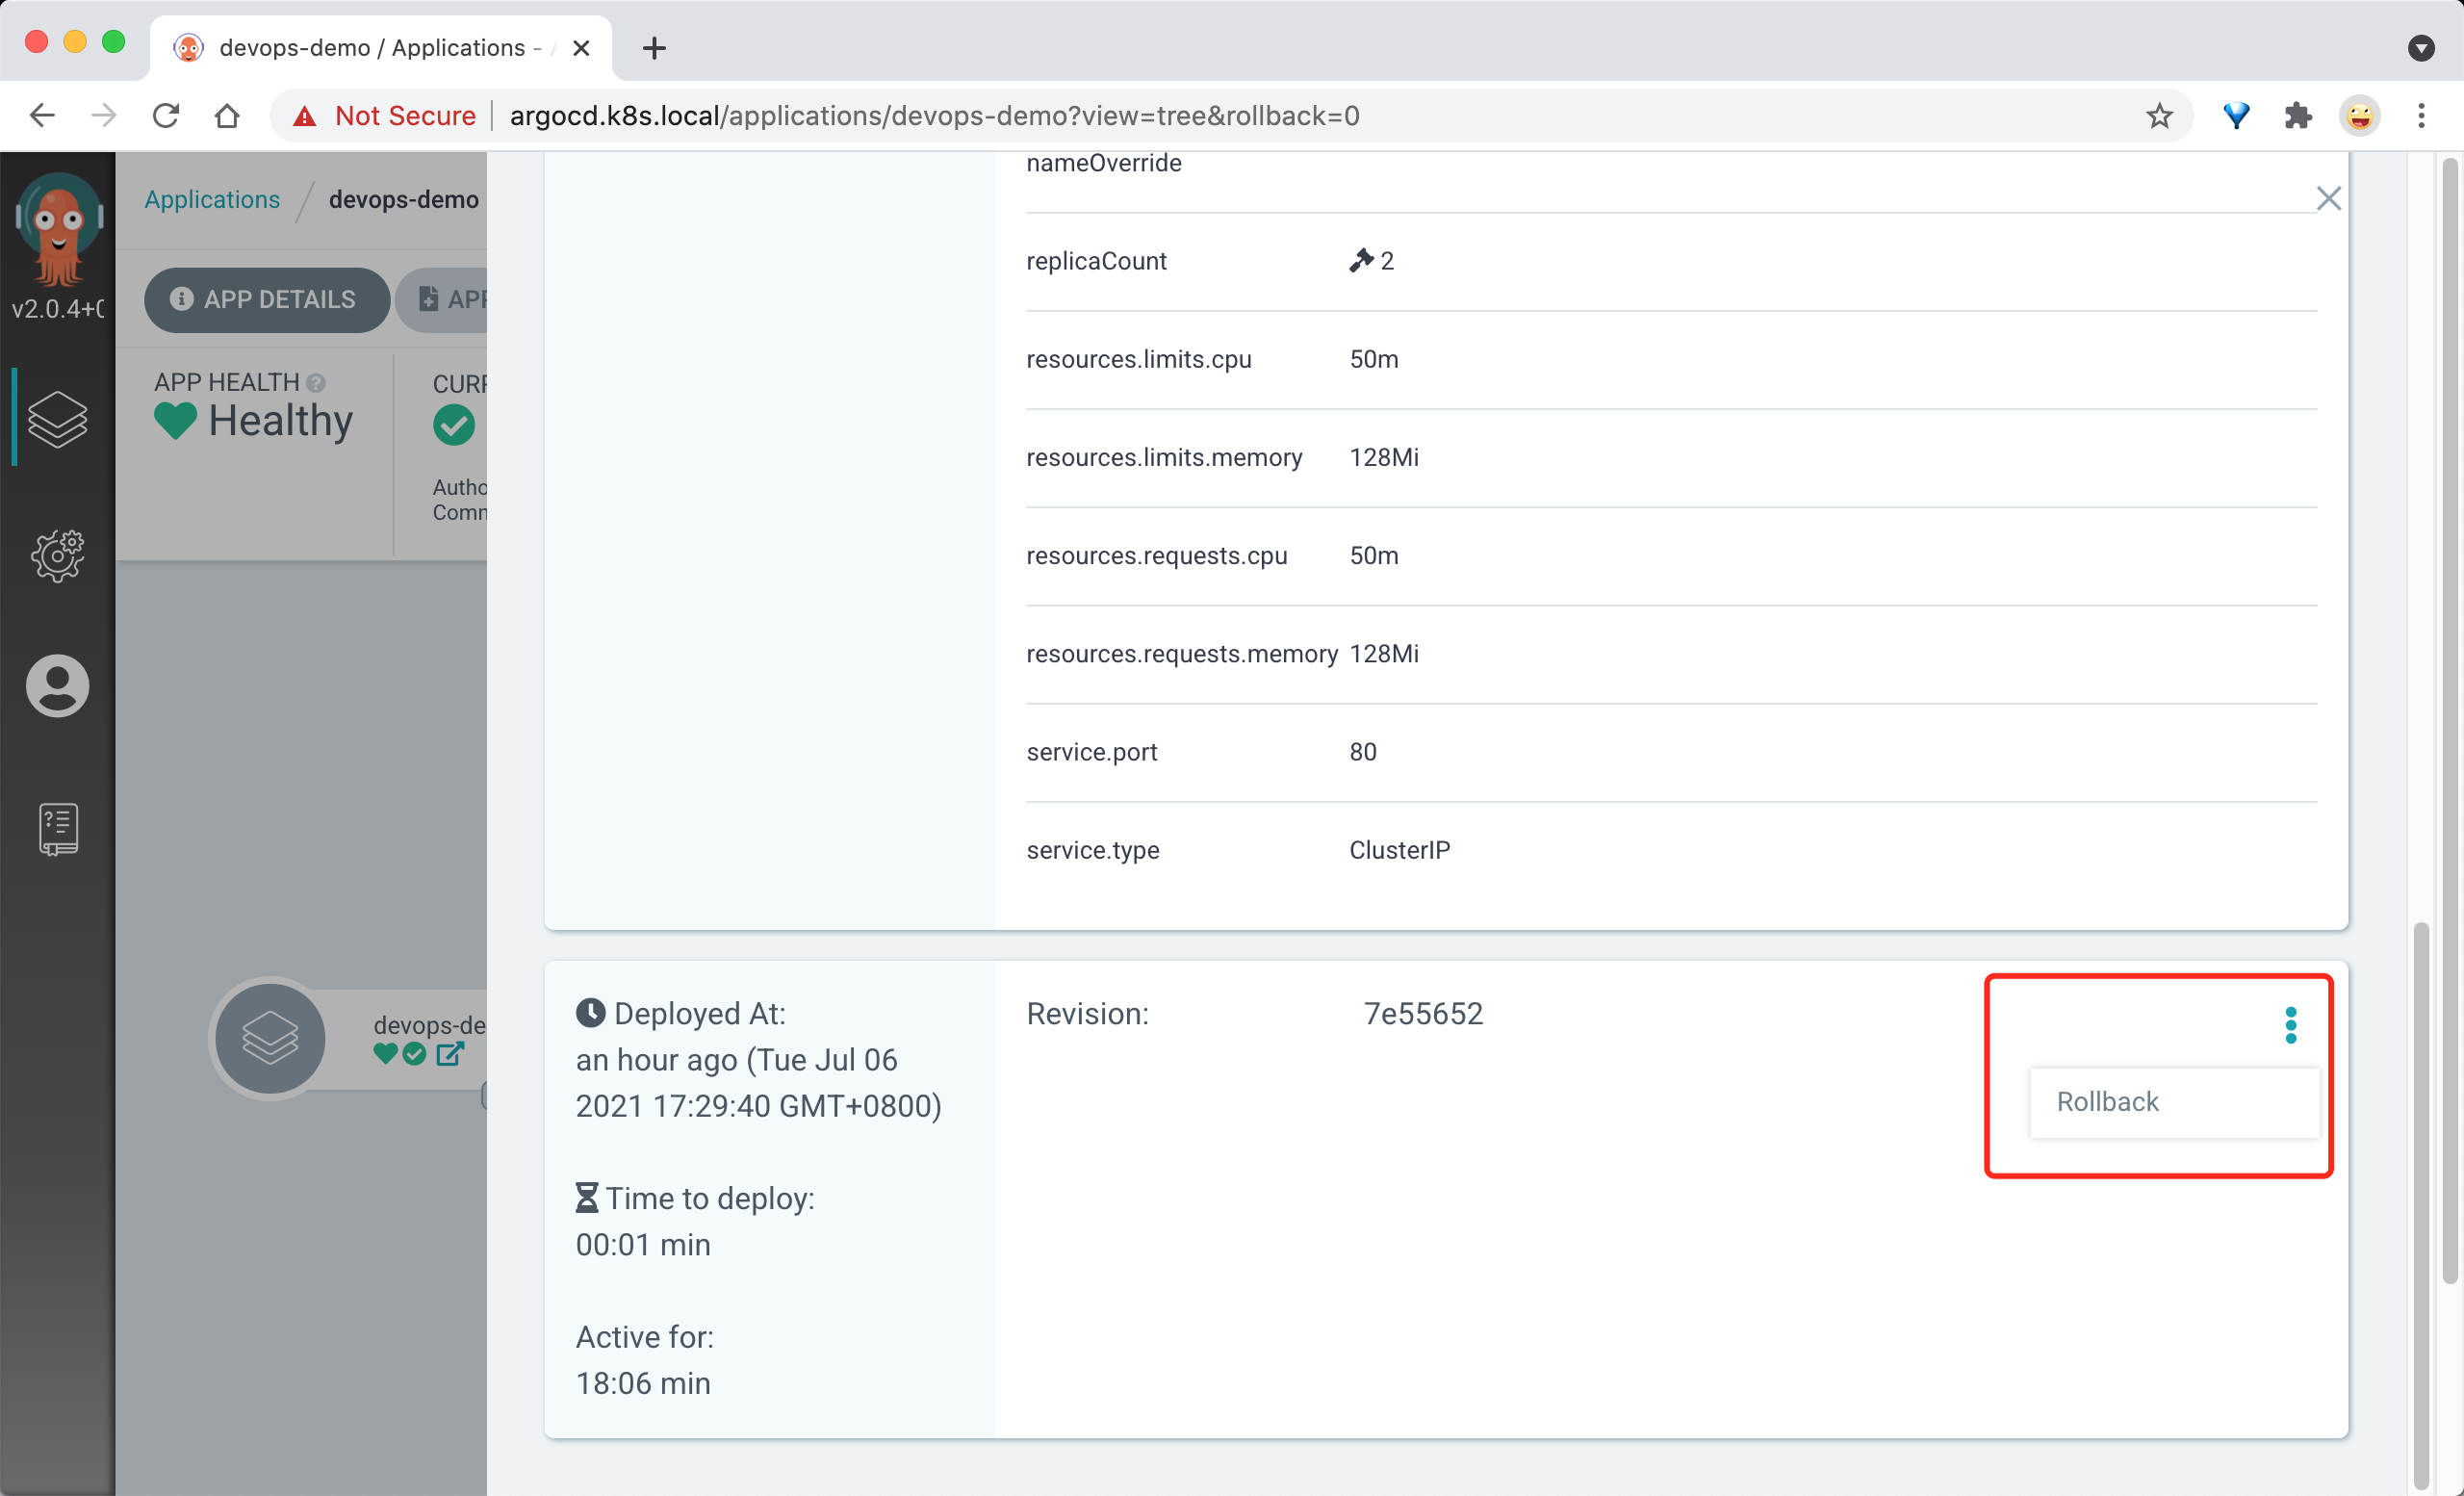
如果需要回滚,则可以直接在 Argo CD 页面上点击 HISTORY AND ROLLBACK 安装查看部署的历史记录选择回滚的版本即可:
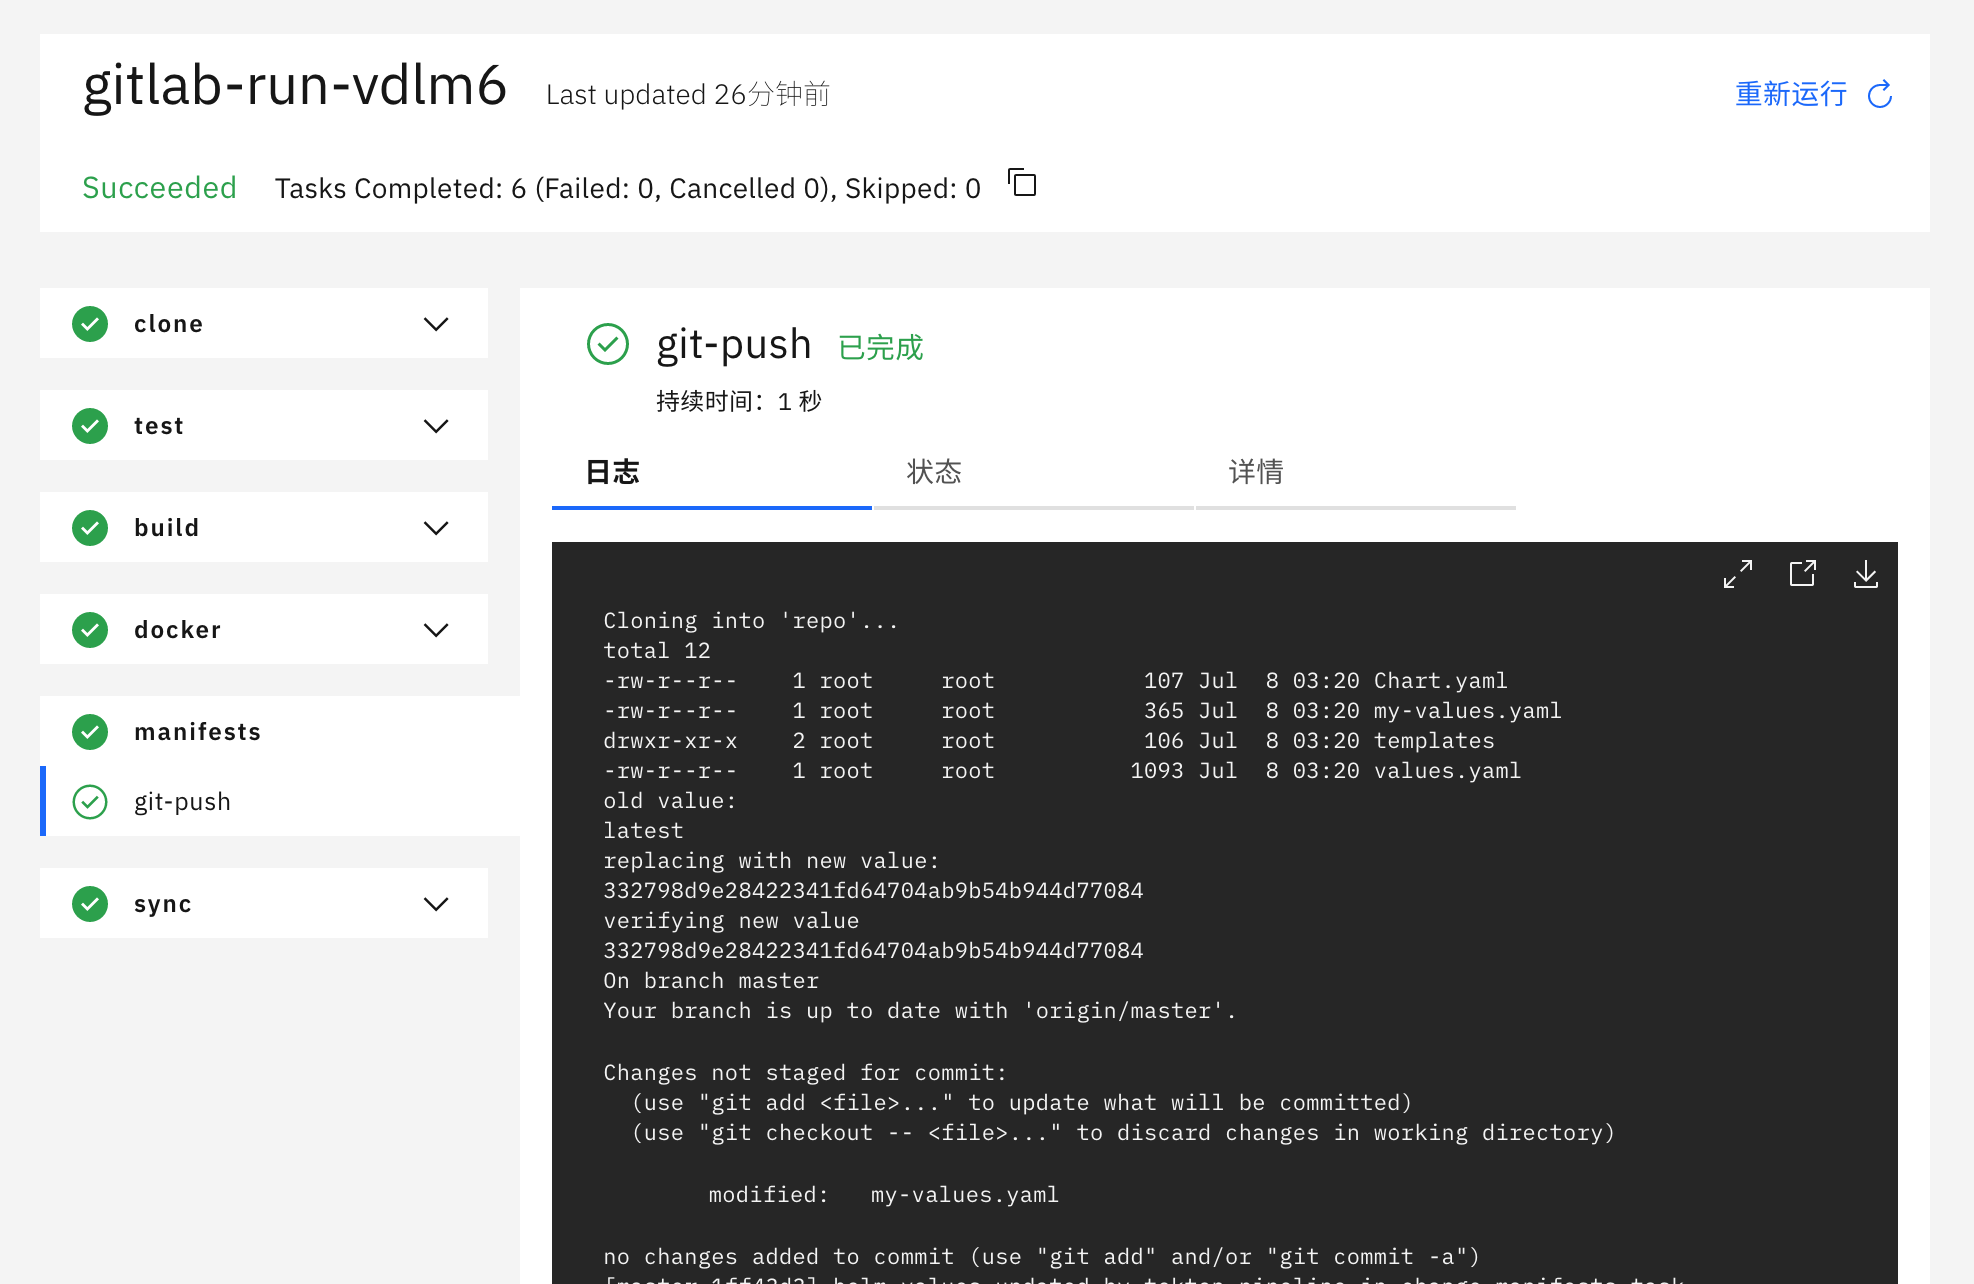
可以查看整个 Tekton 流水线的状态:
$ tkn pr describe gitlab-run-vdlm6
Name:              gitlab-run-vdlm6
Namespace:         default
Pipeline Ref:      pipeline
Service Account:   tekton-build-sa
Timeout:           1h0m0s
Labels:
 tekton.dev/pipeline=pipeline
 triggers.tekton.dev/eventlistener=gitlab-listener
 triggers.tekton.dev/trigger=gitlab-push-events-trigger
 triggers.tekton.dev/triggers-eventid=eeda9157-5eb3-4399-be4b-88955cb56764

🌡️  Status

STARTED         DURATION    STATUS
4 minutes ago   2 minutes   Succeeded

📦 Resources

 No resources

⚓ Params

 NAME              VALUE
 ∙ git_url         http://git.k8s.local/course/devops-demo.git
 ∙ git_infra_url   git.k8s.local/course/devops-demo-deploy.git
 ∙ image           harbor.k8s.local/course/devops-demo
 ∙ image_tag       332798d9e28422341fd64704ab9b54b944d77084
 ∙ argocd_url      argocd.k8s.local
 ∙ argocd_secret   argocd-auth
 ∙ app_name        devops-demo

📝 Results

 No results

📂 Workspaces

 NAME            SUB PATH   WORKSPACE BINDING
 ∙ go-repo-pvc   ---        PersistentVolumeClaim (claimName=go-repo-pvc)

🗂  Taskruns

 NAME                                 TASK NAME   STARTED         DURATION     STATUS
 ∙ gitlab-run-vdlm6-sync-svmxl        sync        3 minutes ago   42 seconds   Succeeded
 ∙ gitlab-run-vdlm6-manifests-d297d   manifests   3 minutes ago   26 seconds   Succeeded
 ∙ gitlab-run-vdlm6-docker-g2tqx      docker      4 minutes ago   48 seconds   Succeeded
 ∙ gitlab-run-vdlm6-build-mkcrd       build       4 minutes ago   9 seconds    Succeeded
 ∙ gitlab-run-vdlm6-test-gjr4c        test        4 minutes ago   4 seconds    Succeeded
 ∙ gitlab-run-vdlm6-clone-57vpw       clone       4 minutes ago   8 seconds    Succeeded
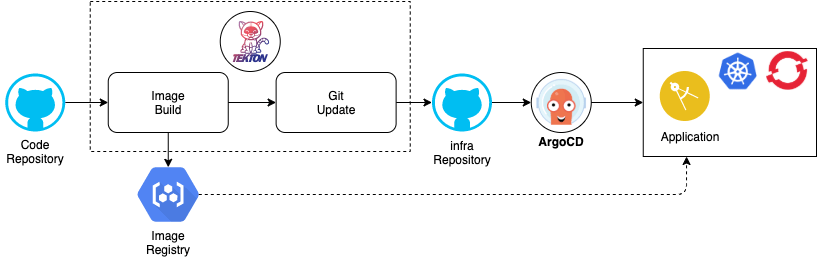
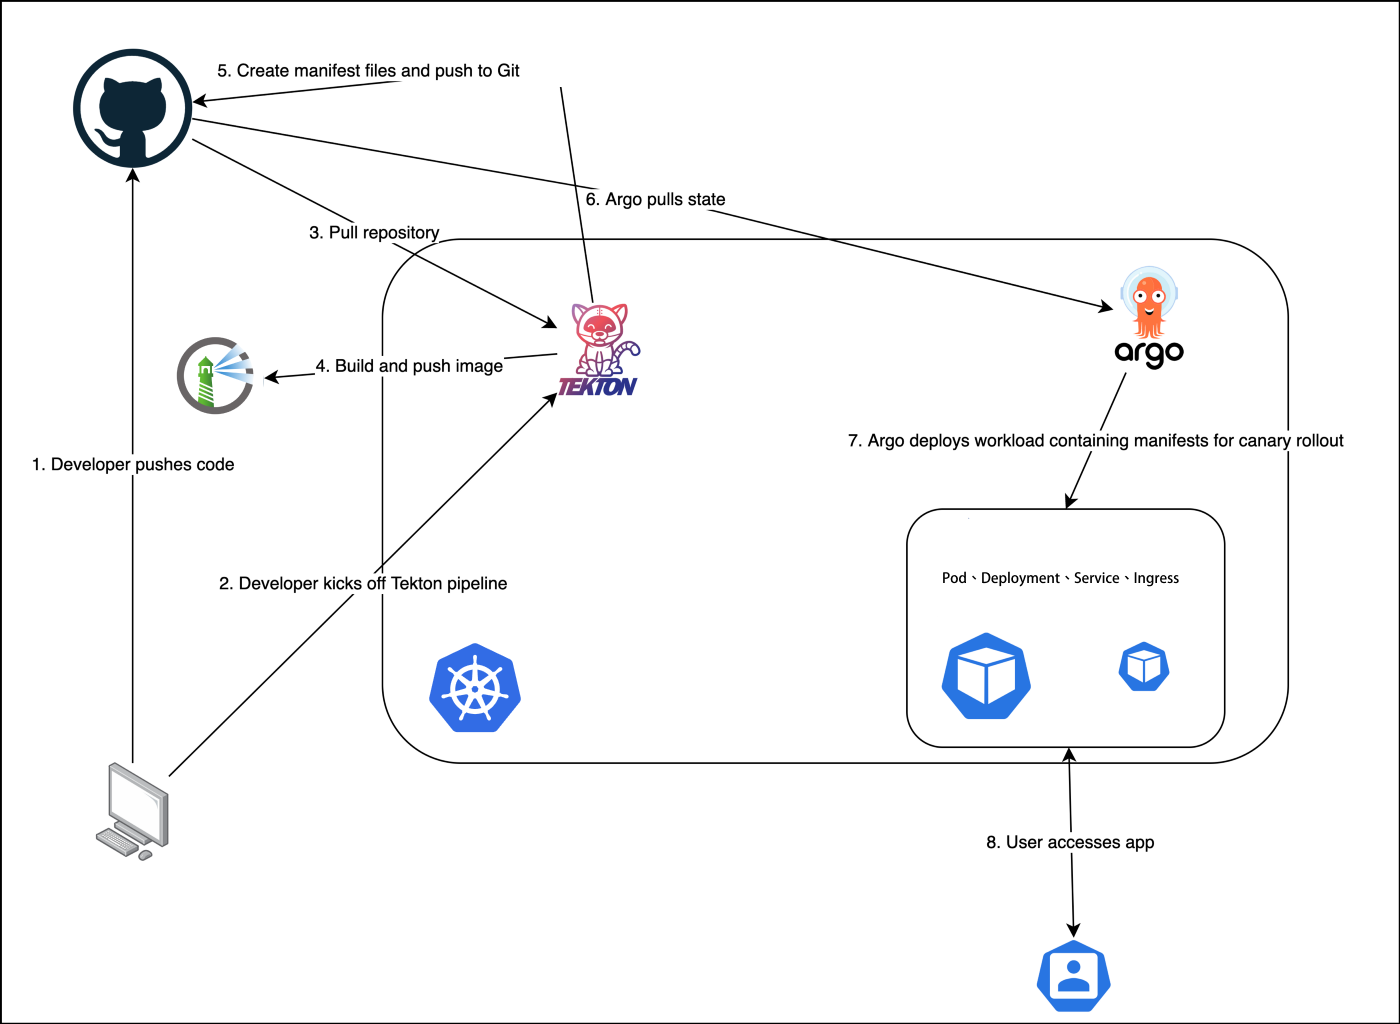
最后用一张图来总结下我们使用 Tekton 结合 Argo CD 来实现 GitOps 的工作流:
webhook 配置
我们知道 Argo CD 会自动检查到配置的应用变化,这是因为 Argo CD 会每个三分钟去轮询一次 Git 存储库来检测清单的变化,为了消除这种轮询延迟,我们也可以将 API 服务端配置为接收 webhook 事件的方式,这样就能实时获取到 Git 存储库中的变化了。Argo CD 支持来着 GitHub、GitLab、Bitbucket、Bitbucket Server 和 Gogs 的 Git webhook 事件,这里我们仍然以上面的 GitLab 为例来说明如果配置 Webhook。
进入到 GitLab 项目仓库 http://git.k8s.local/course/devops-demo-deploy 中配置 Webhooks:
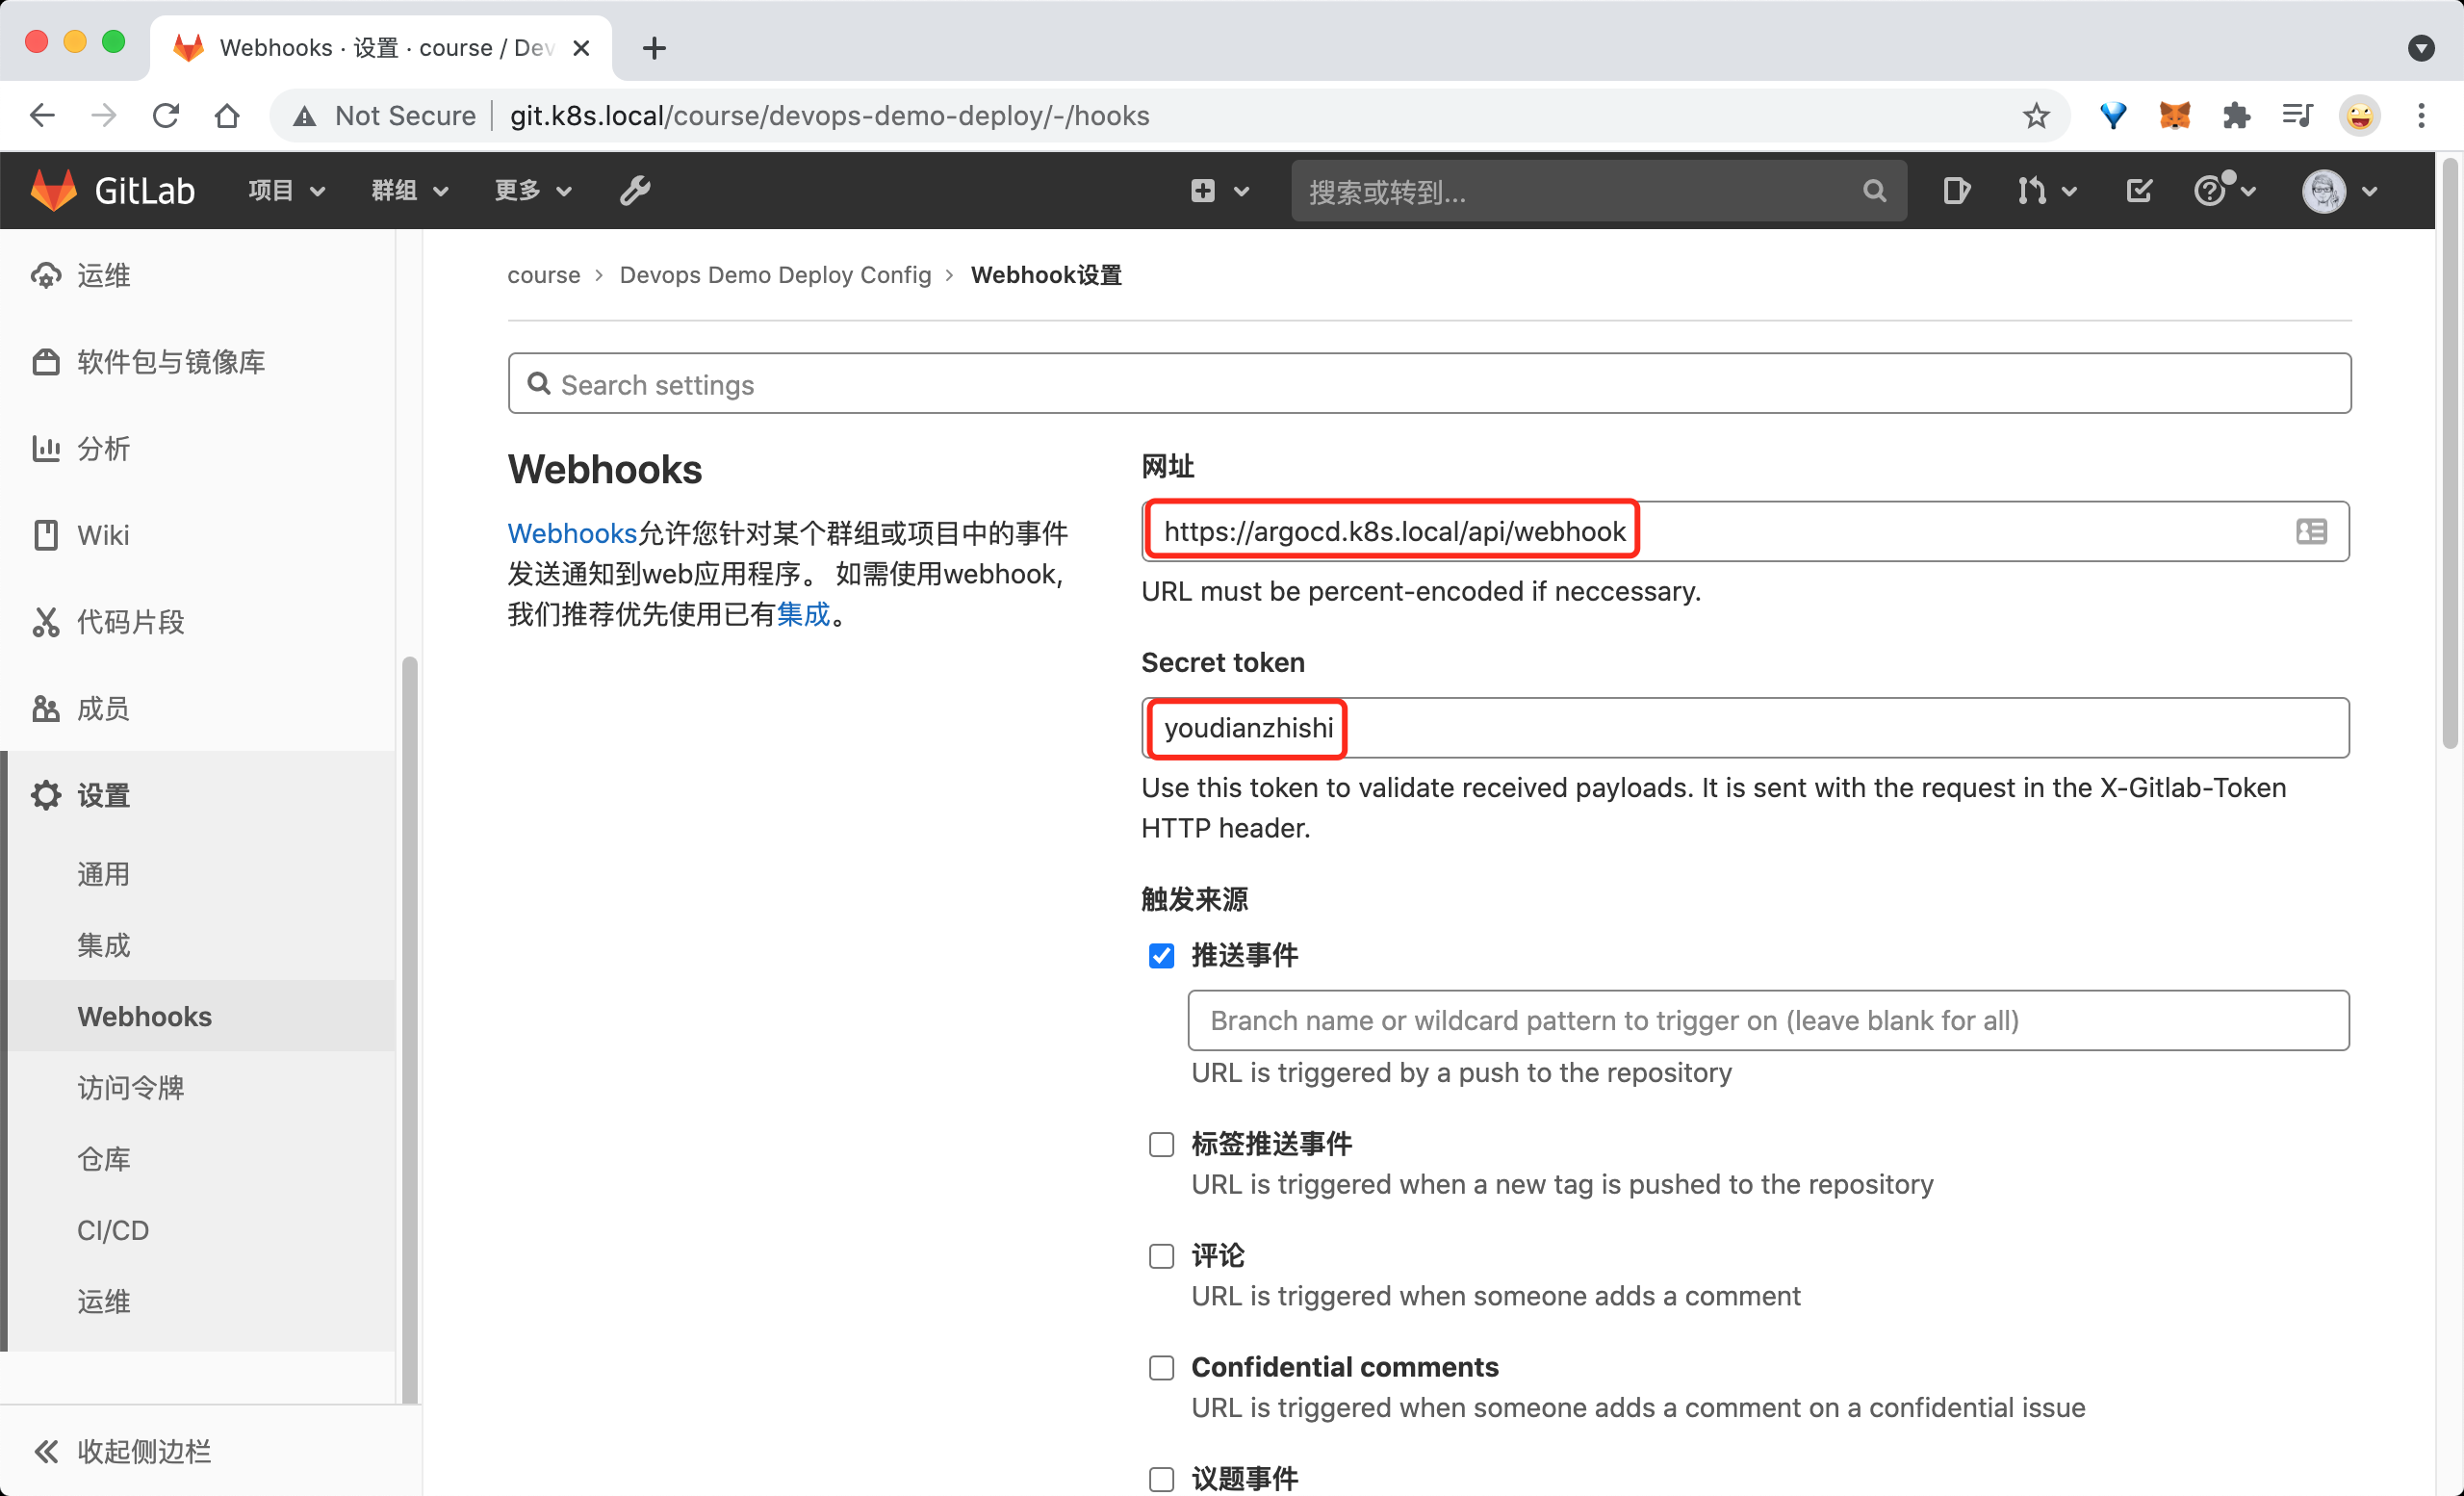
Webhook 的地址填写 Argo CD 的 API 接口地址 http://argocd.k8s.local/api/webhook,下面的 Secret token 是可选的,建议添加上,任意定义即可。另外需要注意这里我们使用的是自签名的 https 证书,所以需要在下方去掉 启用SSL验证。
然后需要将上面配置的 Secret token 添加到 Argo CD 的 Secret 配置中:
➜  ~ kubectl edit secret argocd-secret -n argocd
apiVersion: v1
kind: Secret
metadata:
  name: argocd-secret
  namespace: argocd
type: Opaque
data:
...
stringData:
  # gitlab webhook secret
  webhook.gitlab.secret: youdianzhishi
保存后,更改会自动生效,我们可以在 GitLab 这边测试配置的 Webhook,查看 Argo CD 的 API 服务 Pod 日志,正常就可以收到 Push 事件了:
➜  ~ kubectl logs -f argocd-server-5cc96b75b4-zws2c -n argocd
time="2021-07-08T07:15:32Z" level=info msg="finished streaming call with code OK" grpc.code=OK grpc.method=Watch grpc.service=application.ApplicationService grpc.start_time="2021-07-08T07:15:01Z" grpc.time_ms=31314.16 span.kind=server system=grpc
time="2021-07-08T07:15:37Z" level=info msg="Received push event repo: http://git.k8s.local/course/devops-demo-deploy, revision: master, touchedHead: true"
time="2021-07-08T07:15:37Z" level=info msg="Requested app 'devops-demo' refresh"
Metrics 指标
Argo CD 作为我们持续部署的关键组件,对于本身的监控也是非常有必要的,Argo CD 本身暴露了两组 Prometheus 指标,所以我们可以很方便对接监控报警。
默认情况下 Metrics 指标通过端点 argocd-metrics:8082/metrics 获取指标,包括:
- 应用健康状态指标
- 应用同步状态指标
- 应用同步历史记录
关于 Argo CD 的 API 服务的 API 请求和响应相关的指标(请求数、响应码值等等...)通过端点 argocd-server-metrics:8083/metrics 获取。
然后可以根据我们自己的需求来配置指标抓取任务,比如我们是手动维护 Prometheus 的方式,并且开启了 endpoints 这种类型的服务自动发现,那么我们可以在几个指标的 Service 上添加 prometheus.io/scrape: "true" 这样的 annotation:
➜  ~ kubectl edit svc argocd-metrics -n argocd
apiVersion: v1
kind: Service
metadata:
  annotations:
    kubectl.kubernetes.io/last-applied-configuration: |
      {"apiVersion":"v1","kind":"Service","metadata":{"annotations":{},"labels":{"app.kubernetes.io/component":"metrics","app.kubernetes.io/name":"argocd-metrics","app.kubernetes.io/part-of":"argocd"},"name":"argocd-metrics","namespace":"argocd"},"spec":{"ports":[{"name":"metrics","port":8082,"protocol":"TCP","targetPort":8082}],"selector":{"app.kubernetes.io/name":"argocd-application-controller"}}}
    prometheus.io/scrape: "true"
  creationTimestamp: "2021-07-03T06:16:47Z"
  labels:
    app.kubernetes.io/component: metrics
    app.kubernetes.io/name: argocd-metrics
    app.kubernetes.io/part-of: argocd
......
➜  ~ kubectl edit svc argocd-server-metrics -n argocd
apiVersion: v1
kind: Service
metadata:
  annotations:
    kubectl.kubernetes.io/last-applied-configuration: |
      {"apiVersion":"v1","kind":"Service","metadata":{"annotations":{},"labels":{"app.kubernetes.io/component":"server","app.kubernetes.io/name":"argocd-server-metrics","app.kubernetes.io/part-of":"argocd"},"name":"argocd-server-metrics","namespace":"argocd"},"spec":{"ports":[{"name":"metrics","port":8083,"protocol":"TCP","targetPort":8083}],"selector":{"app.kubernetes.io/name":"argocd-server"}}}
    prometheus.io/scrape: "true"
    prometheus.io/port: "8083"  # 指定8084端口为指标端口
  creationTimestamp: "2021-07-03T06:16:47Z"
  labels:
    app.kubernetes.io/component: server
    app.kubernetes.io/name: argocd-server-metrics
    app.kubernetes.io/part-of: argocd
......
➜  ~ kubectl edit svc argocd-repo-server -n argocd
apiVersion: v1
kind: Service
metadata:
  annotations:
    kubectl.kubernetes.io/last-applied-configuration: |
      {"apiVersion":"v1","kind":"Service","metadata":{"annotations":{},"labels":{"app.kubernetes.io/component":"repo-server","app.kubernetes.io/name":"argocd-repo-server","app.kubernetes.io/part-of":"argocd"},"name":"argocd-repo-server","namespace":"argocd"},"spec":{"ports":[{"name":"server","port":8081,"protocol":"TCP","targetPort":8081},{"name":"metrics","port":8084,"protocol":"TCP","targetPort":8084}],"selector":{"app.kubernetes.io/name":"argocd-repo-server"}}}
    prometheus.io/scrape: "true"
    prometheus.io/port: "8084"  # 指定8084端口为指标端口
  creationTimestamp: "2021-07-03T06:16:47Z"
  labels:
    app.kubernetes.io/component: repo-server
    app.kubernetes.io/name: argocd-repo-server
    app.kubernetes.io/part-of: argocd
......
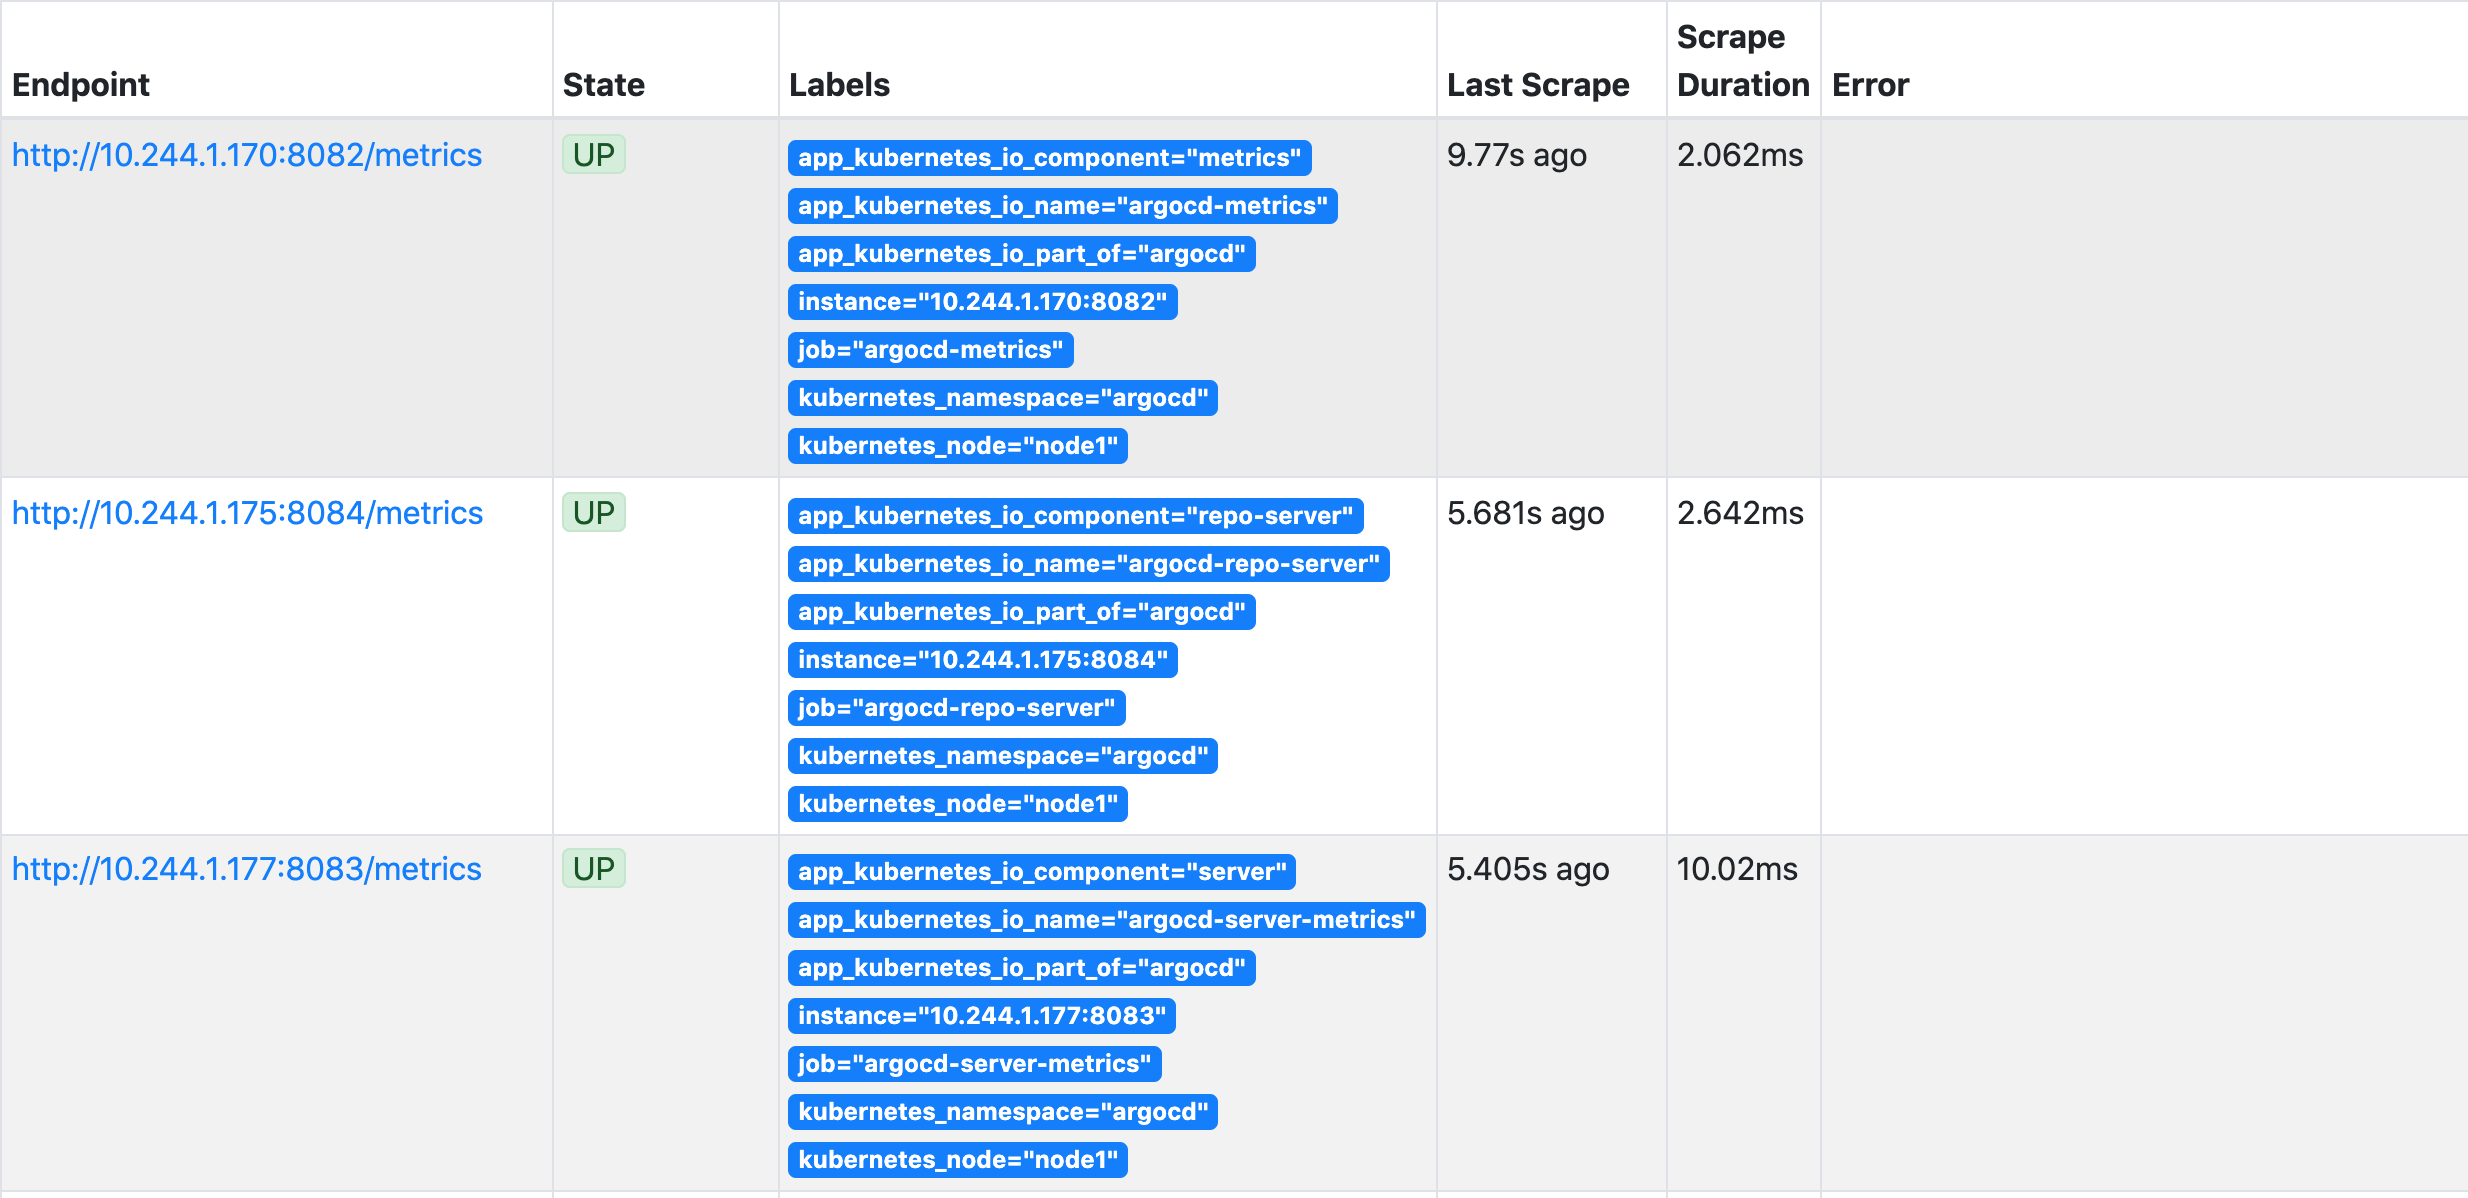
配置完成后正常就可以自动发现上面的几个指标任务了:
如果你使用的是 Prometheus Operator 方式,则可以手动创建 ServiceMonitor 对象来创建指标对象。
然后我们可以在 Grafana 中导入 Argo CD 的 Dashboard,地址:https://github.com/argoproj/argo-cd/blob/master/examples/dashboard.json

消息通知
上面我们配置了 Argo CD 的监控指标,我们可以通过 AlertManager 来进行报警,但是有的时候我们可能希望将应用同步的状态发送到指定的渠道,这样方便我们了解部署流水线的结果,Argo CD 本身并没有提供内置的同步状态通知功能,但是我们可以与第三方的系统进行集成。
- ArgoCD Notifications - Argo CD 通知系统,持续监控 Argo CD 应用程序,旨在与各种通知服务集成,例如 Slack、SMTP、Telegram、Discord 等。
- Argo Kube Notifier - 通用 Kubernetes 资源控制器,允许监控任何 Kubernetes 资源并在满足配置的规则时发送通知。
- Kube Watch - 可以向 Slack/hipchat/mattermost/flock 频道发布通知,它监视集群中的资源变更并通过 webhook 通知它们。
我们知道 Argo CD 本身是提供 resource hook 功能的,在资源同步前、中、后提供脚本来执行相应的动作, 那么想在资源同步后获取应用的状态,然后根据状态进行通知就非常简单了,通知可以是很简单的 curl 命令:
- PreSync: 在同步之前执行相关操作,这个一般用于比如数据库操作等
- Sync: 同步时执行相关操作,主要用于复杂应用的编排
- PostSync: 同步之后且app状态为health执行相关操作
- SyncFail: 同步失败后执行相关操作,同步失败一般不常见
但是对于 PostSync 可以发送成功的通知,但对于状态为 Processing 的无法判断,而且通知还是没有办法做到谁执行的 pipeline 谁接收通知的原则,没有办法很好地进行更细粒度的配置。ArgoCD Notifications 就可以来解决我们的问题,这里我们就以 ArgoCD Notifications 为例来说明如何使用钉钉来通知 Argo CD 的同步状态通知。
首先下载 ArgoCD Notifications 官方安装资源清单:
➜ ~ wget https://raw.githubusercontent.com/argoproj-labs/argocd-notifications/stable/manifests/install.yaml
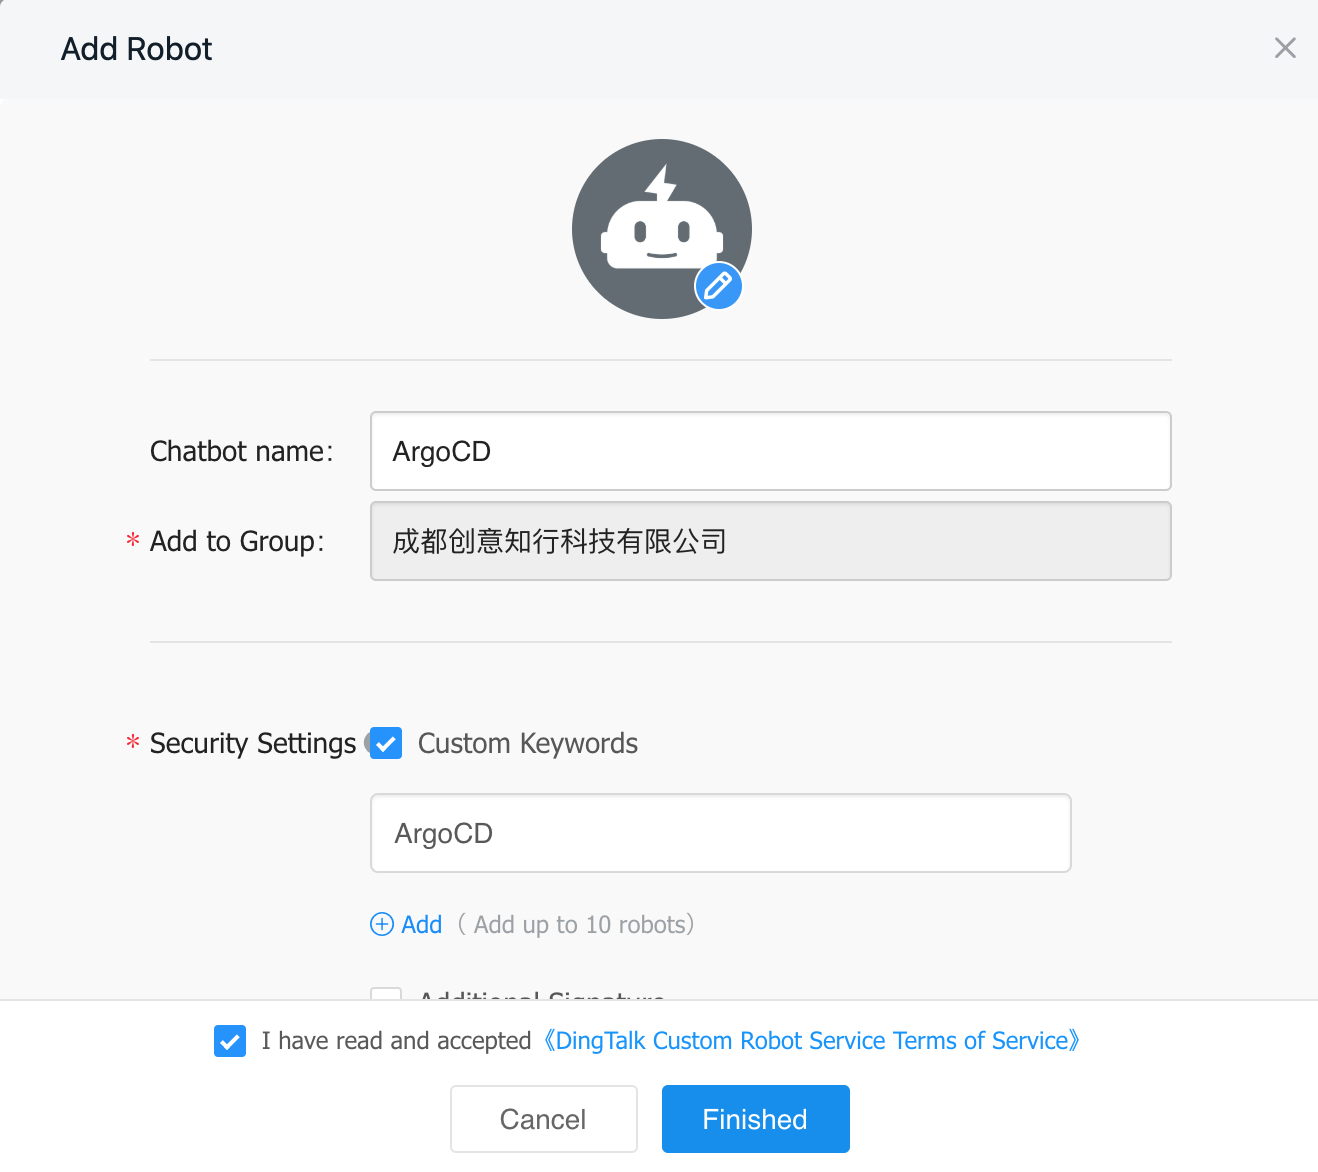
然后我们需要在钉钉群中创建一个机器人,现在的机器人安全认证有几种方式,这里我们就选择关键字的方式,配置包含 ArgoCD 关键字的机器人:
然后我们需要修改 install.yaml 文件中的 argocd-notifications-cm 添加相关配置才能支持钉钉。
apiVersion: v1
kind: ConfigMap
metadata:
  name: argocd-notifications-cm
data:
  service.webhook.dingtalk: |
    url: https://oapi.dingtalk.com/robot/send?access_token=31429a8a66c8cd5beb7c4295ce592ac3221c47152085da006dd4556390d4d7e0
    headers:
      - name: Content-Type
        value: application/json
  context: |
    argocdUrl: http://argocd.k8s.local
  template.app-sync-change: |
    webhook:
      dingtalk:
        method: POST
        body: |
          {
                "msgtype": "markdown",
                "markdown": {
                    "title":"ArgoCD同步状态",
                    "text": "### ArgoCD同步状态\n> - app名称: {{.app.metadata.name}}\n> - app同步状态: {{ .app.status.operationState.phase}}\n> - 时间:{{.app.status.operationState.startedAt}}\n> - URL: [点击跳转ArgoCD]({{.context.argocdUrl}}/applications/{{.app.metadata.name}}?operation=true) \n"
                }
            }
  trigger.on-deployed: |
    - description: Application is synced and healthy. Triggered once per commit.
      oncePer: app.status.sync.revision
      send: [app-sync-change]  # template names
      # trigger condition
      when: app.status.operationState.phase in ['Succeeded'] and app.status.health.status == 'Healthy'
  trigger.on-health-degraded: |
    - description: Application has degraded
      send: [app-sync-change]
      when: app.status.health.status == 'Degraded'
  trigger.on-sync-failed: |
    - description: Application syncing has failed
      send: [app-sync-change]  # template names
      when: app.status.operationState.phase in ['Error', 'Failed']
  trigger.on-sync-running: |
    - description: Application is being synced
      send: [app-sync-change]  # template names
      when: app.status.operationState.phase in ['Running']
  trigger.on-sync-status-unknown: |
    - description: Application status is 'Unknown'
      send: [app-sync-change]  # template names
      when: app.status.sync.status == 'Unknown'
  trigger.on-sync-succeeded: |
    - description: Application syncing has succeeded
      send: [app-sync-change]  # template names
      when: app.status.operationState.phase in ['Succeeded']
  subscriptions: |
    - recipients: [dingtalk]  # 可能有bug,正常应该是webhook:dingtalk
      triggers: [on-sync-running, on-deployed, on-sync-failed, on-sync-succeeded]
其中 argocd-notifications-cm 中添加了一段如下所示的配置:
subscriptions: |
  - recipients: [dingtalk]
    triggers: [on-sync-running, on-deployed, on-sync-failed, on-sync-succeeded]
这个是为定义的触发器添加通知订阅,正常这里的 recipients 是 webhook:dingtalk,不知道是否是因为该版本有 bug,需要去掉前缀才能正常使用。
此外还可以添加一些条件判断,如下所示:
subscriptions:
# global subscription for all type of notifications
- recipients:
  - slack:test1
  - webhook:github
# subscription for on-sync-status-unknown trigger notifications
- recipients:
  - slack:test2
  - email:test@gmail.com
  trigger: on-sync-status-unknown
# global subscription restricted to applications with matching labels only
- recipients:
  - slack:test3
  selector: test=true
然后可以根据不同的状态来配置不同的触发器,如下所示:
trigger.on-sync-status-unknown: |
  - description: Application status is 'Unknown'
    send: [app-sync-change]  # template names
    when: app.status.sync.status == 'Unknown'
该触发器定义包括名称、条件和通知模板引用:
- send:表示通知内容使用的模板名称
- description:当前触发器的描述信息
- when:条件表达式,如果应发送通知,则返回 true
然后下面就是配置发送的消息通知模板:
template.app-sync-change: |
  webhook:
    dingtalk:
      method: POST
      body: |
        {
              "msgtype": "markdown",
              "markdown": {
                  "title":"ArgoCD同步状态",
                  "text": "### ArgoCD同步状态\n> - app名称: {{.app.metadata.name}}\n> - app同步状态: {{ .app.status.operationState.phase}}\n> - 时间:{{.app.status.operationState.startedAt}}\n> - URL: [点击跳转ArgoCD]({{.context.argocdUrl}}/applications/{{.app.metadata.name}}?operation=true) \n"
              }
          }
该模板用于生成通知内容,该模板利用 Golang 中的 html/template 包定义,允许定义通知标题和正文,可以重用,并且可以由多个触发器引用。每个模板默认都可以访问以下字段:
app:保存应用程序对象context:是用户定义的字符串映射,可能包含任何字符串键和值notificationType保留通知服务类型名称,该字段可用于有条件地呈现服务特定字段
然后记得使用钉钉机器人的 webhook 地址替换掉上面的 argocd-notifications-secret 中的 url 地址。
配置完成后直接创建整个资源清单文件:
➜  ~ kubectl apply -f install.yaml
➜  ~ kubectl get pods -n argocd
NAME                                               READY   STATUS    RESTARTS   AGE
argocd-application-controller-0                    1/1     Running   0          5d4h
argocd-dex-server-76ff776f97-ds7mm                 1/1     Running   0          5d4h
argocd-notifications-controller-5c548f8dc9-dx824   1/1     Running   0          9m22s
argocd-redis-747b678f89-w99wf                      1/1     Running   0          5d4h
argocd-repo-server-6fc4456c89-586zl                1/1     Running   0          5d4h
argocd-server-5cc96b75b4-zws2c                     1/1     Running   0          4d22h
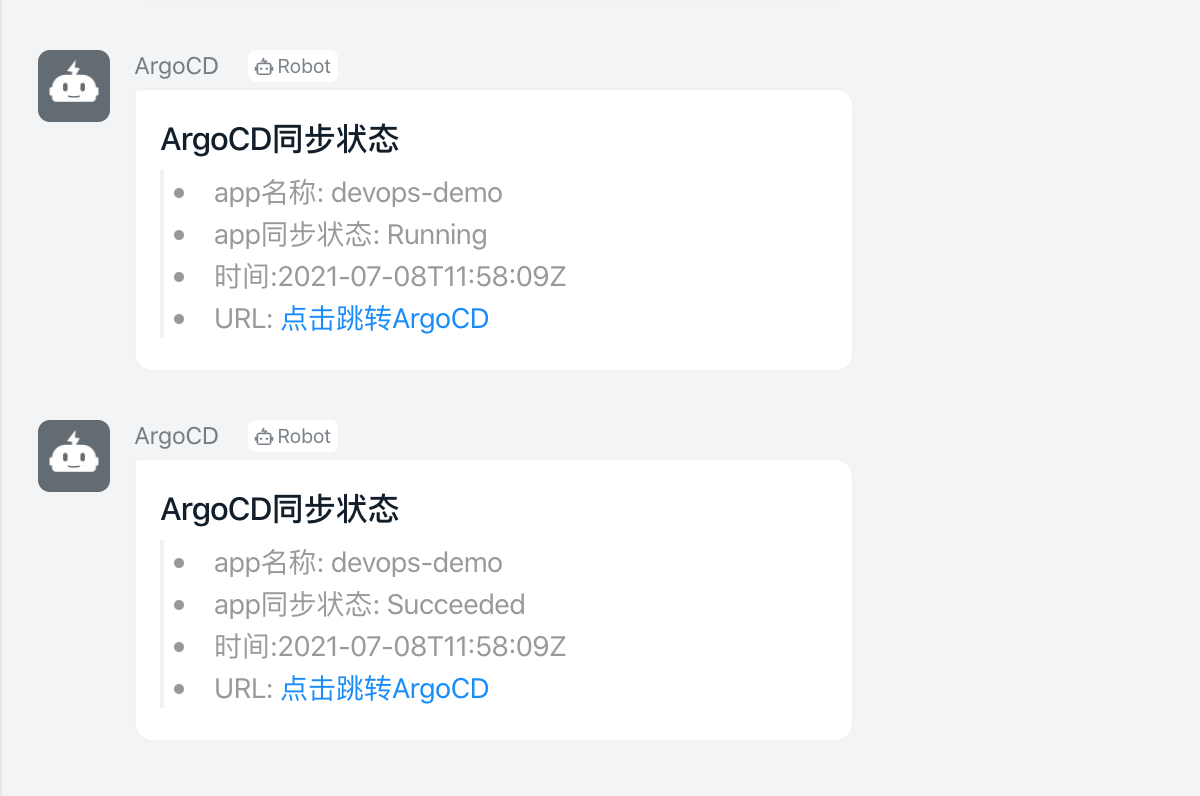
安装完成后重新去修改下应用代码触发整个 GitOps 流水线,正常就可以在钉钉中收到如下所示的消息通知了,如果没有正常收到消息,可以通过 argocd-notifications 的 CLI 命令进行调试:
➜  ~ kubectl exec -it argocd-notifications-controller-5c548f8dc9-dtq7h -n argocd -- /app/argocd-notifications template notify app-sync-change guestbook --recipient dingtalk
DEBU[0000] Sending request: POST /robot/send?access_token=31429a8a66c8cd5beb7c4295ce592ac3221c47152085da006dd4556390d4d7e0 HTTP/1.1
Host: oapi.dingtalk.com
Content-Type: application/json

{
      "msgtype": "markdown",
      "markdown": {
          "title":"ArgoCD同步状态",
          "text": "### ArgoCD同步状态\n> - app名称: guestbook\n> - app同步状态: Succeeded\n> - 时间:2021-07-03T12:53:44Z\n> - URL: [点击跳转ArgoCD](http://argocd.k8s.local/applications/guestbook?operation=true) \n"
      }
  }  service=dingtalk
DEBU[0000] Received response: HTTP/2.0 200 OK
Cache-Control: no-cache
Content-Type: application/json
Date: Thu, 08 Jul 2021 11:45:12 GMT
Server: Tengine

{"errcode":0,"errmsg":"ok"}  service=dingtalk
关于 ArgoCD Notification 的更多使用可以参考官方文档了解更多:https://argocd-notifications.readthedocs.io/en/stable/。