在最近的 Chrome 更新版本中,看到一个非常令人兴奋的功能,那就是内置 AI,旨在将 AI 模型(包括大语言模型)直接集成到浏览器中。在用户浏览器端侧就可以直接启动 Gemini Nano 模型,借助内置 AI,您的网站或 Web 应用可以执行 AI 赋能的任务,而无需部署或管理 自己的 AI 模型。
与自行实现设备端 AI 相比,内置 AI 具有以下优势:
- 部署简单:在分发模型时,浏览器会考虑设备的功能并管理模型的更新。这意味着,您无需负责通过网络下载或更新大型模型。您无需解决存储空间驱逐、运行时内存预算、提取费用和其他问题。
- 使用硬件加速:浏览器的 AI 运行时经过优化,可充分利用可用的硬件(无论是 GPU、NPU 还是回退到 CPU)。因此,您的应用可以在每部设备上实现最佳性能。
有了内置的 AI 方法,在设备上执行 AI 任务变得轻而易举,这带来了很多好处:
- 对敏感数据的本地处理:设备端 AI 可以提高您的隐私保护。例如,如果您处理敏感数据,则可以通过端到端加密向用户提供 AI 功能。
- 简洁的用户体验:在某些情况下,无需往返于服务器意味着您可以提供近乎即时的结果。设备端 AI 可以决定一项功能是否可行,以及用户体验是否理想。
- 更广泛地使用 AI:用户设备可以承担部分处理负载,以换取对更多功能的使用权限。例如,如果您提供高级 AI 功能,那么您可以使用设备端 AI 功能来预览这些功能,这样潜在客户才能看到您产品的优势,额外付费这种混合方法还有助于 尤其是在常用用户流中。
- 离线 AI 使用:即使没有连接到互联网,用户也可以使用 AI 功能。这意味着您的网站和 Web 应用可以按预期运行 或网络连接多变时。
内置 AI 可通过以下几种方式增强您的网站或 Web 应用:
- AI 增强的内容消费:包括摘要、翻译、回答关于某些内容、分类和特征的问题。
- AI 支持的内容创作:例如撰写协助、校对、语法更正和重新表述。
内置 AI API
内置 AI API 提供了一种简单的方法来访问设备上的 AI 模型,并处理结果,需要注意的是现阶段提供的 API 属于实验性阶段,可能会发生变化,主要包含以下几个 API:
Prompt API
通过此 API,我们可以将自然语言指令发送到 Chrome 中的 Gemini Nano 实例。
Summarization API
借助此 API,我们可以使用 内置 Gemini Nano,用于精简长视频内容等。 适用于以下场景:
- 会议转写概览(适用于较晚加入会议的人员)或那些错过了会议的用户。
- 有关客户关系的支持对话要点管理。
- 多条商品评价的摘要。
- 长篇文章中的要点,可帮助读者确定文章是否相关。
- 为文章生成标题草稿。
- 总结论坛中的问题,以帮助专家找到与其专业领域最相关的问题。
Language Detection API
借助此 API,我们可以使用内置的 Gemini Nano 来检测用户语言,言检测有多种使用场景:
- 确定未知的源语言,以便后续翻译,用户无需同时指定这两种语言。
- 为文本添加标签,以改善在线社交网络网站中屏幕阅读器的发音。
Writer API
借助此 API,我们可以使用内置的 Gemini Nano 来撰写协助、校对、语法更正和重新表述。
ReWriter API
借助此 API,我们可以使用内置的 Gemini Nano 来修改和重构文本。
配置
要在 Chrome 浏览器中使用内置 AI 能力,需要使用 Chrome Dev 或 Canary 版本,并确认版本号大于等于 128.0.6545.0,
要确保您至少有 22 GB 的可用存储空间,如果下载后可用存储空间低于 10 GB,模型将再次被删除。
这里我们推荐大家下载最新的 Canary 版本,下载地址:https://www.google.com/intl/en/chrome/canary/。

安装完成后直接打开即可。
首先要确保版本号大于等于 128.0.6545.0,可以通过 chrome://settings/help 查看。

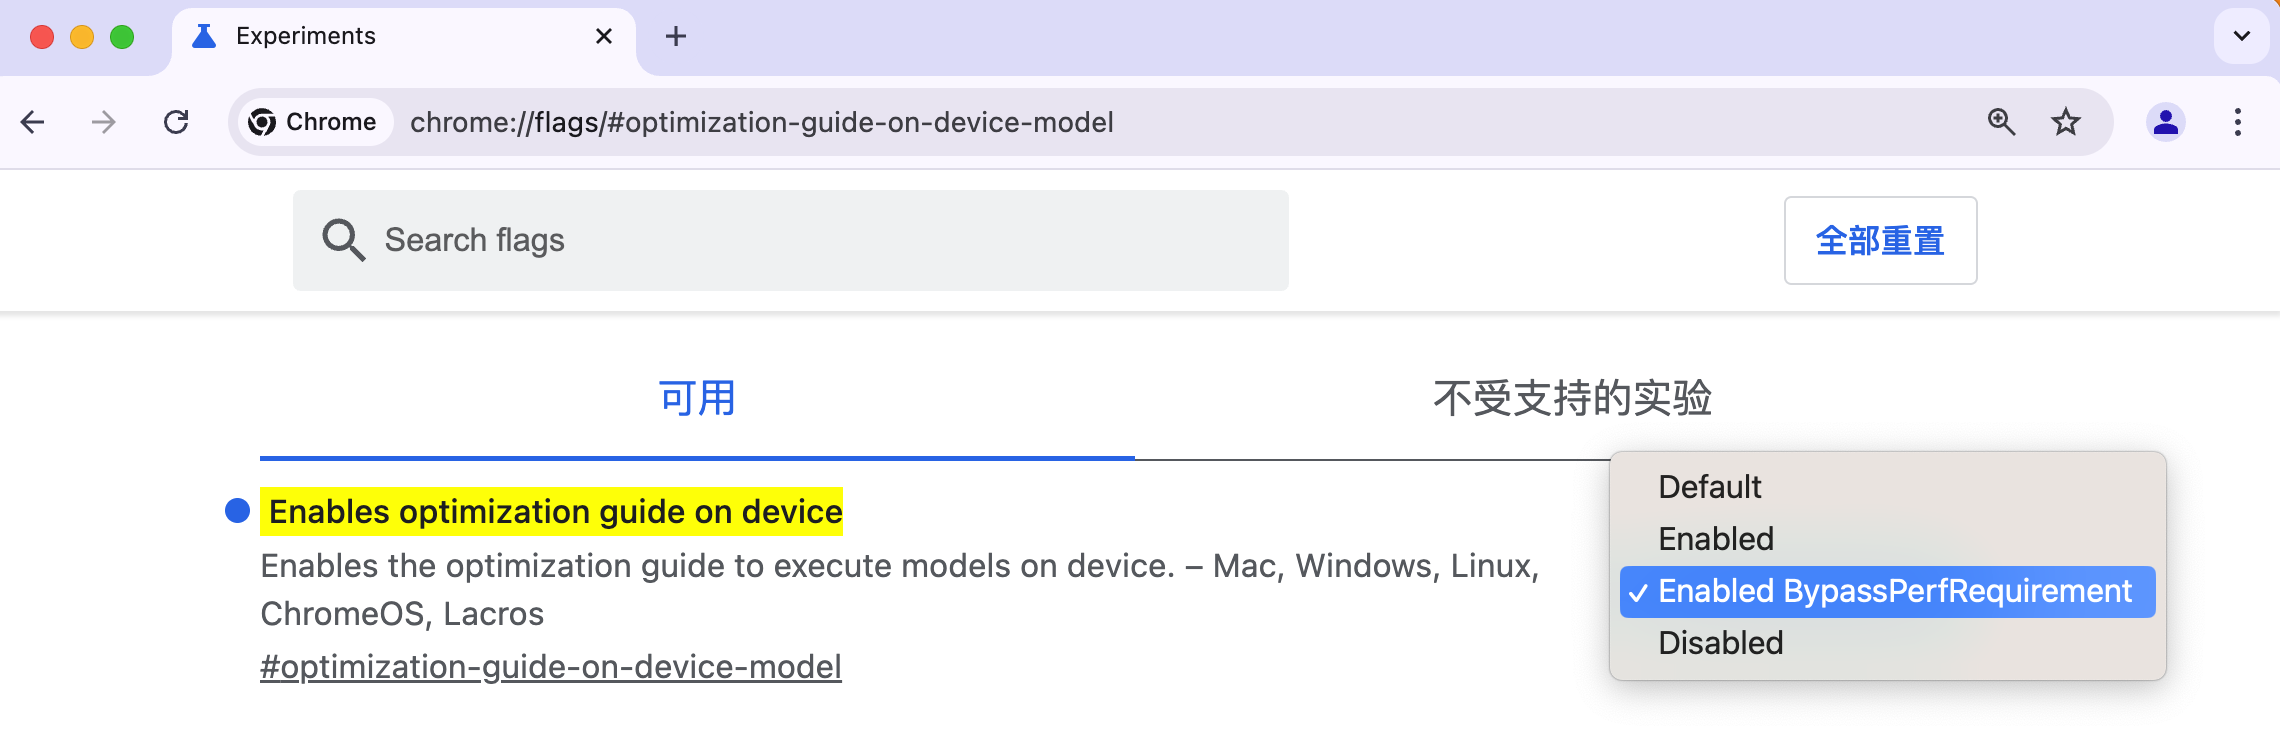
然后需要配置几个 flag 来启用 Gemini Nano 和 API 能力。
在 Chrome 中打开一个新选项卡,跳转到 chrome://flags/#optimization-guide-on-device-model,选择 Enabled BypassPerfRequirement,开启性能优化指南在设备上执行模型。
然后跳转到 chrome://flags/#prompt-api-for-gemini-nano,选择 Enabled。
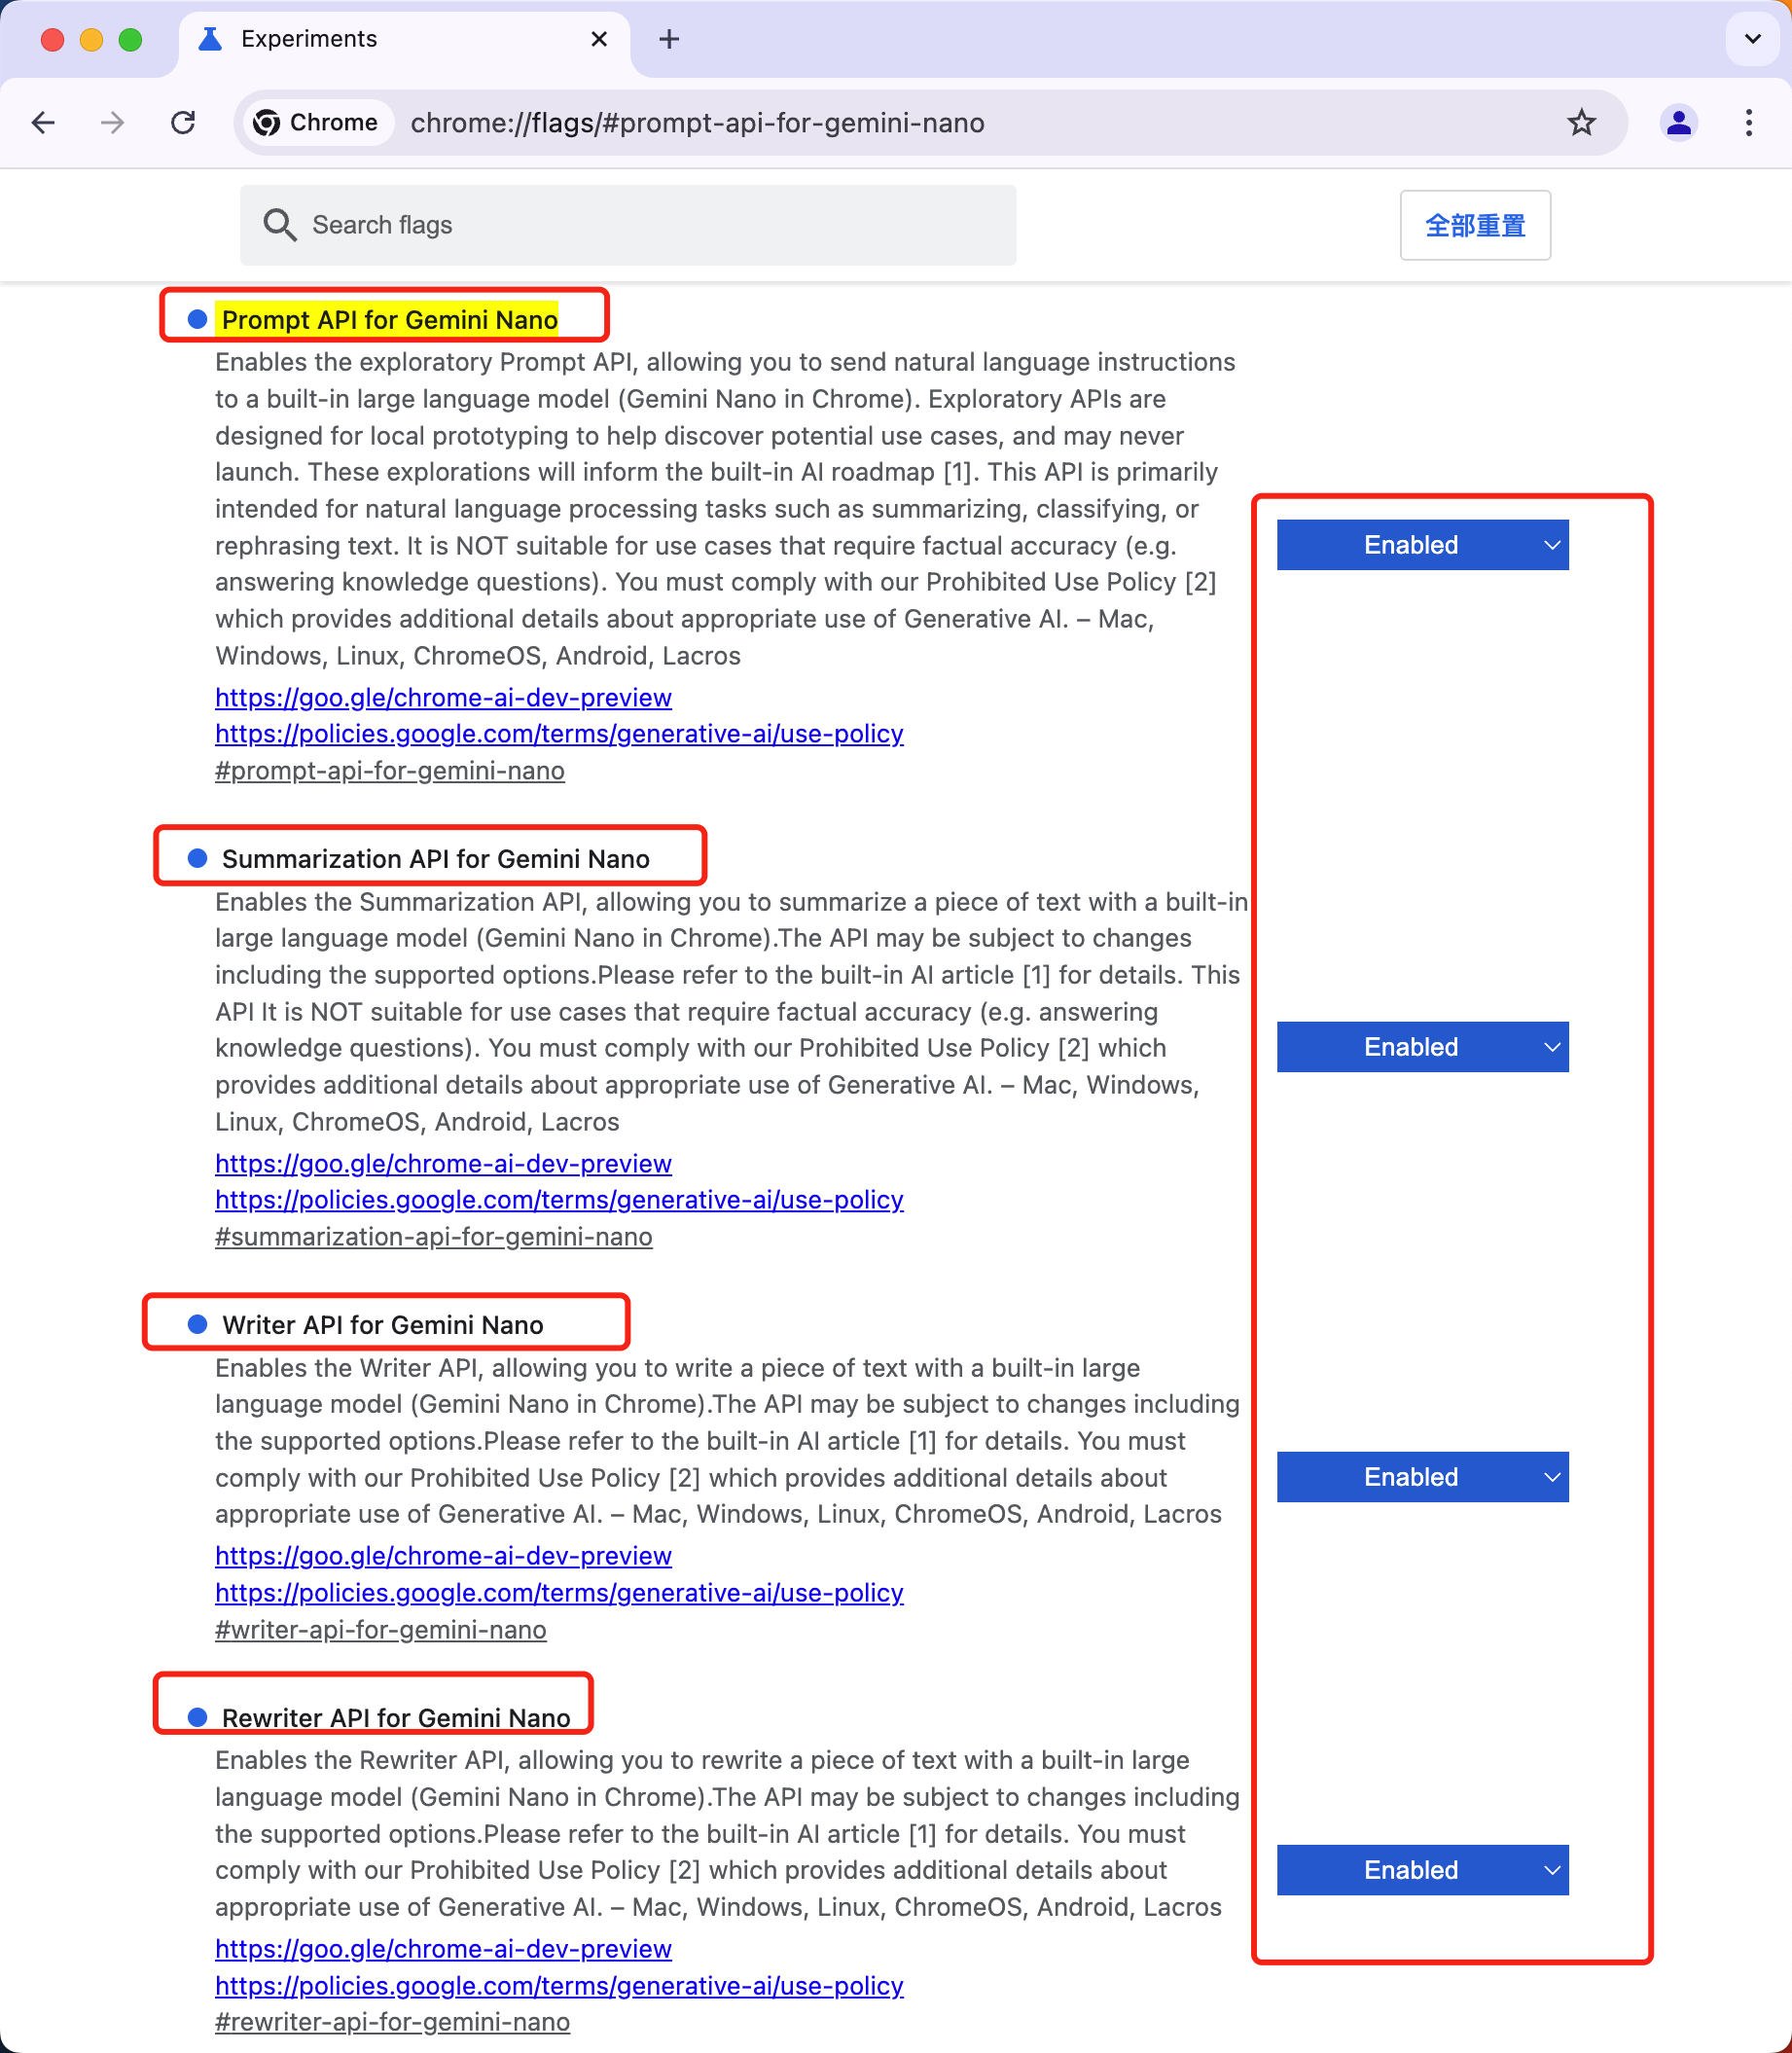
该标志是用来启用 Prompt API 的,启用后,我们就可以使用 Prompt API 来调用 Gemini Nano 模型,同样对于另外的几个 API,如果要使用,我们也需要开启对应的标志。
启用完成后,我们还需要重启浏览器,然后就可以使用内置的 AI 能力了。
使用
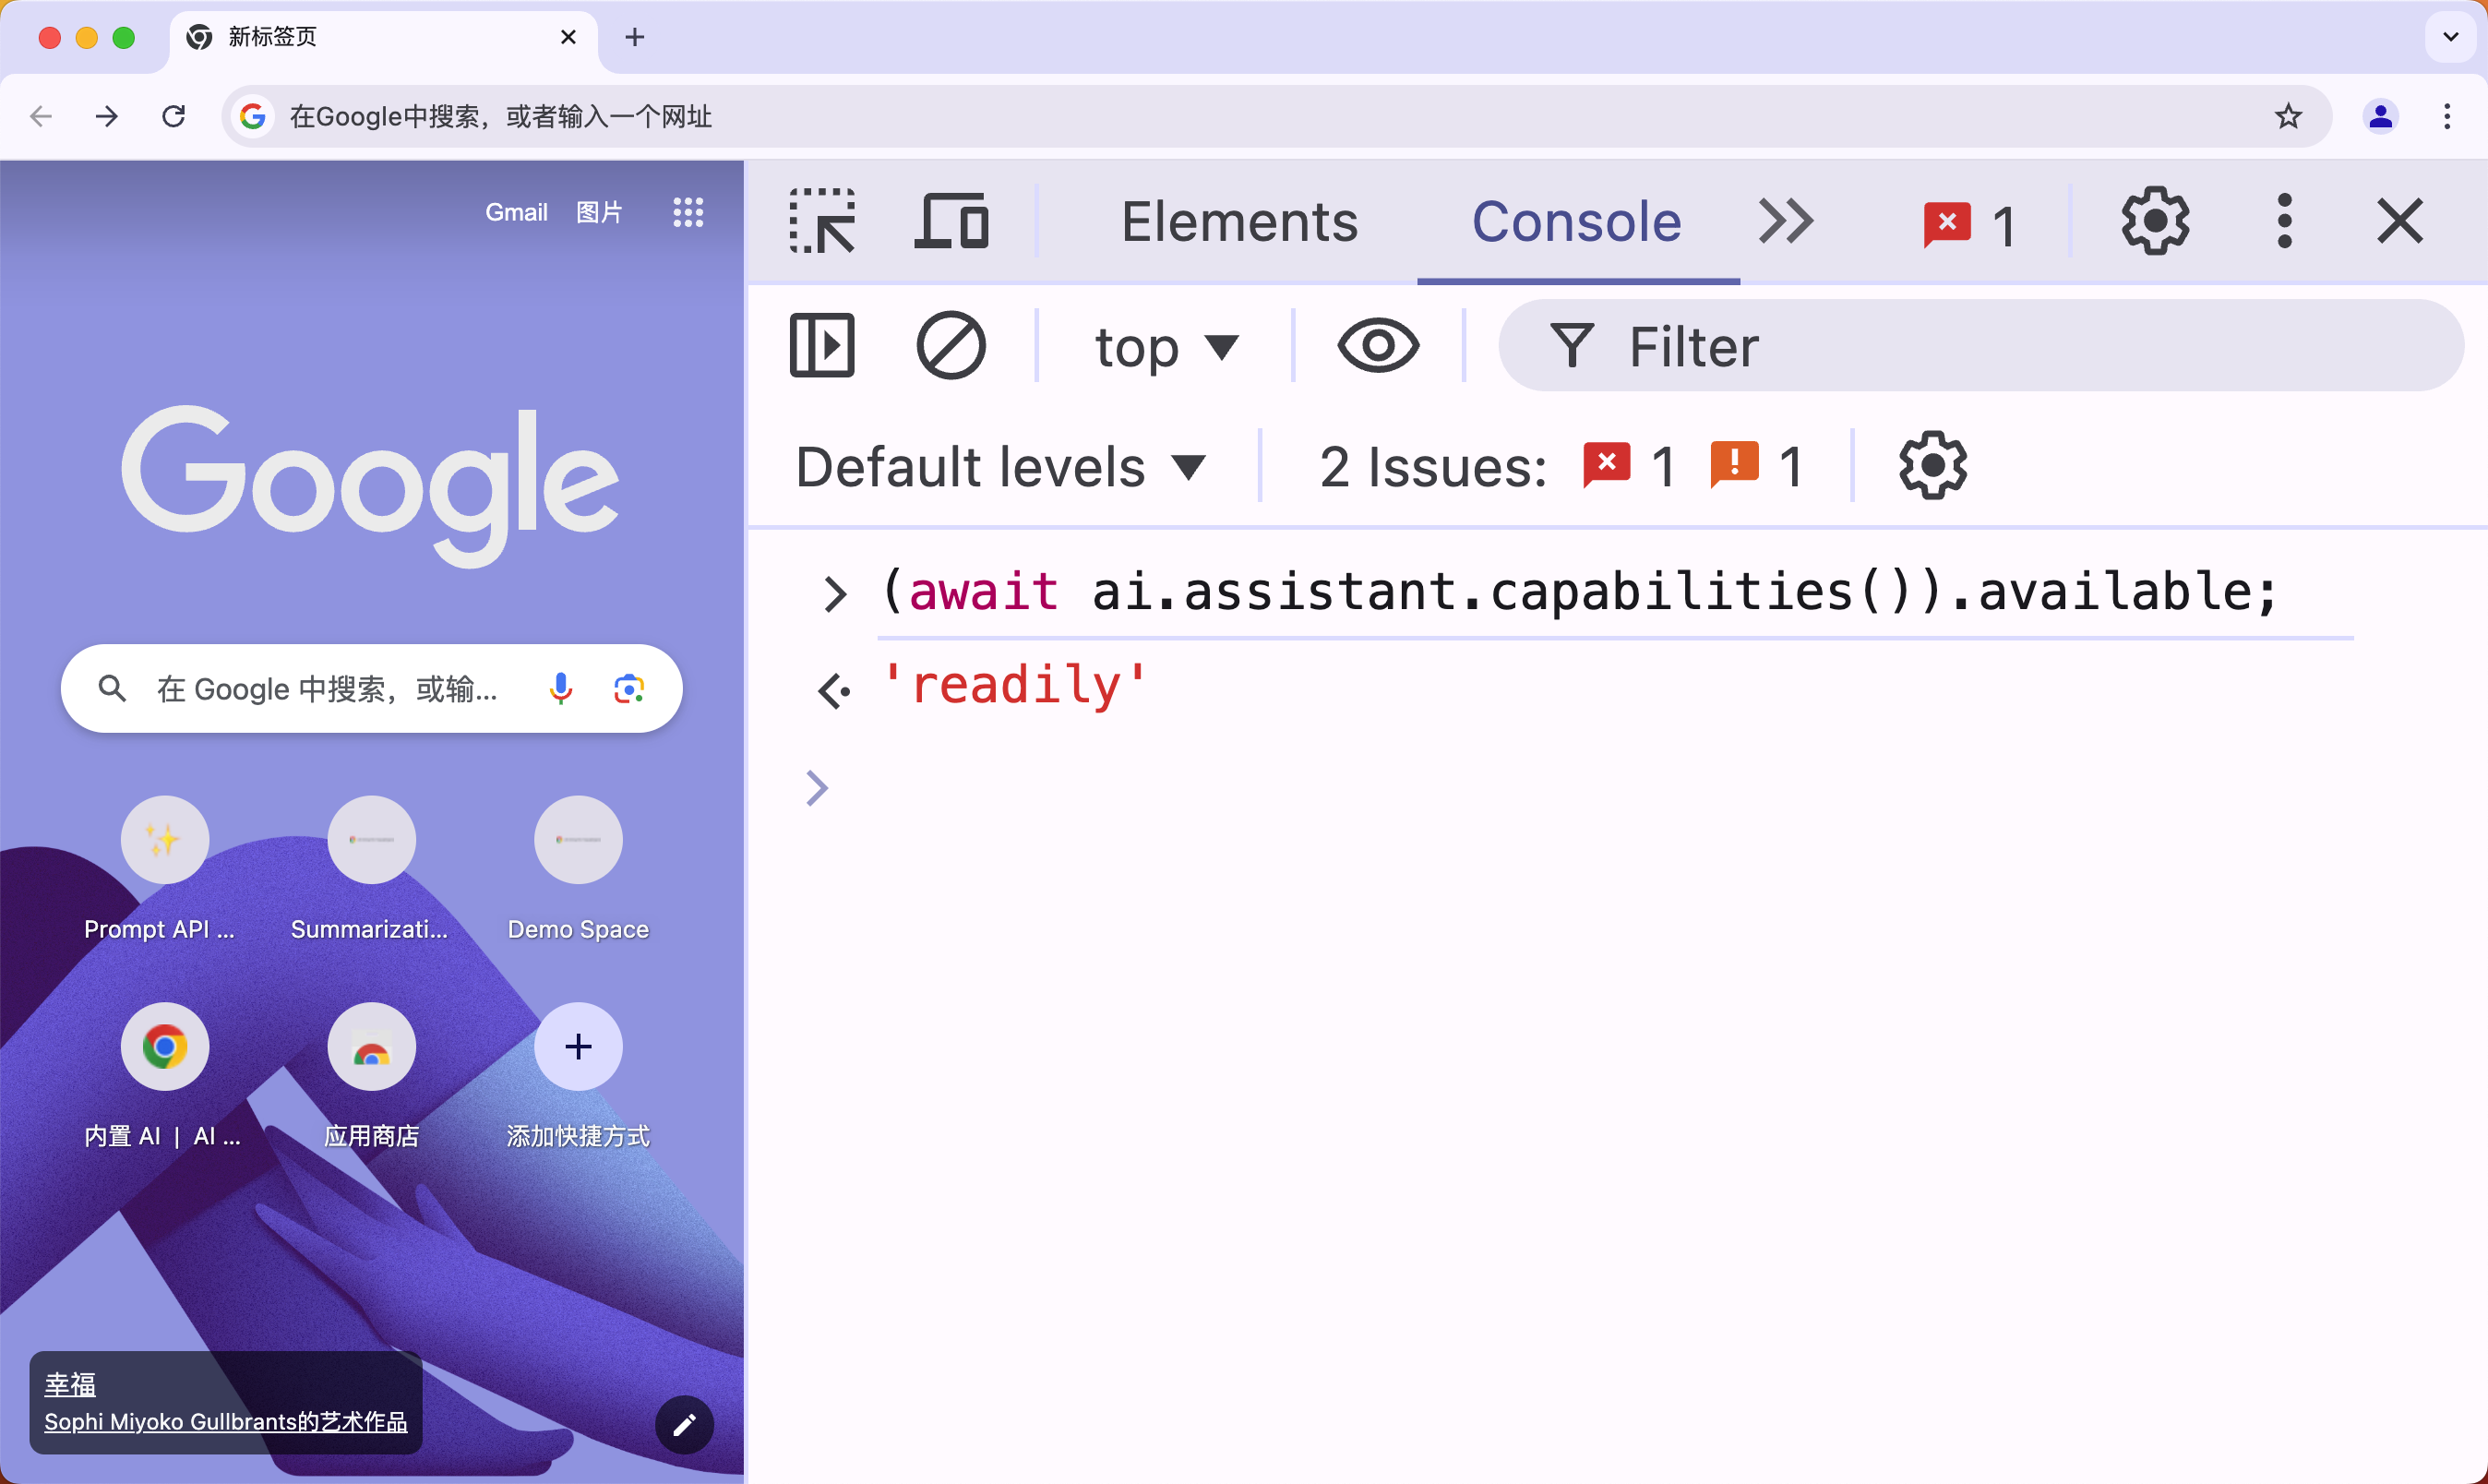
首先我们需要确认 Gemini Nano 的可用性,打开 DevTools,在控制台中输入如下代码:
(await ai.assistant.capabilities()).available;
如果返回 readily,那证明一切都准备好了。
如果是第一次执行,往往这里都不会成功,不过没关系,我们可以继续执行以下操作:
- 📣🆕 强制 Chrome 识别你想要使用此 API。为此,请打开
DevTools并在控制台中发送代码ai.assistant.create();,这可能会失败,不过没关系。 - 然后重新启动浏览器。
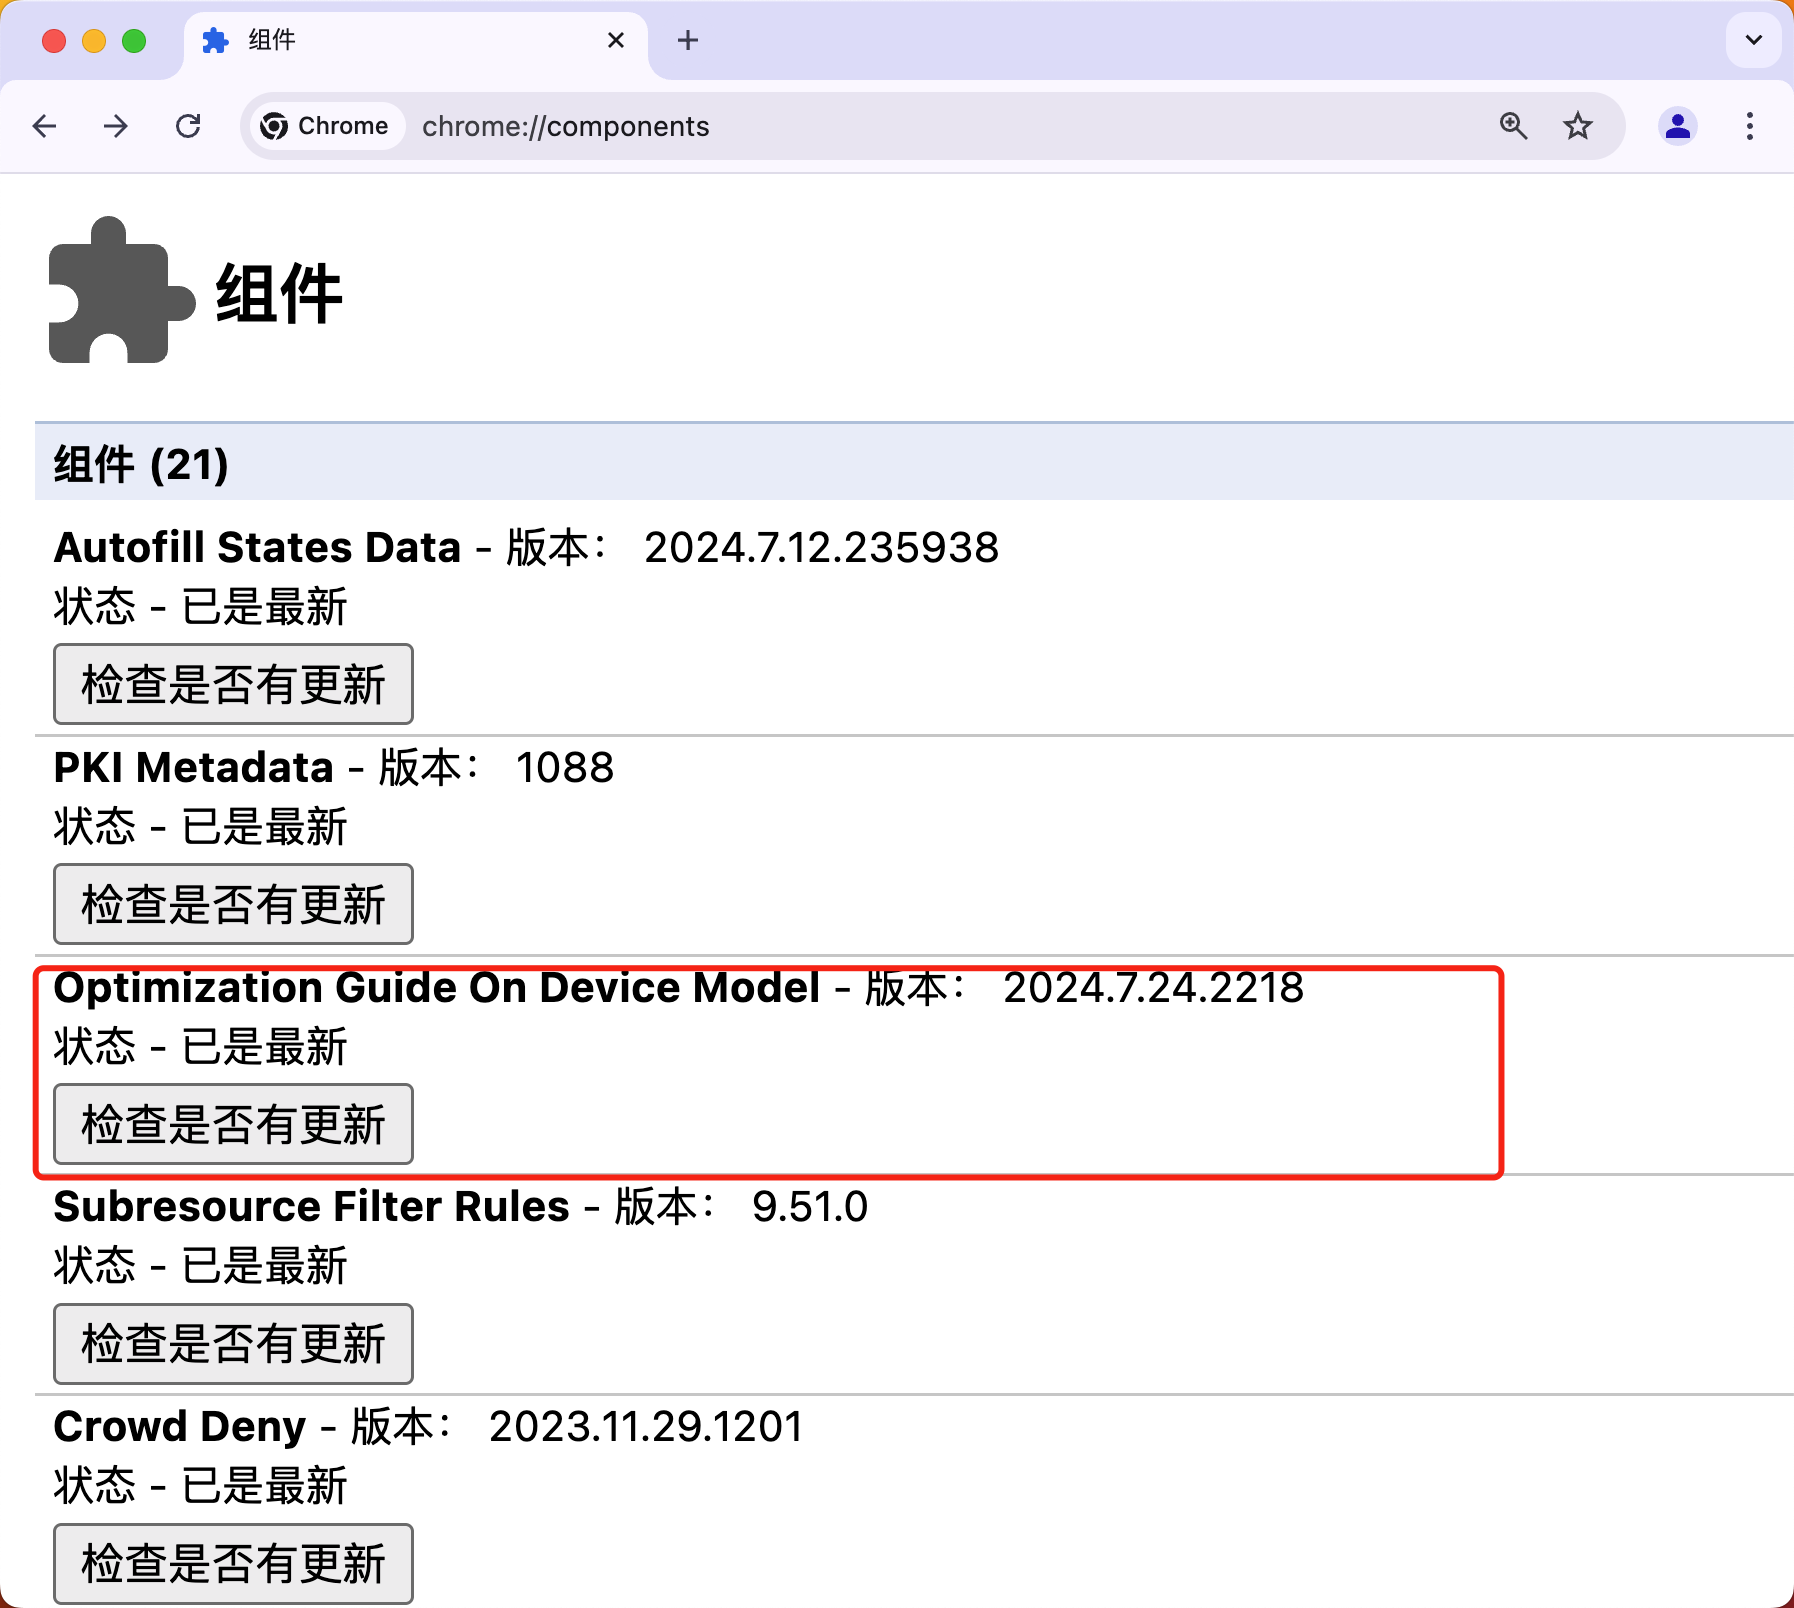
- 在 Chrome 中打开一个新选项卡,转到
chrome://components,找到Optimization Guide On Device Model选项(如果没有,重复上面两个步骤),查看版本号是否大于或等于2024.5.21.1031,如果没有,点击Check for update强制下载,则其实就是下载模型的过程。
一旦模型下载完毕并达到上面所示的版本后,打开 DevTools 并发送(await ai.assistant.capabilities()).available;在控制台中。如果返回 readily,那么一切都准备好了。否则,请重新启动,稍等片刻,然后从步骤 1 开始重试。
Prompt API
接下来我们就可以使用 Prompt API 来调用 Gemini Nano 模型了。
Prompt API 基本使用
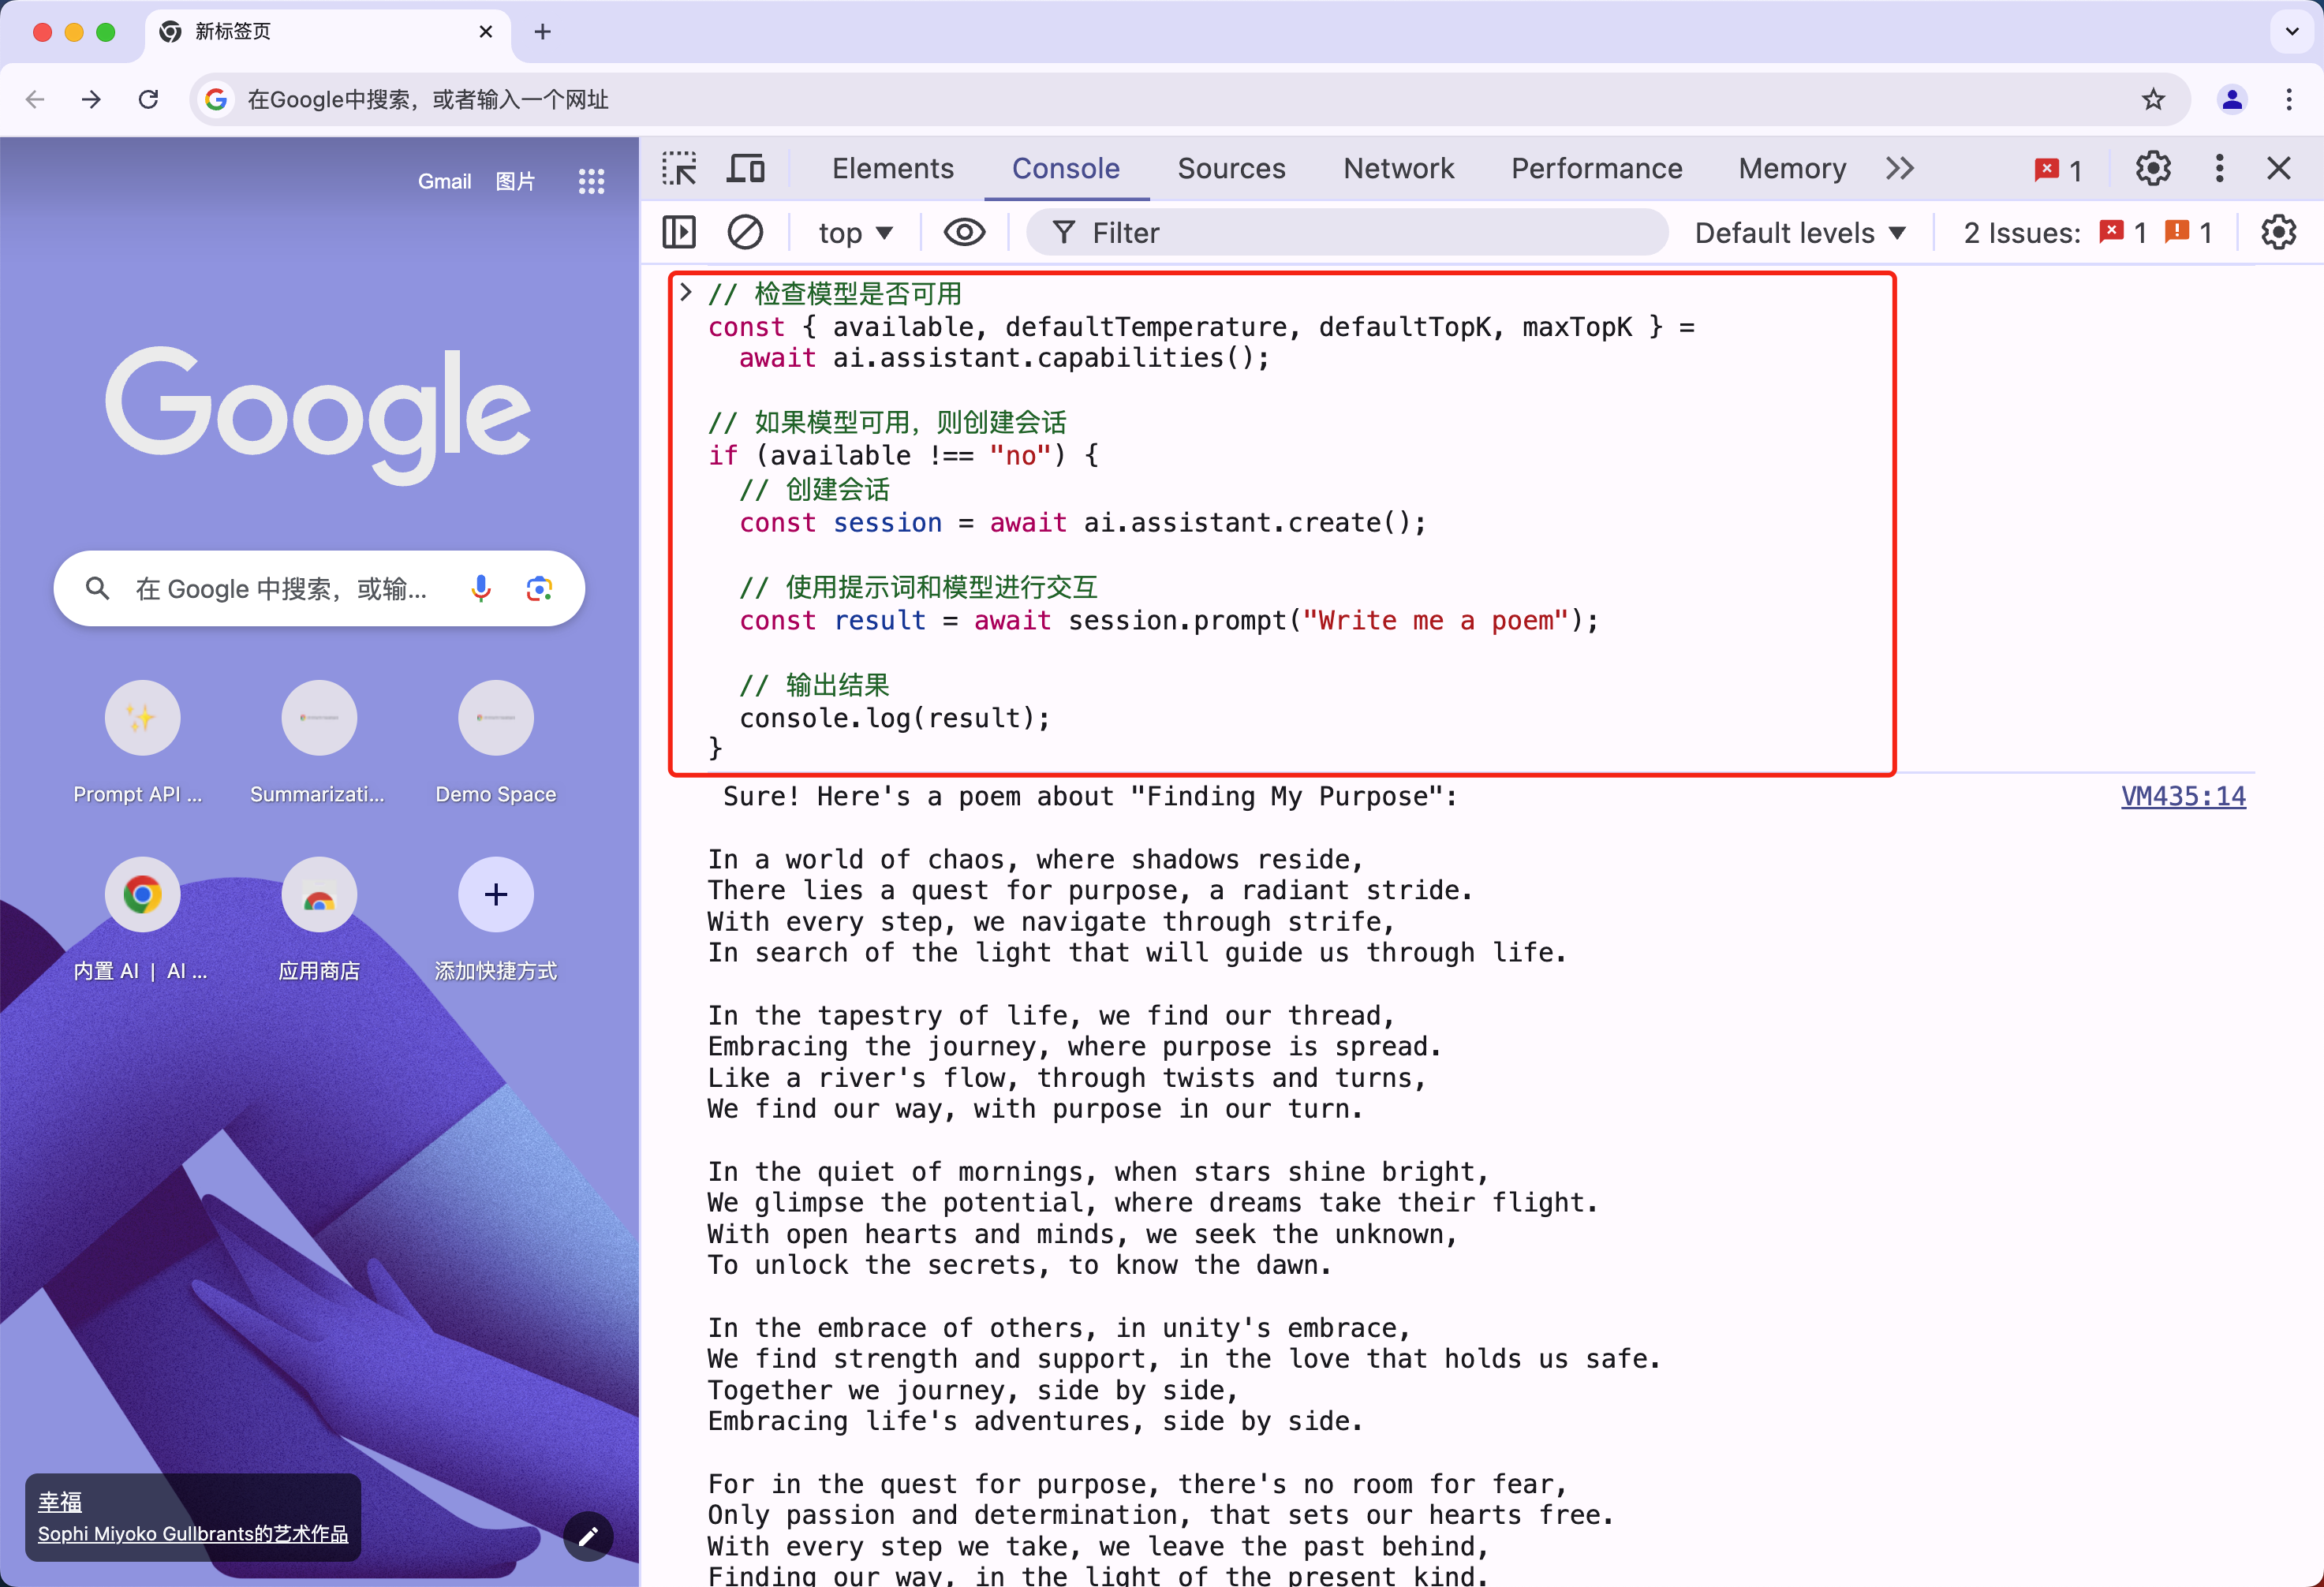
Prompt API 的使用非常简单,首先检查是否可以根据模型的可用性和设备的特性创建会话。
// 检查模型是否可用
const { available, defaultTemperature, defaultTopK, maxTopK } =
  await ai.assistant.capabilities();

// 如果模型可用,则创建会话
if (available !== "no") {
  // 创建会话
  const session = await ai.assistant.create();

  // 使用提示词和模型进行交互
  const result = await session.prompt("Write me a poem");

  // 输出结果
  console.log(result);
}
隔一小会儿,我们就可以在控制台中看到结果了。
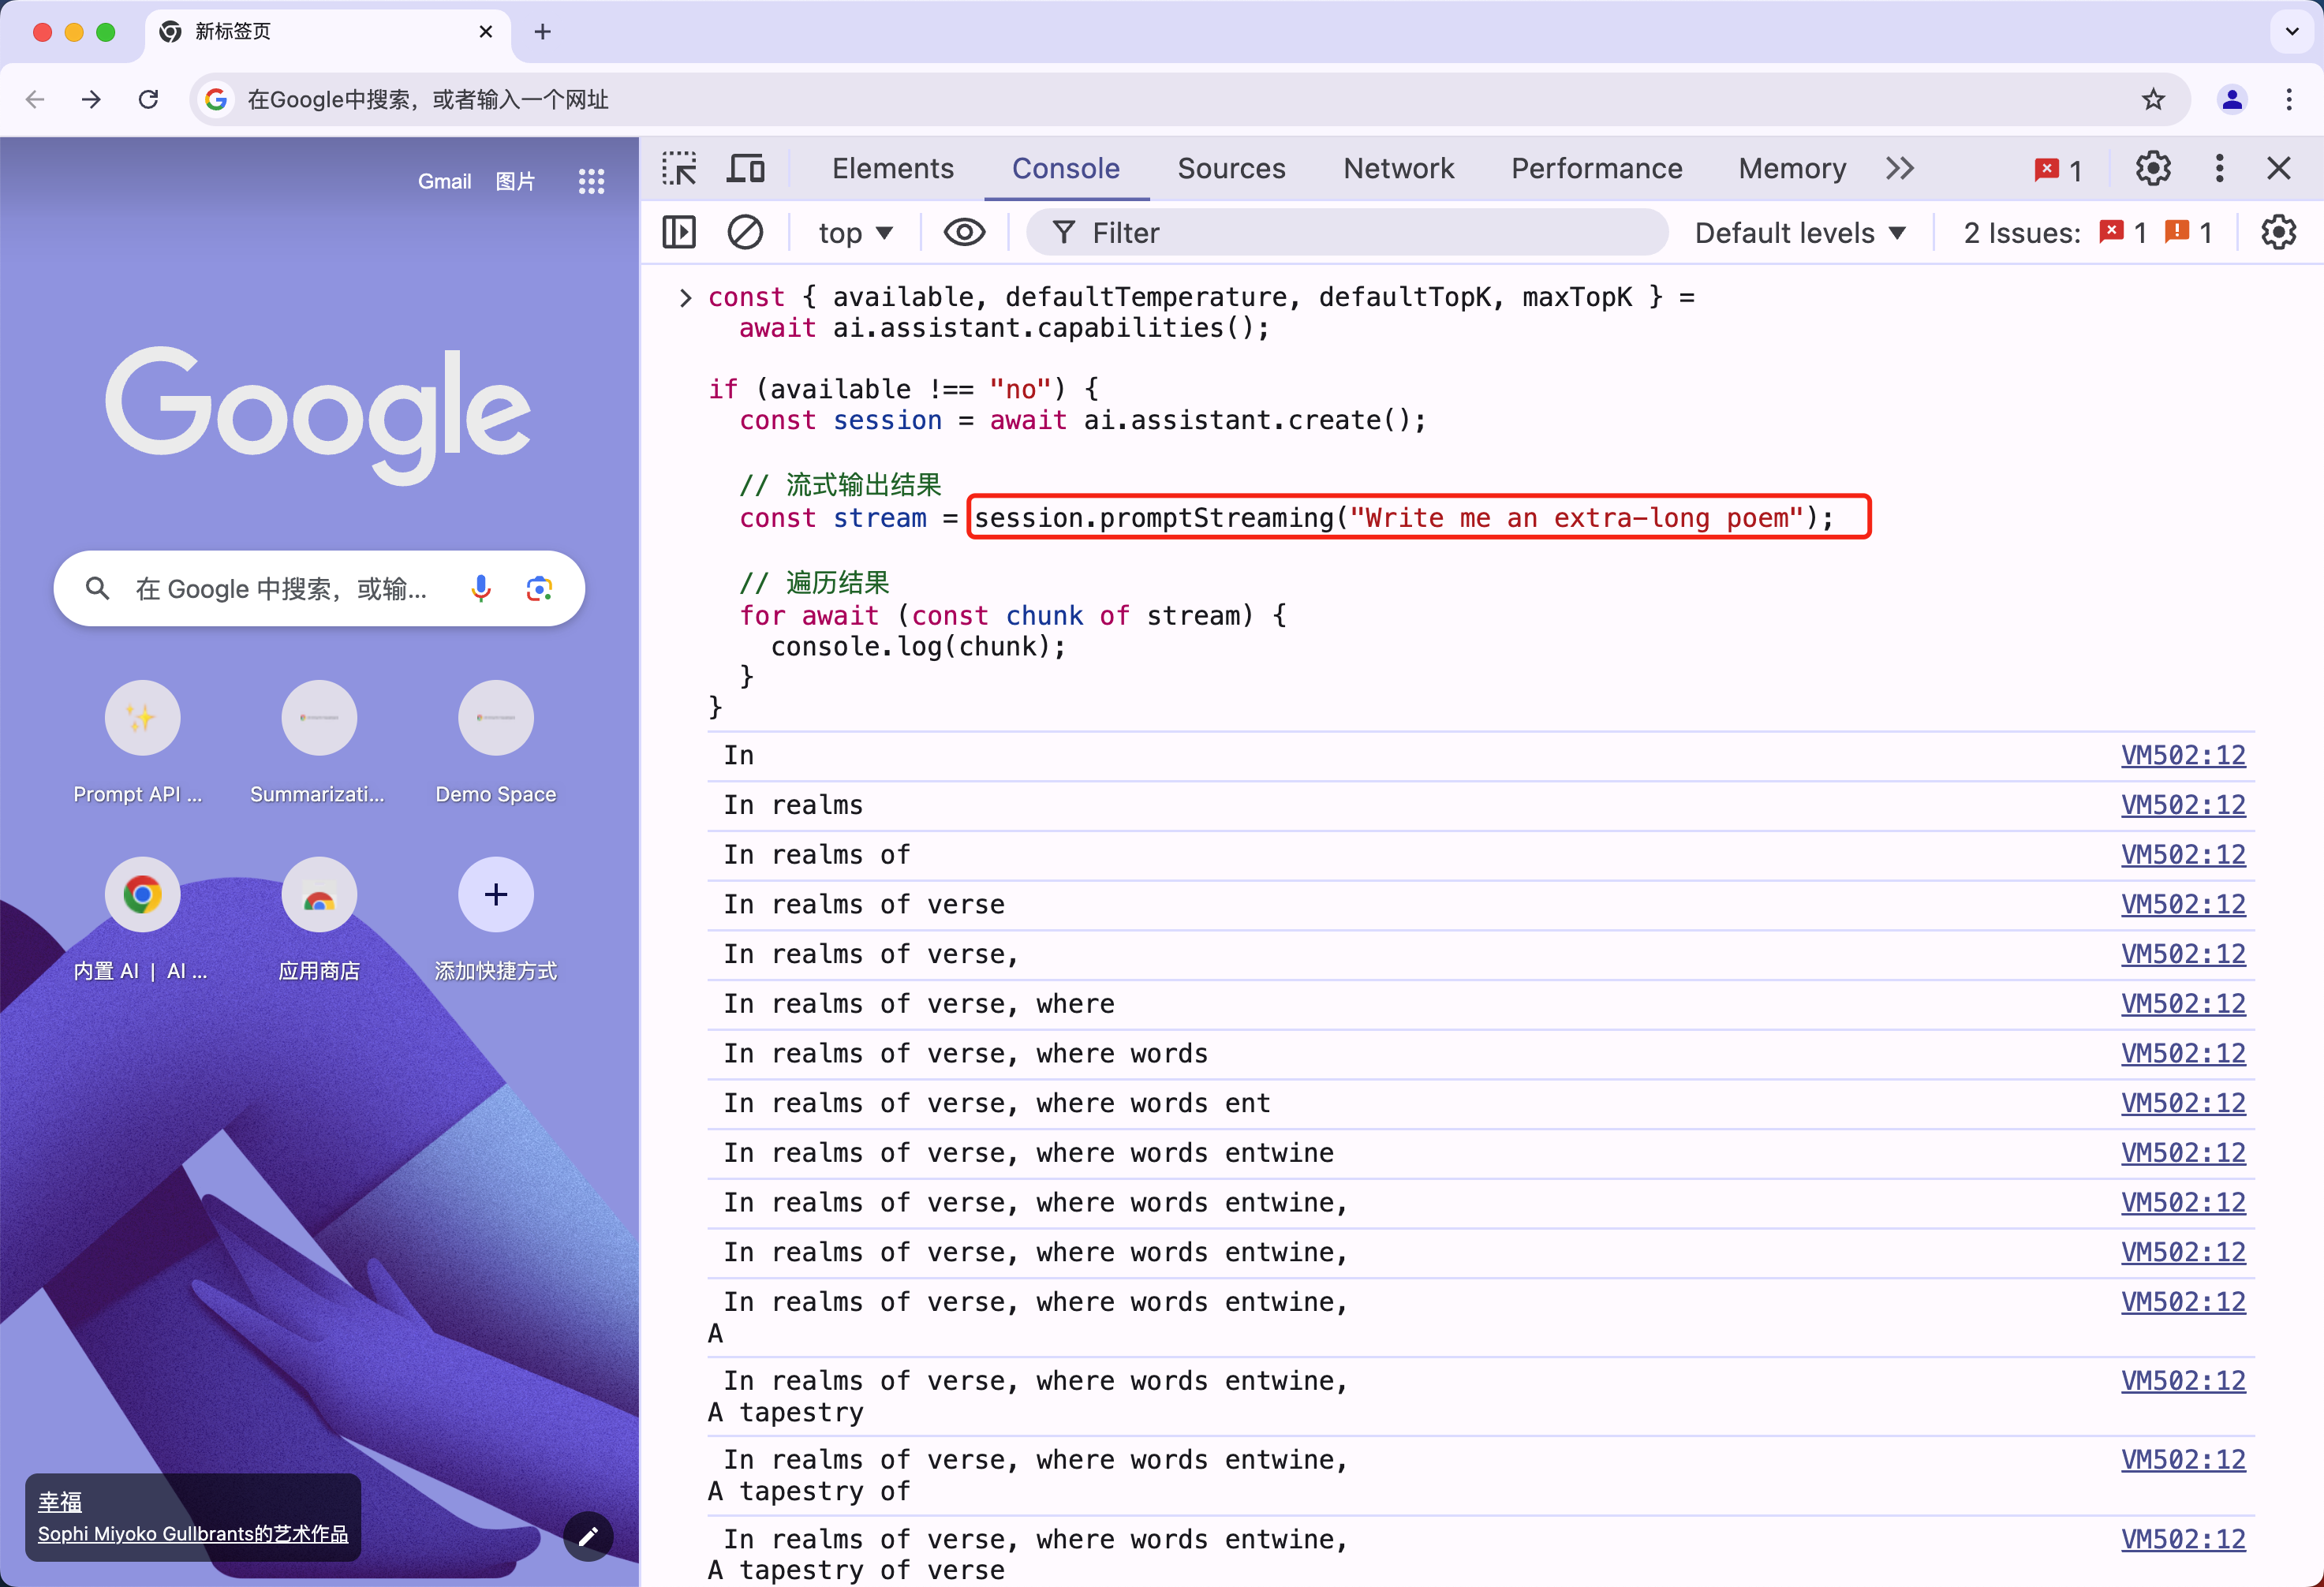
Stream API 流式输出
如果想使用 stream 流式输出,则只需要将 session.prompt 方法替换为 session.promptStreaming 方法即可。
const { available, defaultTemperature, defaultTopK, maxTopK } =
  await ai.assistant.capabilities();

if (available !== "no") {
  const session = await ai.assistant.create();

  // 流式输出结果
  const stream = session.promptStreaming("Write me an extra-long poem");

  // 遍历结果
  for await (const chunk of stream) {
    console.log(chunk);
  }
}
然后就可以在控制台中看到流式输出的结果了。
跟踪模型下载进度
另外我们还可以通过 monitor 方法来跟踪模型下载进度。
const session = await ai.assistant.create({
  monitor(m) {
    m.addEventListener("downloadprogress", (e) => {
      console.log(`Downloaded ${e.loaded} of ${e.total} bytes.`);
    });
  },
});
Session 持久化
Session 是与 AI 模型交互的会话上下文,具有持久化能力,可以跨多个 prompt 调用保持上下文。
const session = await ai.assistant.create({
  systemPrompt:
    "You are a friendly, helpful assistant specialized in clothing choices.",
});

const result = await session.prompt(`
  What should I wear today? It's sunny and I'm unsure between a t-shirt and a polo.
`);
console.log(result);

const result2 = await session.prompt(`
  That sounds great, but oh no, it's actually going to rain! New advice??
`);
上面代码中,我们创建了一个 session,并设置了一个 systemPrompt,然后我们连续执行了两次 prompt 方法,在第二次的 prompt 方法中,session 仍然保留了上一次的上下文,这就是 Session 的持久化能力。
Session Clone
为了保留资源,我们还可以克隆现有会话。对话上下文将被重置,但初始提示或系统提示将保持不变。
const clonedSession = await session.clone();
Session options
每个会话都可以根据 topK 和 temperature 进行定制,这些参数的默认值可以从 ai.assistant.capability() 得到。
// 获取模型能力
const capabilities = await ai.assistant.capabilities();

// 初始化会话,必须指定 `topK` 和 `temperature`,或者都不指定
const slightlyHighTemperatureSession = await ai.assistant.create({
  temperature: Math.max(capabilities.defaultTemperature * 1.2, 1.0),
  topK: capabilities.defaultTopK,
});
系统提示词
给助手指定系统提示词,可以用来指定助手的角色、行为等。
const session = await ai.assistant.create({
  systemPrompt: "Pretend to be an eloquent hamster.",
});
await session.prompt("Do you like nuts?");

// ' As a hamster of unparalleled linguistic ability, I find myself quite adept at responding to the question of whether or not I enjoy the consumption of delectable nuts. Nutty delight indeed!'
Session 信息
session 具有可处理的最大 Token 数,开发人员可以通过使用会话对象上的以下属性来检查其当前使用情况以及达到该限制的进度:
console.log(
  `${session.tokensSoFar}/${session.maxTokens} (${session.tokensLeft} left)`
);
目前,每个提示的 Token 数限制为 1024 个令牌,会话可以保留最后的 4096 个令牌。
Session 终止
如果您不再需要会话,请调用 destroy() 来释放资源。当会话被销毁时,它就不能再被使用,并且任何正在进行的执行都将被中止。
await session.prompt(`
  You are a friendly, helpful assistant specialized in clothing choices.
`);

session.destroy();

// promise 将会被拒绝,并抛出错误,解释会话已被销毁
await session.prompt(`
  What should I wear today? It's sunny and I'm unsure between a t-shirt and a polo.
`);
Summarization API
同样首先需要保证已经开启了对应的标志位。Summarization API 允许我们使用 Gemini Nano 来压缩长篇内容,从而使信息对用户来说更容易访问和有用。
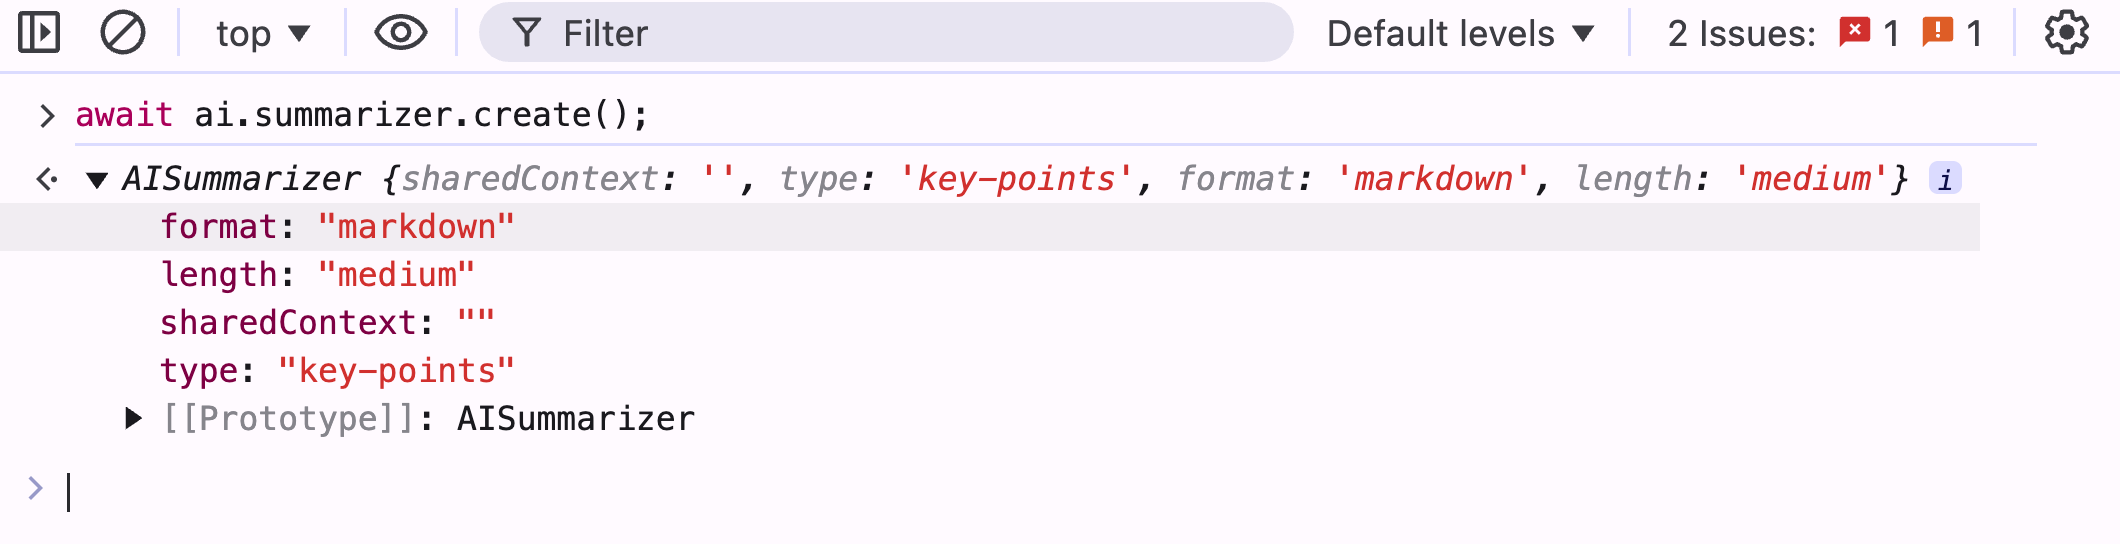
首先同样打开 DevTools,在控制台中输入如下代码:
await ai.summarizer.create();
如果调用失败也不用担心,这可以迫使 Chrome 去下载对应的模型。如果输出如下所示内容,则证明模型下载成功。
现在我们可以在控制台中输入如下代码来检查模型是否可用:
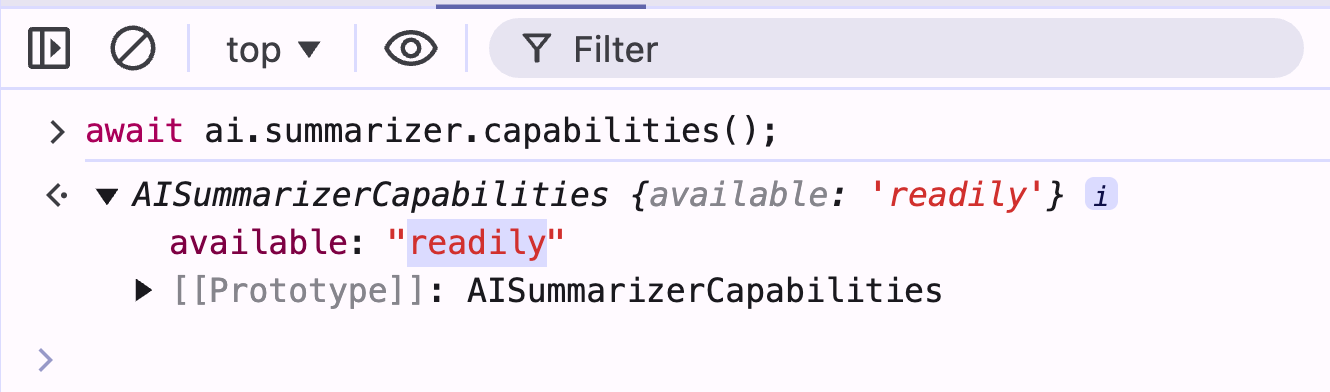
await ai.summarizer.capabilities();
如果输出 readily,则证明模型可用。
接下来我们就可以来使用 Summarization API 来压缩内容了。
const canSummarize = await ai.summarizer.capabilities();

let summarizer;

if (canSummarize && canSummarize.available !== "no") {
  // 如果模型可用,则创建 summarizer
  if (canSummarize.available === "readily") {
    // 创建 summarizer
    summarizer = await ai.summarizer.create();
  } else {
    // 如果模型不可用,则创建 summarizer,并监听下载进度
    summarizer = await ai.summarizer.create();
    summarizer.addEventListener("downloadprogress", (e) => {
      console.log(e.loaded, e.total);
    });
    await summarizer.ready;
  }
} else {
  // The summarizer can't be used at all.
}
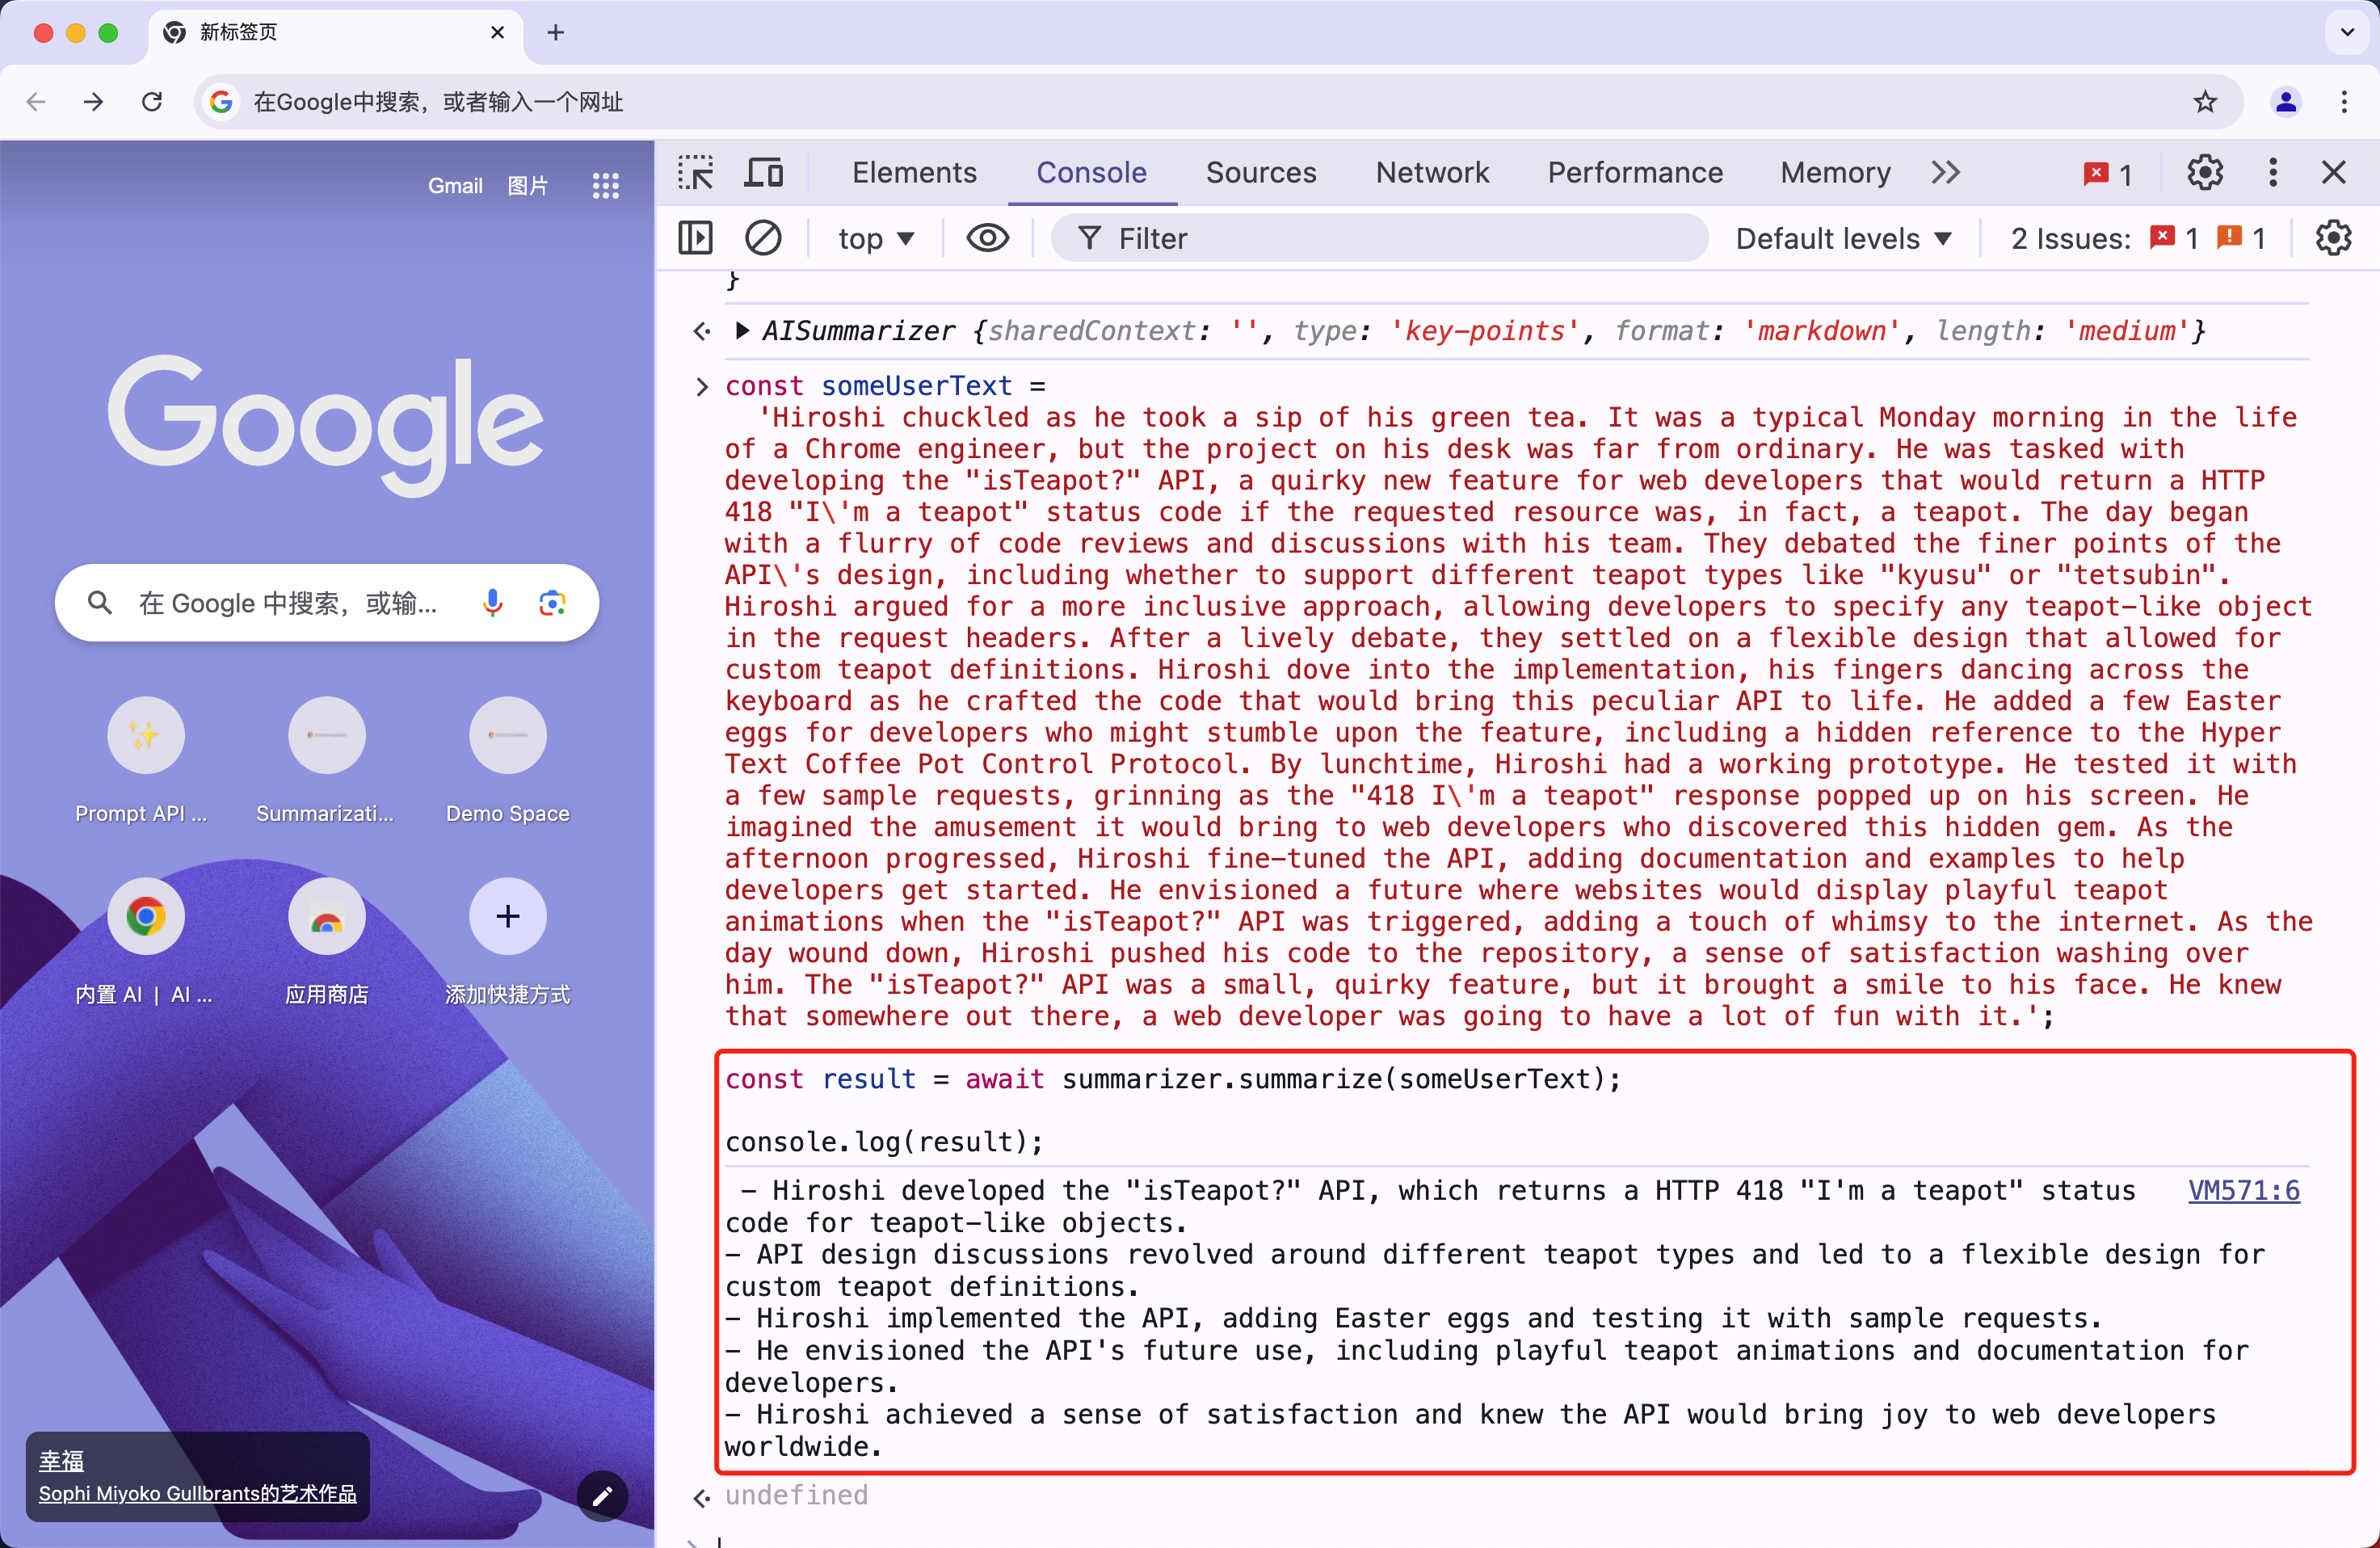
然后可以使用上面的 summarizer 对象来压缩内容。
const someUserText =
  'Hiroshi chuckled as he took a sip of his green tea. It was a typical Monday morning in the life of a Chrome engineer, but the project on his desk was far from ordinary. He was tasked with developing the "isTeapot?" API, a quirky new feature for web developers that would return a HTTP 418 "I\'m a teapot" status code if the requested resource was, in fact, a teapot. The day began with a flurry of code reviews and discussions with his team. They debated the finer points of the API\'s design, including whether to support different teapot types like "kyusu" or "tetsubin". Hiroshi argued for a more inclusive approach, allowing developers to specify any teapot-like object in the request headers. After a lively debate, they settled on a flexible design that allowed for custom teapot definitions. Hiroshi dove into the implementation, his fingers dancing across the keyboard as he crafted the code that would bring this peculiar API to life. He added a few Easter eggs for developers who might stumble upon the feature, including a hidden reference to the Hyper Text Coffee Pot Control Protocol. By lunchtime, Hiroshi had a working prototype. He tested it with a few sample requests, grinning as the "418 I\'m a teapot" response popped up on his screen. He imagined the amusement it would bring to web developers who discovered this hidden gem. As the afternoon progressed, Hiroshi fine-tuned the API, adding documentation and examples to help developers get started. He envisioned a future where websites would display playful teapot animations when the "isTeapot?" API was triggered, adding a touch of whimsy to the internet. As the day wound down, Hiroshi pushed his code to the repository, a sense of satisfaction washing over him. The "isTeapot?" API was a small, quirky feature, but it brought a smile to his face. He knew that somewhere out there, a web developer was going to have a lot of fun with it.';

// 总结内容
const result = await summarizer.summarize(someUserText);

console.log(result);
最后如果不需要再使用 summarizer 对象,则需要调用 destroy 方法来释放资源。
// 销毁 summarizer 对象,释放资源
summarizer.destroy();
Language Detection API
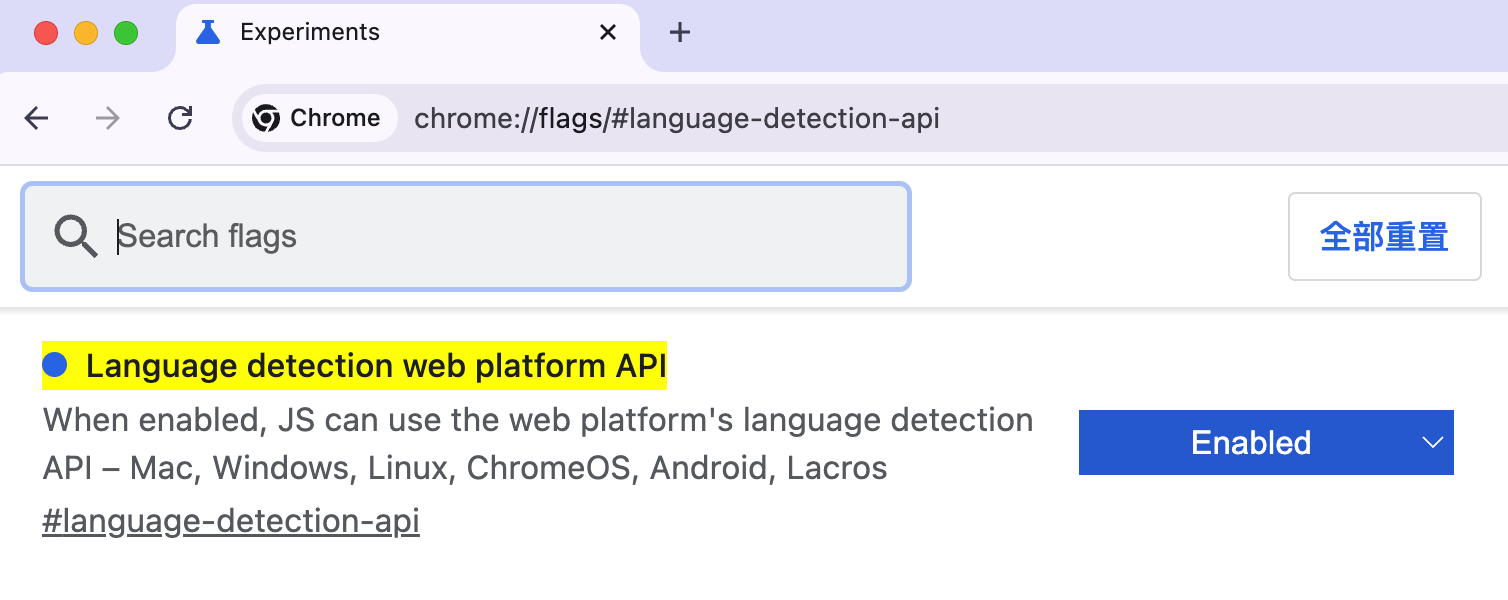
Language Detection API 允许我们使用 Gemini Nano 来检测用户语言。首先我们需要跳转 chrome://flags/#language-detection-api,选择 Enabled,然后重启浏览器,这样才可以使用 Language Detection API。
然后我们就可以使用 Language Detection API 来检测用户语言了。首先打开 DevTools,在控制台中输入如下代码:
await translation.canDetect();
如果输出 readily,则证明模型可用。
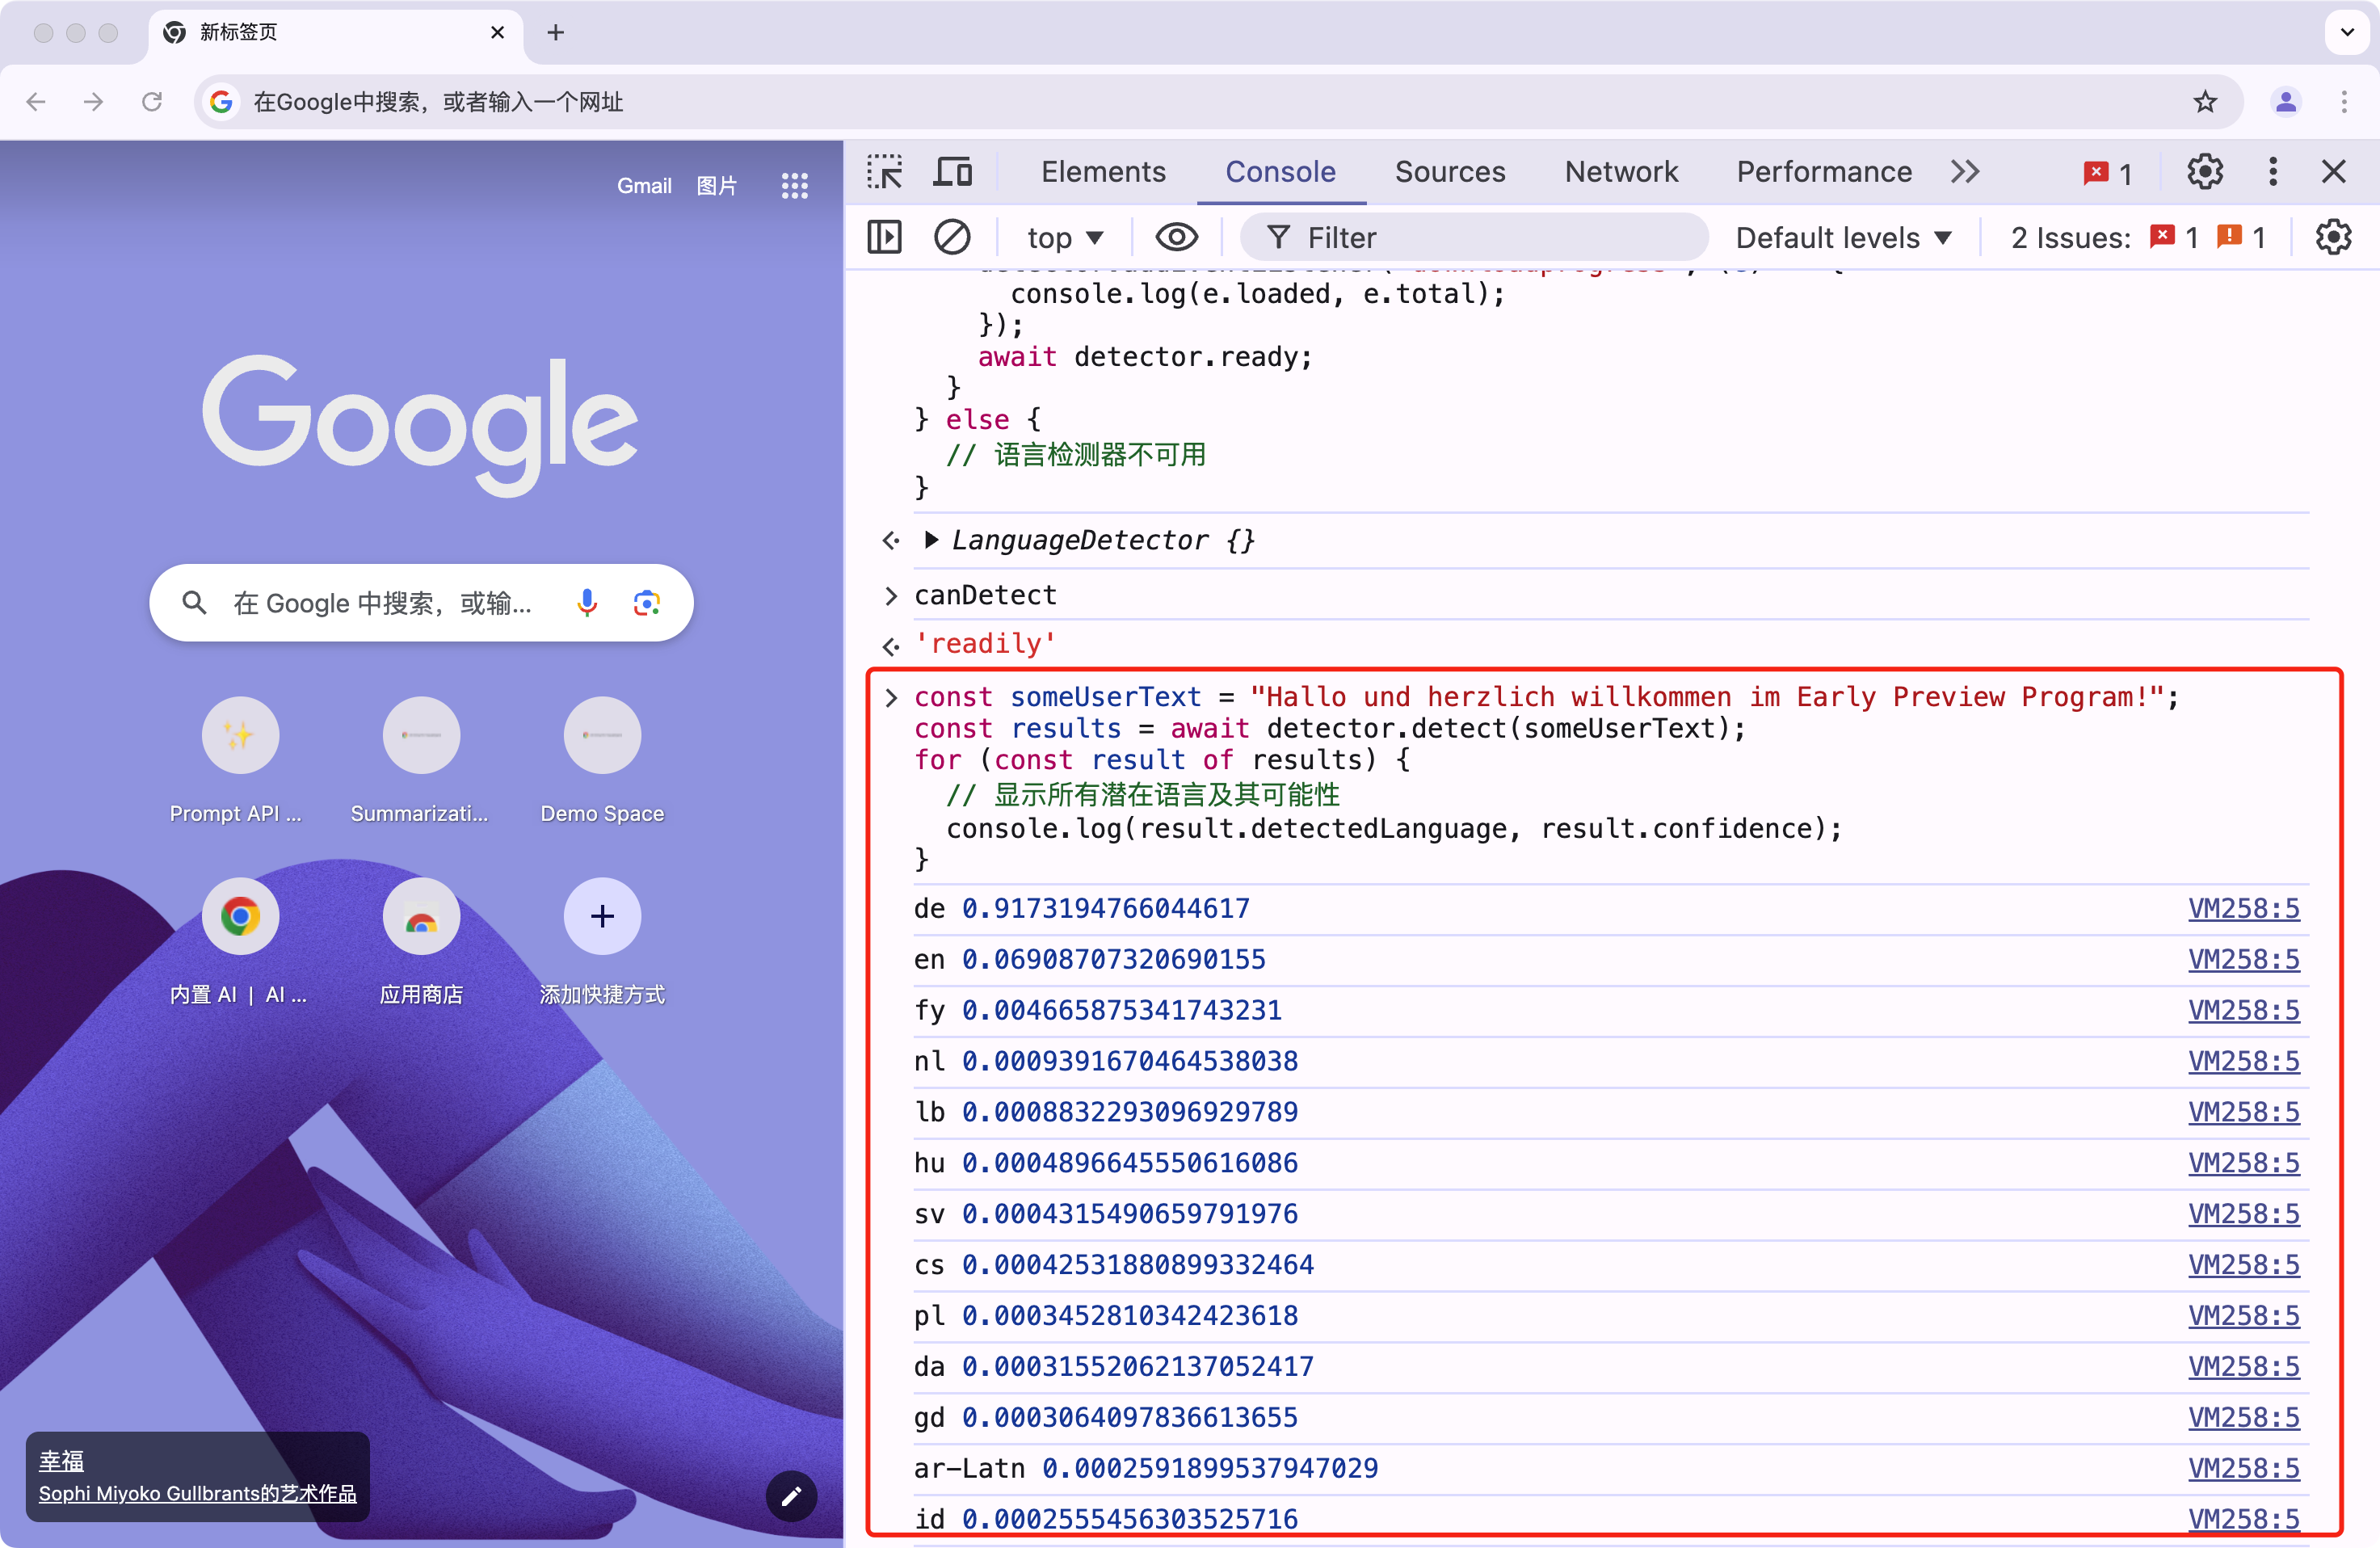
在代码里面使用的时候同样我们可以使用下面的代码来创建一个语言检测器,后面直接使用这个对象来检测语言即可:
const canDetect = await translation.canDetect();
let detector;
if (canDetect !== "no") {
  if (canDetect === "readily") {
    // 实例化语言检测器
    detector = await translation.createDetector();
  } else {
    // 如果模型不可用,则创建语言检测器,并监听下载进度
    detector = await translation.createDetector();
    detector.addEventListener("downloadprogress", (e) => {
      console.log(e.loaded, e.total);
    });
    await detector.ready;
  }
} else {
  // 语言检测器不可用
}
然后使用上面的 detector 对象来检测语言,直接调用 detect 方法即可。
const someUserText = "Hallo und herzlich willkommen im Early Preview Program!";
const results = await detector.detect(someUserText);
for (const result of results) {
  // 显示所有潜在语言及其可能性
  console.log(result.detectedLanguage, result.confidence);
}
上面代码中,我们使用 detector 对象来检测用户输入的文本,然后输出所有潜在语言及其可能性。
我们可以根据 confidence 来判断用户输入的文本是哪种语言,如果 confidence 大于某个阈值,则可以认为用户输入的文本是这种语言。
Writer 和 ReWriter API
Writer 和 ReWriter API 允许我们使用 Gemini Nano 来撰写协助、校对、语法更正和重新表述。
同样首先需要保证已经开启了对应的标志位。
首先打开 DevTools,在控制台中输入如下代码:
await ai.writer.create();
这可能需要一点时间反应。
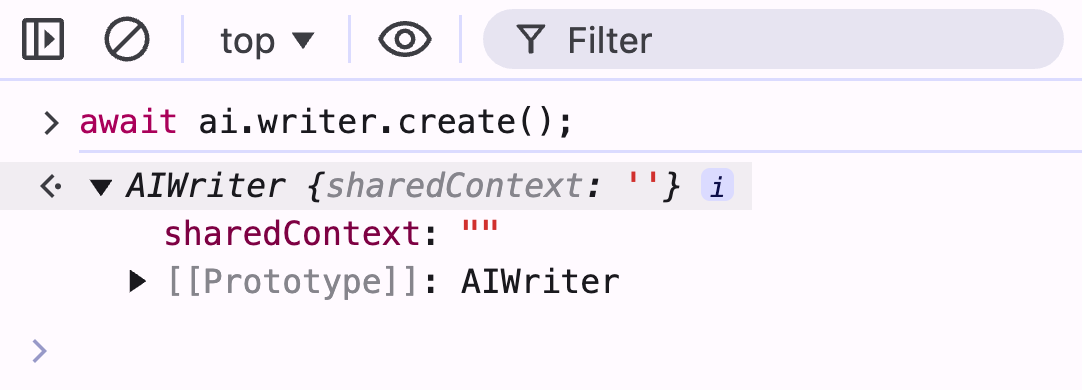
然后我们可以检查模型是否可用:
(await ai.assistant.capabilities()).available;
如果输出 readily,则证明模型可用。
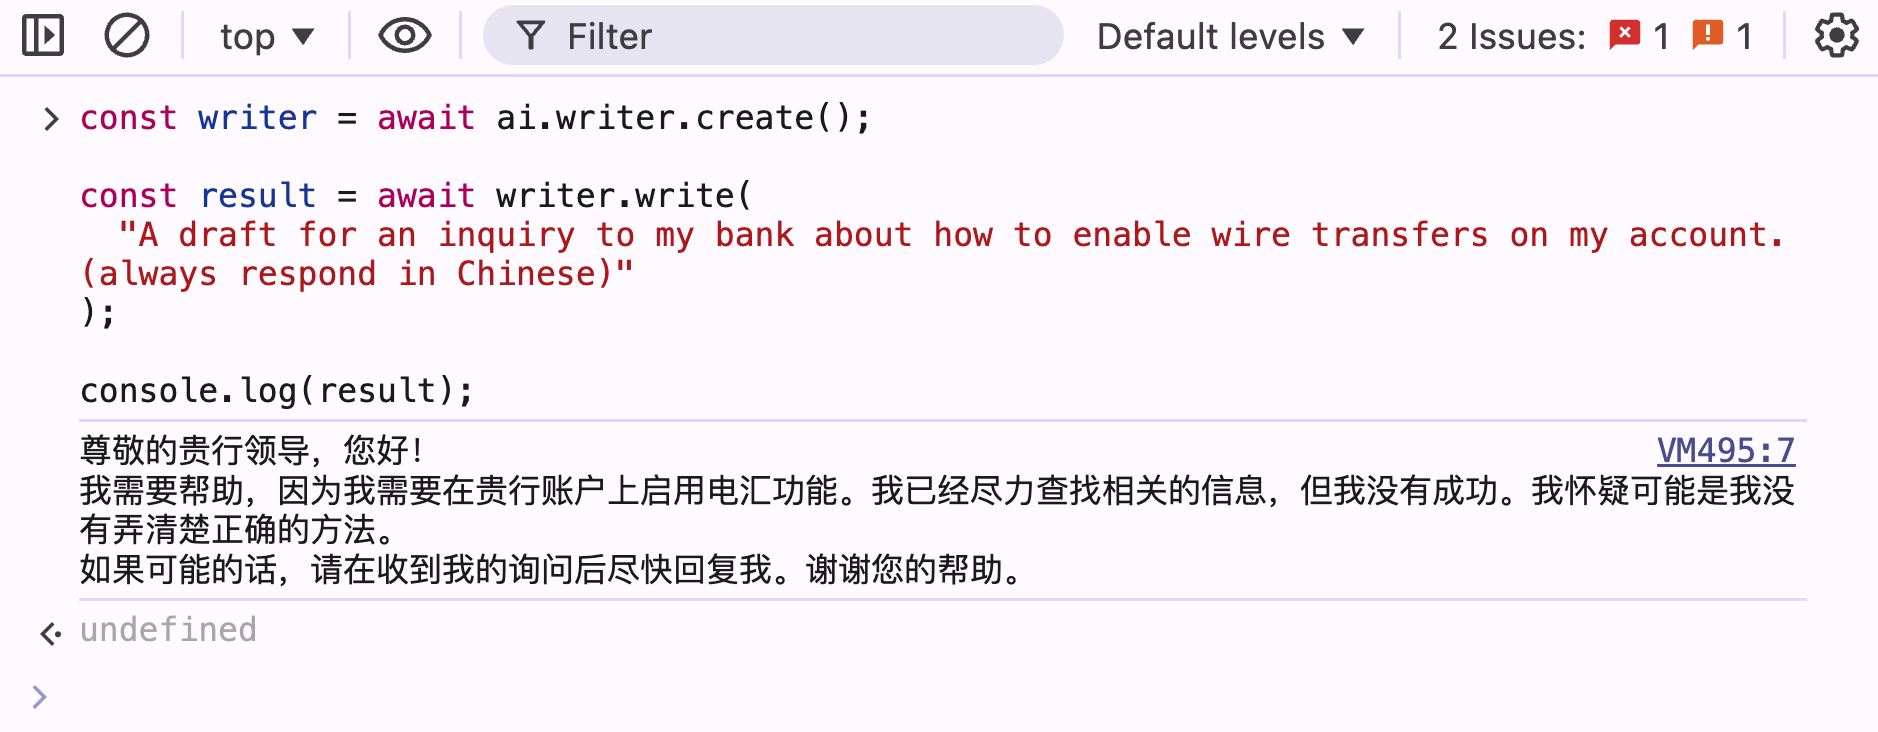
Writer API
Writer API 使用也非常简单,直接调用 write 方法即可。
const writer = await ai.writer.create();

const result = await writer.write(
  "A draft for an inquiry to my bank about how to enable wire transfers on my account.(always respond in Chinese)"
);

console.log(result);
输出结果如下所示:
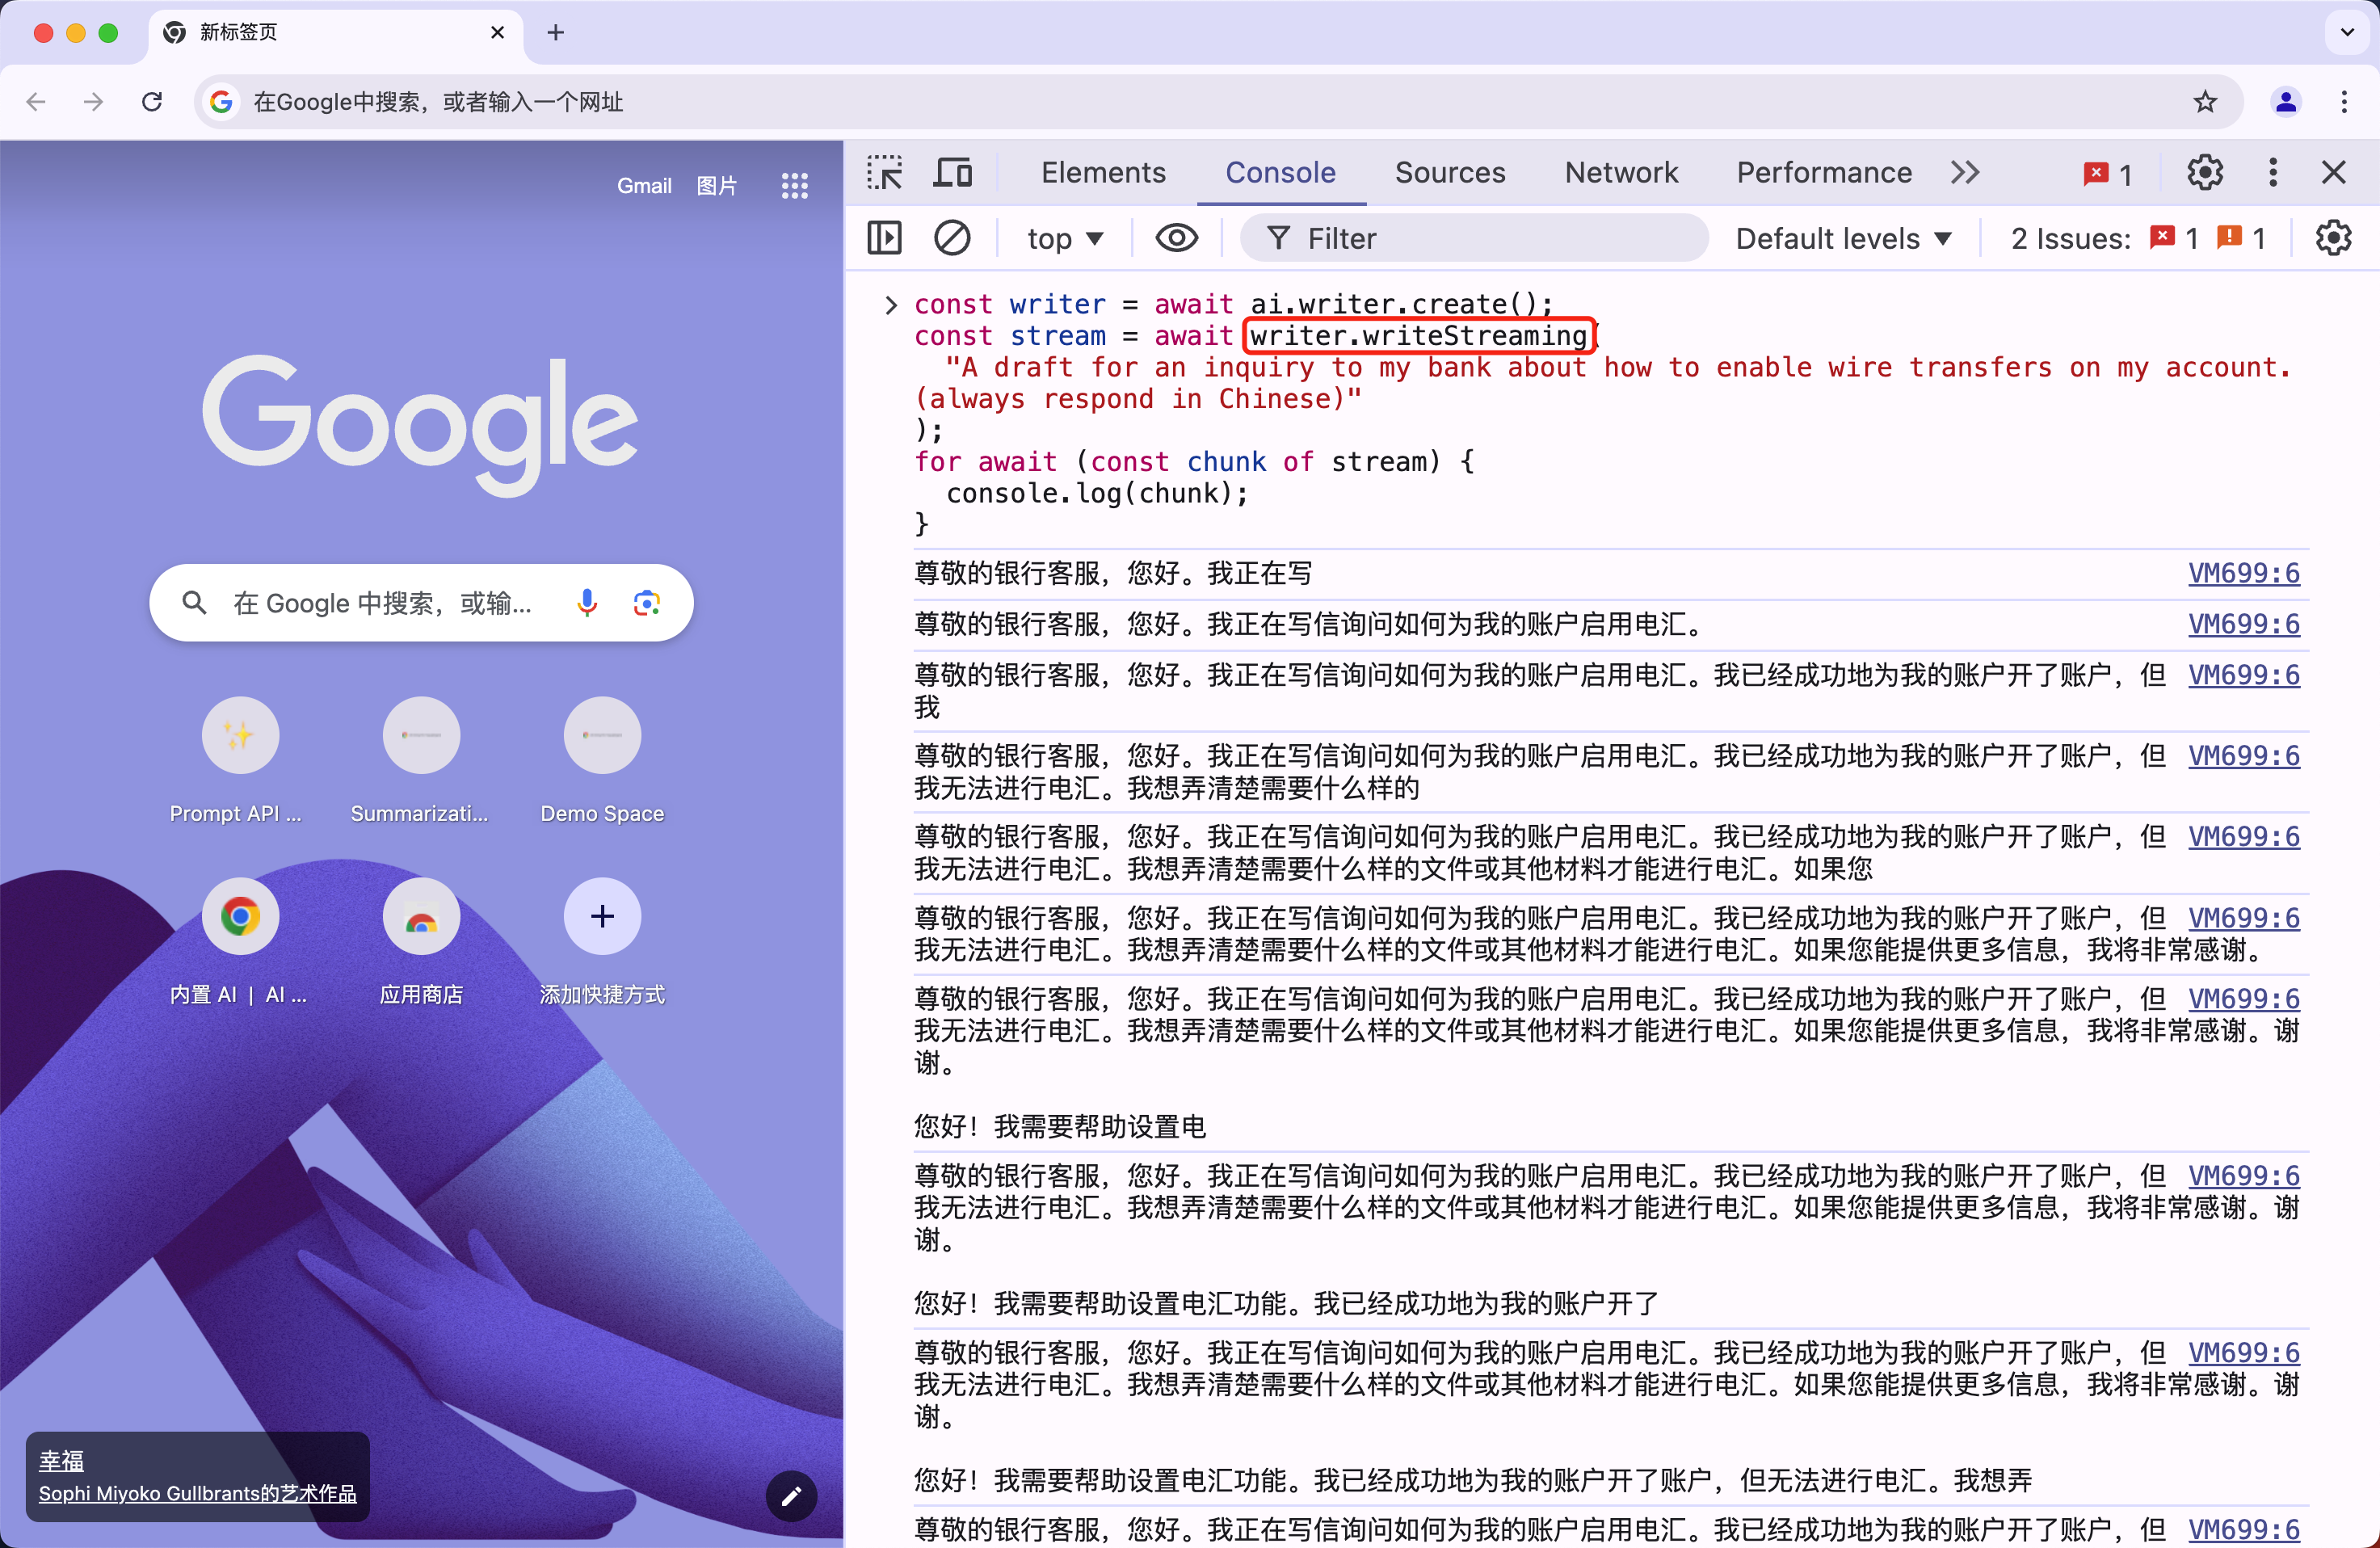
同样如果想使用流式输出,则只需要将 write 方法替换为 writeStreaming 方法即可。
const writer = await ai.writer.create();
const stream = await writer.writeStreaming(
  "A draft for an inquiry to my bank about how to enable wire transfers on my account.(always respond in Chinese)"
);
for await (const chunk of stream) {
  console.log(chunk);
}
现在我们就可以在控制台中看到流式输出的结果了。
此外我们还可以共享上下文和每个写作任务的上下文,如下代码所示:
const writer = await ai.writer.create({
  sharedContext:
    "This is for publishing on [popular website name], a business and employment-focused social media platform.",
});

const stream = await writer.writeStreaming(
  "loving all this work on GenAI at Google! So much to learn and so many new things I can do!",
  {
    context:
      " The request comes from someone working at a startup providing an e-commerce CMS solution.",
  }
);

for await (const chunk of stream) {
  console.log(chunk);
}
上面代码中,在 writeStreaming 方法中,我们传递了一个 context 参数,这个参数是用来指定每个写作任务的上下文,这样可以帮助模型更好地理解用户的需求。
同样最后如果不需要再使用 writer 对象,则需要调用 destroy 方法来释放资源。
writer.destroy();
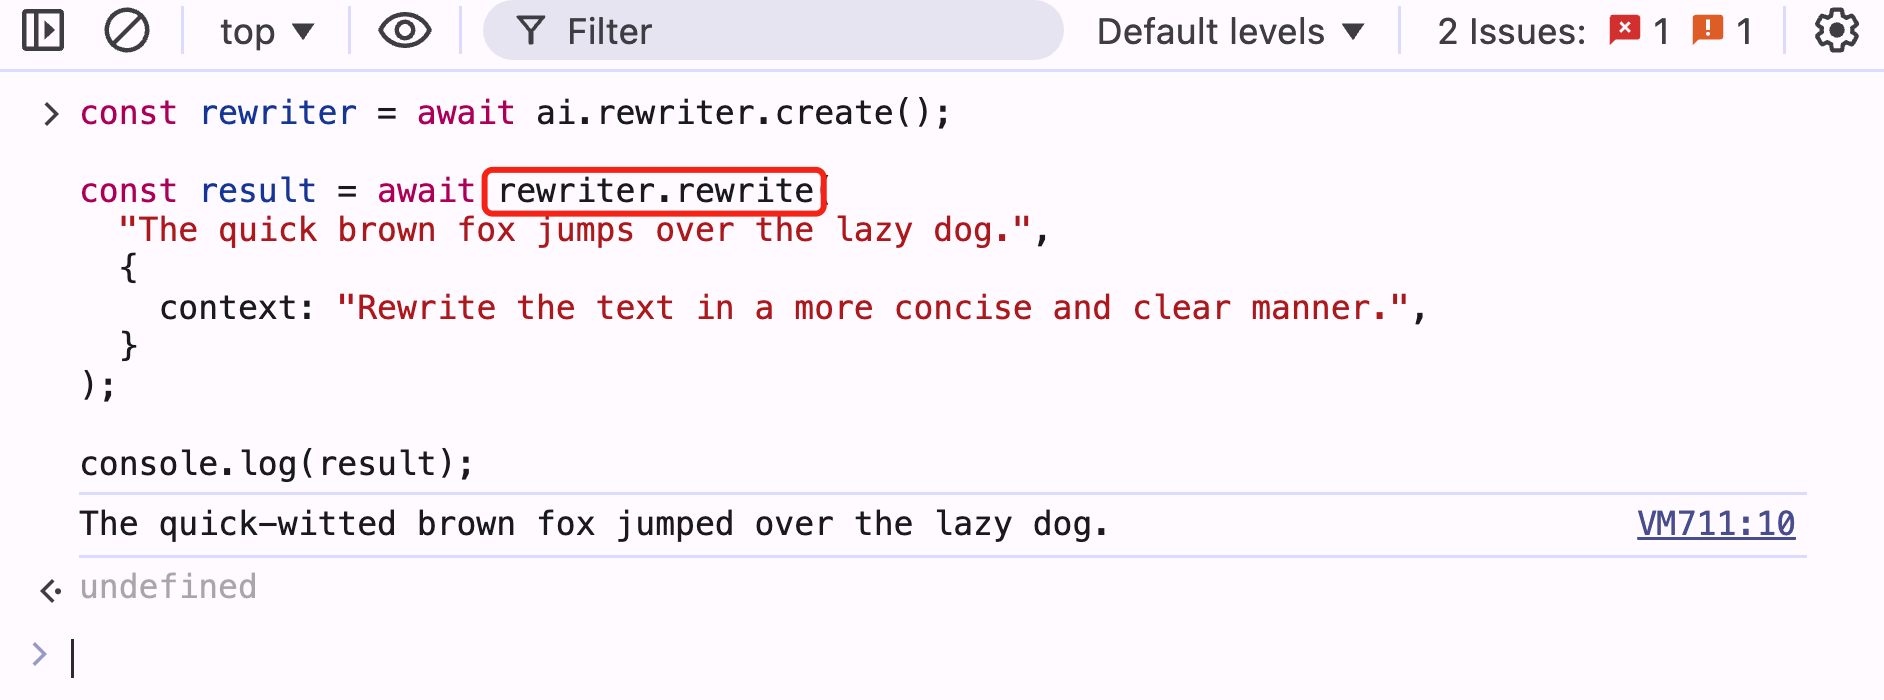
ReWriter API
ReWriter API 的使用方法和 Writer API 非常相似,只不过 ReWriter API 是用来重新表述文本的。
const rewriter = await ai.rewriter.create();

const result = await rewriter.rewrite(
  "The quick brown fox jumps over the lazy dog.",
  {
    context: "Rewrite the text in a more concise and clear manner.",
  }
);

console.log(result);
rewrite 方法的第一个参数就是需要重新表述的文本,第二个参数是一个可选的 context 参数,用来指定每个写作任务的上下文,这样可以帮助模型更好地理解用户的需求。
同样如果想使用流式输出,则只需要将 rewrite 方法替换为 rewriteStreaming 方法即可。
总结
Chrome 内置 AI 为开发者提供了强大而便捷的工具,使得在 Web 应用中集成先进的 AI 功能变得更加简单和高效。这一功能的推出将为用户带来更智能、更个性化的浏览体验,同时也为 Web 开发开辟了新的可能性。关于 Chrome 内置 AI 的更多信息,可以参考官方文档:https://developer.chrome.com/docs/ai/built-in。
阳明和他朋友们的一些项目


微信公众号
扫描下面的二维码关注我们的微信公众帐号,在微信公众帐号中回复◉加群◉即可加入到我们的 AI 技术讨论群里面共同学习。