Jinjia 模板
接下来我们学习下服务端模板的使用,在project/api/views/py文件中增加一个新的路由处理函数:
from flask import Blueprint, jsonify, request, render_template
@users_blueprint.route('/', methods=['GET'])
def index():
    return render_template('index.html')
然后更新下Blueprint,增加对模板的配置:
users_blueprint = Blueprint('users', __name__, template_folder='./templates')
然后在project/api目录下增加一个templates的文件夹,在该文件夹下面添加一个index.html的文件:
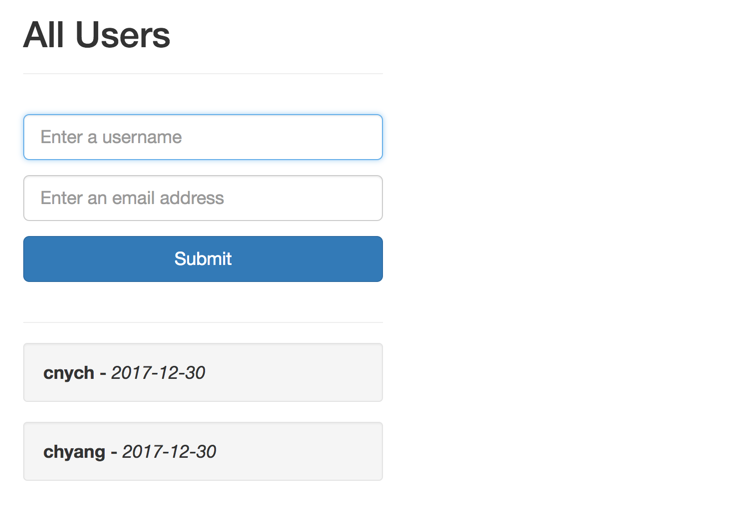
<!DOCTYPE html>
<html lang="en">
<head>
    <meta charset="UTF-8">
    <title>Flask microservice app on Docker</title>
    <meta name="author" content="">
    <meta name="description" content="">
    <meta name="viewport" content="width=device-width,initial-scale=1">
    <!-- styles -->
    <link href="//maxcdn.bootstrapcdn.com/bootstrap/3.3.7/css/bootstrap.min.css" rel="stylesheet">
    {% block css %}{% endblock %}
</head>
<body>
<div class="container">
  <div class="row">
    <div class="col-md-4">
      <br>
      <h1>All Users</h1>
      <hr><br>
      <form action="/" method="POST">
        <div class="form-group">
          <input name="username" class="form-control input-lg" type="text" placeholder="Enter a username" required>
        </div>
        <div class="form-group">
          <input name="email" class="form-control input-lg" type="email" placeholder="Enter an email address" required>
        </div>
        <input type="submit" class="btn btn-primary btn-lg btn-block" value="Submit">
      </form>
      <br>
      <hr>
      <div>
        {% if users %}
          {% for user in users %}
            <h4 class="well"><strong>{{user.username}}</strong> - <em>{{user.created_at.strftime('%Y-%m-%d')}}</em></h4>
          {% endfor %}
        {% else %}
          <p>No users!</p>
        {% endif %}
      </div>
    </div>
  </div>
</div>
<!-- scripts -->
<script src="https://code.jquery.com/jquery-2.2.4.min.js"></script>
{% block js %}{% endblock %}
</body>
</html>
然后再重新构建我们开发环境的镜像:
(tdd3)$ docker-compose -f docker-compose.yml up -d --build
构建完成后,在浏览器中打开http://127.0.0.1:5001

怎么来测试呢?如果当前数据库中没有任何数据:
def test_main_no_users(self):
    """没有用户"""
    response = self.client.get('/')
    self.assertEqual(response.status_code, 200)
    self.assertIn('No users!', response.data)
添加几条测试数据,获取所有用户列表,添加一条测试用例:
def test_main_with_users(self):
    """有多个用户的场景"""
    add_user('cnych', 'icnych@gmail.com')
    add_user('qikqiak', 'qikqiak@gmail.com')
    response = self.client.get('/')
    self.assertEqual(response.status_code, 200)
    self.assertIn(b'All Users', response.data)
    self.assertNotIn(b'No users!', response.data)
    self.assertIn(b'cnych', response.data)
    self.assertIn(b'qikqiak', response.data)
现在我们执行测试命令,会测试不通过的,因为还没有将用户列表的数据传递到首页,现在来更改project/api/views.py的index处理函数,增加用户列表的获取:
@users_blueprint.route('/', methods=['GET'])
def index():
    users = User.query.all()
    return render_template('index.html', users=users)
这样我们就能够将users列表传递到前端页面index.html中去了,然后可以通过标签{% for user in users %}对每一个用户进行渲染了,现在继续执行测试命令,通过~~~
在上面的前端页面中我们可以看到还有一个表单,用户点击提交按钮后可以添加一个新的用户到数据库中,当然继续我们的测试用例:
def test_main_add_user(self):
    """前端页面添加一个新的用户"""
    with self.client:
        response = self.client.post(
            '/',
            data=dict(username='cnych', email='cnych@gmail.com'),
            follow_redirects=True
        )
        self.assertEqual(response.status_code, 200)
        self.assertIn(b'All Users', response.data)
        self.assertNotIn(b'No users!', response.data)
        self.assertIn(b'cnych', response.data)
上面的测试代码中我们看到self.client.post()函数中多了一个follow_redirects=True参数,这样的话能确保post操作完成后页面能够重新刷新,这样的话首页的用户列表数据就能重新获取渲染了,现在继续执行我们的测试命令,会出现一个错误:
======================================================================
FAIL: test_main_add_user (test_users.TestUserService)
前端页面添加一个新的用户
----------------------------------------------------------------------
Traceback (most recent call last):
  File "/usr/src/app/project/tests/test_users.py", line 159, in test_main_add_user
    self.assertEqual(response.status_code, 200)
AssertionError: 405 != 200

----------------------------------------------------------------------
这是因为在首页的路由处理函数index中还没有对POST的请求进行处理,现在我们继续来更新project/api/views.py的index处理函数:
@users_blueprint.route('/', methods=['GET', 'POST'])
def index():
    if request.method == 'POST':
        username = request.form['username']
        email = request.form['email']
        db.session.add(User(username=username, email=email))
        db.session.commit()
    users = User.query.order_by(User.created_at.desc()).all()
    return render_template('index.html', users=users)
上面的函数针对POST的请求进行了数据库添加的操作,注意用户列表我们增加了一条根据created_at进行排序的规则还有methods增加了一个POST,现在再来执行我们的测试代码,通过~~~
上面的测试全部通过过后,现在我们将我们的代码部署到生产环境:
(tdd3)$ docker-compose -f docker-compose-prod.yml up -d --build
然后执行测试:
(tdd3)$ docker-compose -f docker-compose-prod.yml -run users-service python manage.py test
然后在浏览器中打开http://127.0.0.1(因为生产环境是用Nginx做转发的,所以不用加端口):
天下大事,合久必分,分久必合, 下节课我们就来将项目进行拆分~~~
最后还是广告~~~
扫描下面的二维码(或微信搜索iEverything)添加我微信好友(注明python),然后可以加入到我们的python讨论群里面共同学习